
- Adobe Enterprise & Teams: Administration guide
- Plan your deployment
- Basic concepts
- Deployment Guides
- Deploy Creative Cloud for education
- Deployment home
- K-12 Onboarding Wizard
- Simple setup
- Syncing Users
- Roster Sync K-12 (US)
- Key licensing concepts
- Deployment options
- Quick tips
- Approve Adobe apps in Google Admin Console
- Enable Adobe Express in Google Classroom
- Integration with Canvas LMS
- Integration with Blackboard Learn
- Configuring SSO for District Portals and LMSs
- Add users through Roster Sync
- Kivuto FAQ
- Primary and Secondary institution eligibility guidelines
- Set up your organization
- Identity types | Overview
- Set up identity | Overview
- Set up organization with Enterprise ID
- Setup Azure AD federation and sync
- Set up Google Federation and sync
- Set up organization with Microsoft ADFS
- Set up organization for District Portals and LMS
- Set up organization with other Identity providers
- SSO common questions and troubleshooting
- Set up Frame.io for enterprise
- Manage your organization setup
- Manage existing domains and directories
- Enable automatic account creation
- Domain Enforcement for restricted authentication
- Set up organization via directory trust
- Migrate to a new authentication provider
- Asset settings
- Authentication settings
- IP-based access control
- Privacy and security contacts
- Console settings
- Manage encryption
- Manage existing domains and directories
- Manage users
- Overview
- Manage administrative roles
- Manage user roles
- Create custom user roles
- Manage Frame.io account roles
- User management strategies
- Assign licenses to a Teams user
- Manage your team in Creative Cloud desktop app
- Add users with matching email domains
- Change user's identity type
- Manage user groups
- Manage directory users
- Manage exception list for domain enforcement
- Manage developers
- Migrate existing users to the Admin Console
- Migrate user management to the Admin Console
- Migrate Frame.io user management to the Admin Console
- Overview
- Manage products and entitlements
- Manage products and product profiles
- Manage products
- Buy products and licenses
- Manage product profiles for enterprise users
- Manage automatic assignment rules
- Adobe Express Photos FAQs for administrators
- Entitle users to train Firefly custom models
- Enable Shared Credits for your organization
- Review product requests
- Manage self-service policies
- Manage app integrations
- Manage product permissions in the Admin Console
- Single App | Creative Cloud for enterprise
- Manage Shared Device licenses
- Manage products and product profiles
- Get started with Global Admin Console
- Adopt global administration
- Select your organization
- Manage organization hierarchy
- Manage product profiles
- Manage administrators
- Manage user groups
- Create license assignment reports
- Update organization policies
- Manage policy templates
- Allocate products to child organizations
- Execute pending jobs
- Download audit logs and export reports
- Export or import organization structure
- Manage storage and assets
- Storage
- Manage projects
- Asset migration
- Reclaim assets from a user
- Student asset migration | EDU only
- Manage services
- Enable/disable services
- Optional services
- Enable Shared Credits for your organization
- Adobe Stock
- Custom fonts
- Adobe Asset Link
- Adobe Acrobat Sign
- Deploy apps and updates
- Overview
- Create packages
- Customize packages
- Deploy Packages
- Manage updates
- Adobe Update Server Setup Tool (AUSST)
- Adobe Remote Update Manager (RUM)
- Troubleshoot
- Manage your Teams account
- Renewals
- Manage contracts
- Automated expiration stages for ETLA contracts
- Switching contract types within an existing Adobe Admin Console
- Manage enterprise trials and special offers
- Complimentary membership for team members
- Creative Cloud for enterprise - free membership
- Frame.io and Creative Cloud for teams and enterprise plans
- Value Incentive Plan (VIP) in China
- VIP Select help
- Reports & logs
- Get help
Applies to enterprise.


Adobe Creative Cloud empowers students and educators to develop powerful presentations, photography, illustrations, movies and videos, and web applications.
Integrating Adobe Express and Adobe Creative Cloud with Canvas LMS provides students and educators with quick and easy access to their creative work. Students and educators can access their Adobe Express files and Creative Cloud apps within Canvas and use them to create and complete their assignments. For more information, see our blog post.
Integrate Adobe Creative Cloud and Adobe Express with Canvas
For administrators
As the institution’s or school district's IT admin, for your educators and students to be able to access Adobe applications within Canvas LMS, you must integrate Canvas LMS with Adobe Express or Adobe Creative Cloud. Once the integration is done, the educators and students can start creating and completing assignments using the Adobe applications.
Before you begin with the integration, ensure the following:
- Adobe Express or Adobe Creative Cloud is deployed in your educational institution.
- Users are entitled to relevant Adobe products and services.
Do the following to add Adobe Express to Canvas:
-
Sign in to Canvas, and navigate to Admin.
-
From the list of accounts that display, choose the appropriate one.
If you want to add the integration to a specific account which has a selected set of users, you can choose the relevant one from the available accounts. -
Navigate to Developer Keys > Inherited, and turn the keys for Adobe Express API key and Adobe Express LTI.
-
Copy the client ID string for Adobe Express LTI from the Details column. You'll use this when installing it on Courses. If you want to install Adobe Creative Cloud as well, turn on and copy the strings for Adobe Creative Cloud too.
-
Decide where you’d like it installed.
- If you’d like to only install into some courses, choose the course you’d like to install the integration into.
- If you’d like to install globally, navigate to settings from the global navigation.
From Settings, navigate to Apps.
-
Click View App Configurations, and then + App.
-
In the Add App dialog box, select By client ID from the Configuration type drop-down list.
-
Paste the Adobe Express LTI string you copied from the Developer Key page into the Client ID option, and click Submit.
-
Click Install.
The app is added to Canvas.
-
To test the integration, select a course. Then, navigate to assignments and click +Assignment. Select Submission Type > External Tool to see Adobe Express in the list of tools.
NoteTo test the integration in a test or beta instance or to use AGS or NRPS in beta, reach out to your Canvas CSM to enable Beta and Test Access For Students.


Do the following to add Adobe Creative Cloud to Canvas:
-
Sign in to Canvas, and navigate to Admin.
-
From the list of accounts that display, choose the appropriate one.
If you want to add the integration to a specific account which has a selected set of users, you can choose the relevant one from the available accounts. -
Navigate to Developer Keys > Inherited, and turn the keys for Adobe Classroom Prod API key, and Adobe Creative Cloud.
-
Copy the strings in the Details column for Adobe Creative Cloud.
If you want to install Adobe Express as well, turn on and copy the strings for Adobe Express too. -
Decide where you’d like it installed.
- If you’d like to only install into some courses, choose the course you’d like to install the integration into.
- If you’d like to install globally, navigate to settings from the global navigation.
From Settings, navigate to Apps.
-
Click View App Configurations, and then + App.
-
In the Add App dialog box, select By client ID from the Configuration type drop-down list.
-
One by one, paste the strings you copied from the Developer Key page into the Client ID option, and click Submit.
-
Click Install.
The app is added to Canvas.
-
To test the integration, navigate to courses. The integration is successful if Adobe Creative Cloud shows under Courses.
NoteTo test the integration in a test or beta instance or to use AGS or NRPS in beta, reach out to your Canvas CSM to enable Beta and Test Access For Students.

To configure SSO, add a secondary IdP in the Adobe Admin Console and select Canvas in the Add Portal or Learning Management Systems for SSO screen.
-
I am testing the Adobe Express integration using Canvas's impersonate function to create a Adobe Express assignment as a Teacher and submit the assignment as a Student. However, I am not seeing an option to submit the assignment when switching to the Student view. How shall I proceed?
Recognizing that this scenario is unique to testing and does not represent expected Teacher and Student behavior in the real world, there is a workaround to test. The key is to use two separate browsers in incognito mode when you are testing on the same computer using Canvas’s impersonate function.
- Sign in as Teacher on one browser window to create the Adobe Express assignment.
- Then, sign in to Adobe Express from a separate incognito browser window as Student and submit the assignment.
-
How can I contact Adobe Customer Care with an issue not covered here?
Navigate to the Support tab in the Admin Console to contact Adobe Customer Care. Learn more.
-
What are Adobe's policies on data privacy?
To learn how Adobe complies with laws, regulations and best practices related to the privacy of student data visit Adobe Privacy Center.
Create assignments using Adobe Express
For educators
Once your institution's or school district's IT admin has granted you access to Adobe Express or Adobe Creative Cloud within Canvas LMS, you're ready to create high-quality creative work using the Adobe applications. You can use Adobe Express to work on school projects wherever you are, not just in a computer lab.
To know your Canvas instance, go to the Canvas website, and click Find My School. To access Adobe Express, do the following:
-
Sign in to your Canvas instance, navigate to Courses.
-
Select a course, and navigate to Assignments.
-
You can choose to create a new assignment or edit an existing one. Once the editor opens, scroll down to Submission Type, select External Tool, and find Adobe Express in your course’s External Tools.
-
If your IT administrator has configured Single Sign-On (SSO), you are automatically signed in to your Adobe Express account.
If SSO is not configured, a sign-in screen appears for Adobe Express, enter your credentials and sign in.
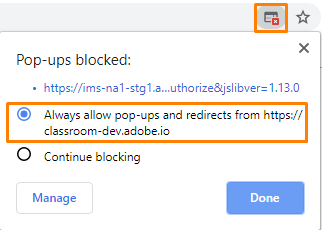
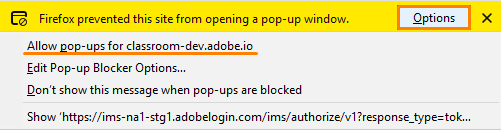
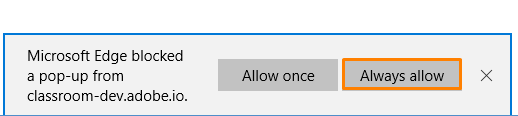
If your browser blocks pop-ups, click the pop-up blocker icon, and select Always allow pop-ups for this site.
-
The first time you launch Adobe Express from within Canvas, you are prompted to authorize Adobe to use your account. To do so, click Authorize.

Your Adobe Express designs display.
After signing in to Adobe Express from Canvas, a file browser window will appear. All your up-to-date files will be listed if you’ve used Adobe Express. To create an assignment using Adobe Express, do the following:
-
Choose one of your existing Express files to attach as a template for your students. You’ll have two options:
- Edit: If you want to make additional edits, you’ll see an option to open up the Adobe Express editor.
- Attach: Once your file is ready, return to Canvas and select the thumbnail for the file you want to assign to students. Then, select attach.
-
By attaching your Express file to the Canvas assignment, you are creating a remixable template that your students can get started from.
-
Enter the assignment name, add instructions, and update the other assignment fields. Since the Submission Type is set to External Tool, your students will need to Turn in via the Canvas option in Adobe Express. This will send their work directly to Canvas for you to grade.
-
Click Save.
Your assignment is ready.

To access Adobe products and services from Canvas LMS, sign in to your Canvas instance. To know your Canvas instance, go to the Canvas website, and click Find My School.
Navigate to Courses > Adobe Creative Cloud. All applications that have been purchased for you by the district or university display. You can install or update any of the available apps.

-
What is Adobe Express?
Adobe Express is one of Adobe’s new web-based applications that makes it easy for educators and students to communicate ideas with stunning presentations, graphics, and short videos—in minutes. Students can demonstrate learning, tell a story, or convey a point of view by making high-quality reports, research papers, posters, writing assignments, and presentations. Learn more.
-
What is Adobe Creative Cloud?
Creative Cloud is a set of creative apps that empowers students, educators, and creators of all ages and experience levels to develop powerful presentations, photography, illustrations, movies and videos, and web applications. Creative Cloud includes all of Adobe’s creative tools, from classics like Photoshop, and Illustrator, and new apps like Adobe Premiere Rush and Adobe XD. Learn more.
-
How do students sign in?
Students can sign in through the enterprise option in the sign-in pop-up screen. Or, they can sign through either of these links:
They must use their regular school credentials.
Also, ensure that they allow pop-ups on the browser. For details, see Sign in and access Adobe Express from Canvas LMS.
-
How can I give my students Adobe Express templates I’ve created or the ones I want them to watch?
- Through the external tools flow, you can assign content and instructions that students can watch within their own Adobe Express accounts. They’ll then be able to create their own content and submit it to an assignment from Adobe Express.
- Through the rich content editor, you can make templates here that students will be able to copy into their own Adobe Express accounts. For details, see Create an assignment using Adobe Express.
-
How does this work in SpeedGrader?
SpeedGrader displays full, rich previews of both, videos and posts, for assignments submitted through Online URL submission type or external tools. When students submit an assignment through the Online > Text Entry flow, educators have hyperlinks created in SpeedGrader.
-
Where can I find more resources on Adobe Creative Cloud and Adobe Express?
Visit The Adobe Education Exchange for free online professional development courses and resources.
Complete assignments using Adobe Express
For students
Once your institution's or school district's IT admin has granted you access to use Adobe Express or Adobe Creative Cloud within Canvas LMS, you are ready to create high-quality creative work using the Adobe applications.
To know your Canvas instance, go to the Canvas website, and click Find My School. To access Adobe Express, do the following:
-
Sign in to your Canvas instance, navigate to Courses.
-
Select a course, and navigate to Assignments.
-
If your IT administrator has configured Single Sign-On (SSO), you are automatically signed in to your Adobe Express account.
If SSO is not configured, a sign-in screen appears for Adobe Creative Cloud, enter your credentials and sign in.
If your browser blocks pop-ups, click the pop-up blocker icon, and select Always allow pop-ups for this site.
-
The first time you launch Adobe Express from within Canvas, you are prompted to authorize Adobe to use your account. To do so, click Authorize.
Your Adobe Express designs display.
After signing in to Adobe Express from Canvas, all your pending assignments appear. To work on one of these assignments, select it, and do the following:
-
Read the instructions from the educator, and select Open Adobe Express. The assignment opens in Adobe Express web.
-
Make the required changes and complete the assignment.
-
To submit the assignment, click Share > Turn in to Canvas. This will automatically submit to the correct assignment in Canvas.


Your assignment is submitted.
To access Adobe products and services from Canvas LMS, sign in to your Canvas instance. To know your Canvas instance, go to the Canvas website, and click Find My School.
Navigate to Courses > Adobe Creative Cloud. All applications that have been purchased for you by the district or university display. You can install or update any of the available apps.
-
I see a blank screen when trying to access Adobe Express from Canvas LMS.
Check for pop-up blockers in your browser and click Allow to sign in to Adobe. For more information on how to sign in, see Sign in and access Adobe Express from Canvas LMS.
-
Turn in doesn’t work.
The Turn in to Canvas option is disabled if you are signed in with an account different from the school account. Do the following to ensure you are signed in with the correct account.
- In Canvas, navigate to Adobe Express and click
 , your profile icon in the upper right corner.
 - Sign out and sign back in with your school credentials and school account.
For more information on how to sign in, see Sign in and access Adobe Express from Canvas LMS.
- In Canvas, navigate to Adobe Express and click
-
Your assignment does not show in the assignment drop-down if your educator has selected assignment using an external app as the submission type. In this case, confirm with your educator if the assignment should be turned in.