
If you have a question to ask or an idea to share, come and participate in Adobe Illustrator Community. We would love to hear from you and see your creations.
Last updated on
Jul 17, 2024
- Illustrator User Guide
- Get to know Illustrator
- Introduction to Illustrator
- Workspace
- Workspace basics
- Create documents
- Learn faster with the Illustrator Discover panel
- Accelerate workflows using the Contextual Task Bar
- Toolbar
- Default keyboard shortcuts
- Customize keyboard shortcuts
- Introduction to artboards
- Manage artboards
- Customize the workspace
- Properties panel
- Set preferences
- Touch Workspace
- Microsoft Surface Dial support in Illustrator
- Undo edits and manage design history
- Rotate view
- Rulers, grids, and guides
- Accessibility in Illustrator
- View artwork
- Use the Touch Bar with Illustrator
- Files and templates
- Tools in Illustrator
- Tools at a glance
- Select tools
- Navigate tools
- Paint tools
- Text tools
- Draw tools
- Modify tools
- Generative AI (not available in mainland China)
- Quick actions
- Illustrator on the iPad
- Introduction to Illustrator on the iPad
- Workspace
- Documents
- Select and arrange objects
- Drawing
- Type
- Work with images
- Color
- Cloud documents
- Basics
- Troubleshooting
- Add and edit content
- Drawing
- Drawing basics
- Edit paths
- Draw pixel-perfect art
- Draw with the Pen, Curvature, or Pencil tool
- Draw simple lines and shapes
- Draw rectangular and polar grids
- Draw and edit flares
- Trace images
- Simplify a path
- Symbolism tools and symbol sets
- Adjust path segments
- Design a flower in 5 easy steps
- Create and edit a perspective grid
- Draw and modify objects on a perspective grid
- Use objects as symbols for repeat use
- Draw pixel-aligned paths for web workflows
- Measurement
- 3D objects and materials
- Color
- Painting
- Select and arrange objects
- Select objects
- Layers
- Expand, group, and ungroup objects
- Move, align, and distribute objects
- Align, arrange, and move objects on a path
- Snap objects to glyph
- Snap objects to Japanese glyph
- Stack objects
- Lock, hide, and delete objects
- Copy and duplicate objects
- Rotate and reflect objects
- Intertwine objects
- Create realistic mockups
- Reshape objects
- Crop images
- Transform objects
- Combine objects
- Cut, divide, and trim objects
- Puppet Warp
- Scale, shear, and distort objects
- Blend objects
- Reshape using envelopes
- Reshape objects with effects
- Build new shapes with Shaper and Shape Builder tools
- Work with Live Corners
- Enhanced reshape workflows with touch support
- Edit clipping masks
- Live shapes
- Create shapes using the Shape Builder tool
- Global editing
- Type
- Add text and work with type objects
- Add basic formatting to text
- FAQs on fonts in Illustrator
- Fonts and typography
- Create type on a path
- Create bulleted and numbered lists
- Manage text area
- Add advanced formatting to text
- Format paragraphs
- Character and paragraph styles
- Special characters
- Tabs
- Scale and rotate type
- Line and character spacing
- Hyphenation and line breaks
- Spelling and language dictionaries
- Format Asian characters
- Arabic and Hebrew type
- Composers for Asian scripts
- Reflow Viewer
- Preview, add, or replace missing fonts
- Import and export text
- Identify the fonts used in images and outlined text
- Creative typography designs
- Create text designs with blend objects
- Create a text poster using Image Trace
- Create special effects
- Web graphics
- Drawing
- Import, export, and save
- Import
- Creative Cloud Libraries in Illustrator
- Save and export
- Printing
- Prepare for printing
- Printing
- Automate tasks
- Troubleshooting
- Fixed issues
- Known issues
- Crash issues
- Recover files after crash
- Repair damaged documents
- Safe mode
- File issues
- Supported file formats
- GPU device driver issues
- GPU performance issues
- Wacom device issues
- DLL file issues
- Memory issues
- Preferences file issues
- Font issues
- Printer issues
- Media issues
- Missing plugin issues
- Share crash report with Adobe
- Unable to apply effects in Illustrator
- Improve Illustrator performance
- Fixed issues
Want to give a floral theme to your posters, cards, brochures, and more? Let's learn how to create a flower with heart-shaped petals using the basic features of Illustrator.

Update Illustrator to its latest version before you proceed with designing a flower.

Try it yourself
You'll get a sample file to follow along with as you learn how to create a flower.
Look at the basics of Illustrator:
Set the following options:
- View > Smart Guides
- View > Snap to Points
- Assign no fill color and stroke in black with 5pt.
Step 1: Create the first petal
Use the Ellipse tool
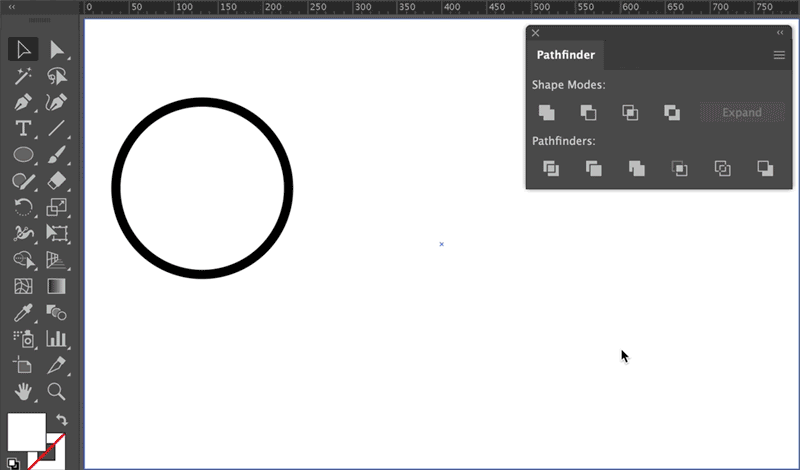
Let's create a circle with the Ellipse tool.
Press L to use the Ellipse tool, or long press the Rectangle tool ( ) and then select the Ellipse tool (
 ) from the drop-down list.
![]() To create a perfect circle using the Ellipse tool, press the Shift key and then draw the circle.
To create a perfect circle using the Ellipse tool, press the Shift key and then draw the circle.

Design journey of a petal

a.
Press Alt+Shift (Windows) or Option+Shift (macOS) and drag the first circle from its center to create a duplicate.

b.
Merge the two circles using the Unite shape mode in Pathfinder
(Windows > Pathfinder).

c.
Remove extra anchor points from the bottom of the circle using the Delete Anchor Points tool.

d.
Press the Shift key and drag the handles of the bottom-most anchor point to form the heart-shaped petal.
Watch this animated illustration to see how these steps work:
![]() If you are working with Illustrator 24.1.2 version, press the Shift key when you delete anchor points, else the path shape will change.
If you are working with Illustrator 24.1.2 version, press the Shift key when you delete anchor points, else the path shape will change.
Step 2: Create the flower structure
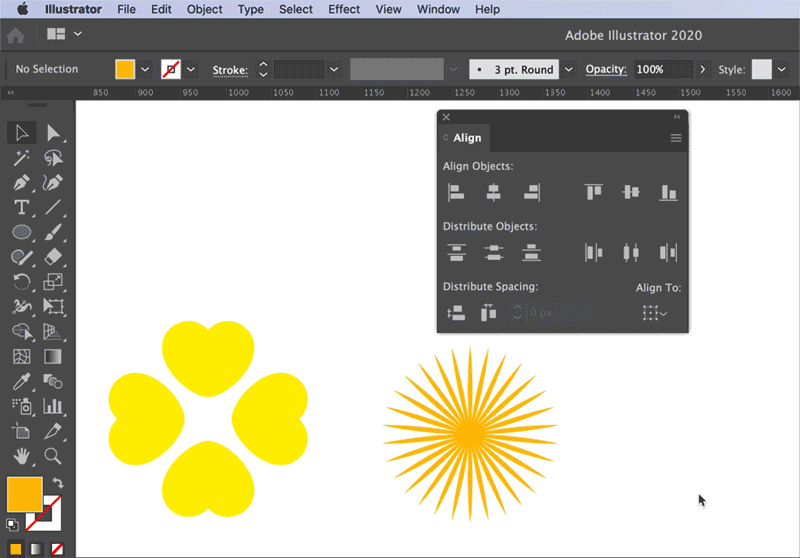
Use rotate and duplicate features

- Select the first petal using the Selection tool.
- Click the Rotate tool from the toolbar.
- Hold Alt and click right below the petal shape to open the Rotate settings dialog.
 To maintain symmetry in the petal arrangement, ensure you click vertically below the center of the shape.
 - In the Rotate dialog, specify the angle as 90 degrees and click Copy.
- Now, press Ctrl+D or Command+D to create duplicate shapes.

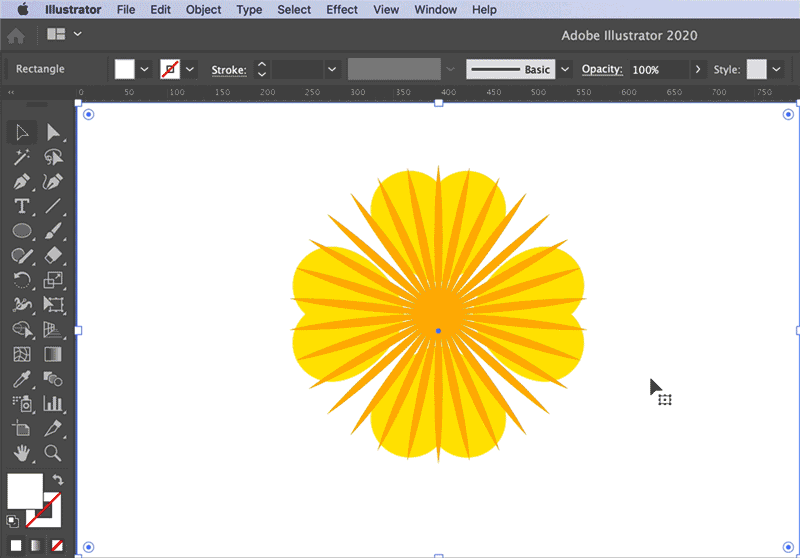
Step 3: Create components of the flower

Fold lines

A Pollen

A Sepal
- Create a straight line using the Pen tool and then select it using the Selection tool.
- Choose Width Profile 1 (leaf shape) and change the Stroke to 5.
- Click the Rotate tool. Alt+click at the bottom point on the line to open Rotate settings. Specify Angle as 12 degrees.
- Press Ctrl+D or Command+D to form a circular pattern.
Convert strokes to path
We have now got a collection of strokes and now will expand appearance to convert your strokes to a path. To do this, select all strokes and choose Object > Expand Appearance.
Note: Alternatively, if you don't want to convert strokes to a path, set the General > Scale Strokes and Effects preference.


Sepal is a green leaf-like support on the base of the flower.
- Select the Star tool from the toolbar. Press Alt and click to open the Star settings. As we have 4 petals, let's create a 4-point star with Radius1 as 25px and Radius2 as 100px.
- Use the Ellipse tool to create a small circle at the center of the flower shape.
Step 4: Add color to flower components
Add color to the flower and its different components using the Color panel.


See also: Paint with fill and strokes.
Step 5: Arrange the flower components
Prerequisites
Before arranging the components, do the following:
- Create a petal group: Select the petals and then right-click and choose Group.
- Create a compound path:
- Select the petal group and create its copy. Keep it aside.
- Choose Object > Compound Path > Make or press Command+8 or Ctrl+8.
See also: Combine objects. - Select the fold lines and the compound path. Align them using the Align panel (Horizontal and vertical Align Center). Ensure that Align to key object option is enabled. Ensure that the petal comound path is on the top.
Create the clipping mask to clip the fold lines inside petals:
- Select the petals and flower folds and choose Object > Clipping Mask > Make.
See also: Edit clipping masks.
![]() To control the visibility of objects, right-click the objects and choose Arrange > Send to Back or Bring to Front.
To control the visibility of objects, right-click the objects and choose Arrange > Send to Back or Bring to Front.
To derive the final shape for the fold lines, trim the clipping mask using the Trim option in Pathfinder.
See also: Cut, divide, and trim objects


Arrange the components to form the flower

Select all the components and align them using the Align panel (Horizontal and Vertical Align Center). Ensure that Align to Selection option is enabled.
The final artwork. You did it!

Recap of tools and features used
Have a question or an idea?
