Choose File > Place, and select the image that you want to place. Click Place.
- Illustrator User Guide
- Get to know Illustrator
- Introduction to Illustrator
- Workspace
- Workspace basics
- Create documents
- Learn faster with the Illustrator Discover panel
- Accelerate workflows using the Contextual Task Bar
- Toolbar
- Default keyboard shortcuts
- Customize keyboard shortcuts
- Introduction to artboards
- Manage artboards
- Customize the workspace
- Properties panel
- Set preferences
- Touch Workspace
- Microsoft Surface Dial support in Illustrator
- Undo edits and manage design history
- Rotate view
- Rulers, grids, and guides
- Accessibility in Illustrator
- View artwork
- Use the Touch Bar with Illustrator
- Files and templates
- Tools in Illustrator
- Tools at a glance
- Select tools
- Navigate tools
- Paint tools
- Text tools
- Draw tools
- Modify tools
- Generative AI (not available in mainland China)
- Quick actions
- Illustrator on the iPad
- Introduction to Illustrator on the iPad
- Workspace
- Documents
- Select and arrange objects
- Drawing
- Type
- Work with images
- Color
- Cloud documents
- Basics
- Troubleshooting
- Add and edit content
- Drawing
- Drawing basics
- Edit paths
- Draw pixel-perfect art
- Draw with the Pen, Curvature, or Pencil tool
- Draw simple lines and shapes
- Draw rectangular and polar grids
- Draw and edit flares
- Trace images
- Simplify a path
- Symbolism tools and symbol sets
- Adjust path segments
- Design a flower in 5 easy steps
- Create and edit a perspective grid
- Draw and modify objects on a perspective grid
- Use objects as symbols for repeat use
- Draw pixel-aligned paths for web workflows
- Measurement
- 3D objects and materials
- Color
- Painting
- Select and arrange objects
- Select objects
- Layers
- Expand, group, and ungroup objects
- Move, align, and distribute objects
- Align, arrange, and move objects on a path
- Snap objects to glyph
- Snap objects to Japanese glyph
- Stack objects
- Lock, hide, and delete objects
- Copy and duplicate objects
- Rotate and reflect objects
- Intertwine objects
- Create realistic mockups
- Reshape objects
- Crop images
- Transform objects
- Combine objects
- Cut, divide, and trim objects
- Puppet Warp
- Scale, shear, and distort objects
- Blend objects
- Reshape using envelopes
- Reshape objects with effects
- Build new shapes with Shaper and Shape Builder tools
- Work with Live Corners
- Enhanced reshape workflows with touch support
- Edit clipping masks
- Live shapes
- Create shapes using the Shape Builder tool
- Global editing
- Type
- Add text and work with type objects
- Add basic formatting to text
- FAQs on fonts in Illustrator
- Fonts and typography
- Create type on a path
- Create bulleted and numbered lists
- Manage text area
- Add advanced formatting to text
- Format paragraphs
- Character and paragraph styles
- Special characters
- Tabs
- Scale and rotate type
- Line and character spacing
- Hyphenation and line breaks
- Spelling and language dictionaries
- Format Asian characters
- Arabic and Hebrew type
- Composers for Asian scripts
- Reflow Viewer
- Preview, add, or replace missing fonts
- Import and export text
- Identify the fonts used in images and outlined text
- Creative typography designs
- Create text designs with blend objects
- Create a text poster using Image Trace
- Create special effects
- Web graphics
- Drawing
- Import, export, and save
- Import
- Creative Cloud Libraries in Illustrator
- Save and export
- Printing
- Prepare for printing
- Printing
- Automate tasks
- Troubleshooting
- Fixed issues
- Known issues
- Crash issues
- Recover files after crash
- Repair damaged documents
- Safe mode
- File issues
- Supported file formats
- GPU device driver issues
- GPU performance issues
- Wacom device issues
- DLL file issues
- Memory issues
- Preferences file issues
- Font issues
- Printer issues
- Media issues
- Missing plugin issues
- Share crash report with Adobe
- Unable to apply effects in Illustrator
- Improve Illustrator performance
- Fixed issues
Learn how to use the Crop Image feature in Illustrator to crop an image.
You can crop linked or embedded images in Illustrator. While cropping, you can use intuitive widget controls to work with the selected image.


The Crop Image feature works only on the currently selected image. Also, linked images become embedded after you crop them.
The cropped portion of the image is discarded and is not recoverable. Also, you cannot transform an image while cropping it. If you try to transform an image after selecting the Crop Image option, Illustrator exits the cropping interface.
New to cropping? Practice and learn how to crop an image with a hands-on tutorial in the Discover panel, without leaving the app.


Crop an image
Perform the following steps to crop an image:
-
-
Select the image you want to crop using the Selection tool (
 ).
).Illustrator invokes the Selection tool by default when you choose the Crop Image option. If any other tool is active, Illustrator automatically switches to the Selection tool.
-
Do one of the following to crop the selected image:
- Click Crop Image on the Control panel.
- Choose Object > Crop Image.
- Choose Crop Image from the context menu.
 You cannot select the Crop Image option when two or more objects are selected.
-
If you're working with a linked image, Illustrator prompts you that linked files are embedded after cropping. Click OK to continue.
-
Drag the widget corners and edge handles to define the crop boundaries. For details, see Adjust the crop widget.
 For any image, the crop widget is always rectangular in shape. Moreover, you cannot rotate the crop widget.
-
(Optional) Specify the cropping options using the Control panel. For details, see Cropping options.
-
Do one of the following:
- Click Apply on the Control panel.
- Press Enter (Windows) or Return (macOS).
At any point, to exit the cropping interface without applying changes, press Escape. Alternatively, click Cancel in the Control panel, or select any tool from the Tools panel, except the Zoom tool and the Hand tool.
On Windows 64-bit and macOS, when you select the Crop Image option to crop an image on the artboard, Illustrator identifies the visually significant portions of the selected image. A default cropping box is then displayed based on this identified portion of the image. You can adjust the dimensions of this cropping box if needed. Once you are done, you can click Apply in the Properties panel or press Enter (Windows) or Return (macOS) to crop the image.
To disable this feature, deselect the Enable Content Aware Defaults option in the Edit > Preferences > General (Windows) or Illustrator> Preferences > General (macOS). By deselecting this option, the default experience for Crop Image, Freeform gradient, and Puppet Warp is disabled.
Resize


Do one of the following to resize the crop widget:
- Specify the Height and the Width in the Control panel.
- Drag the corner or edge handles.
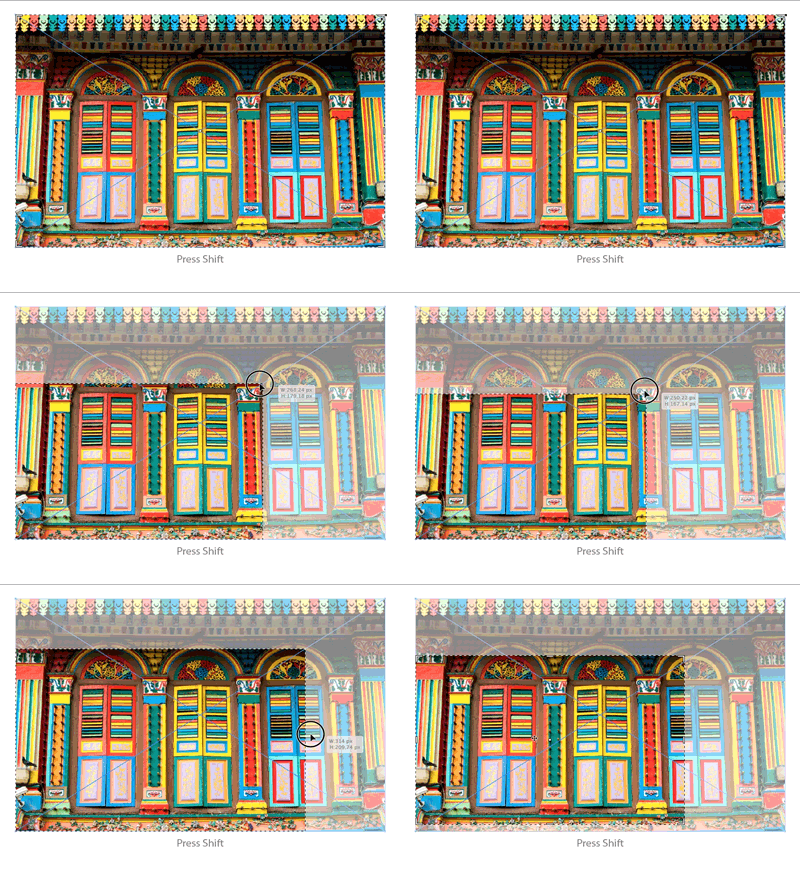
- Press Shift to scale the widget proportionally.
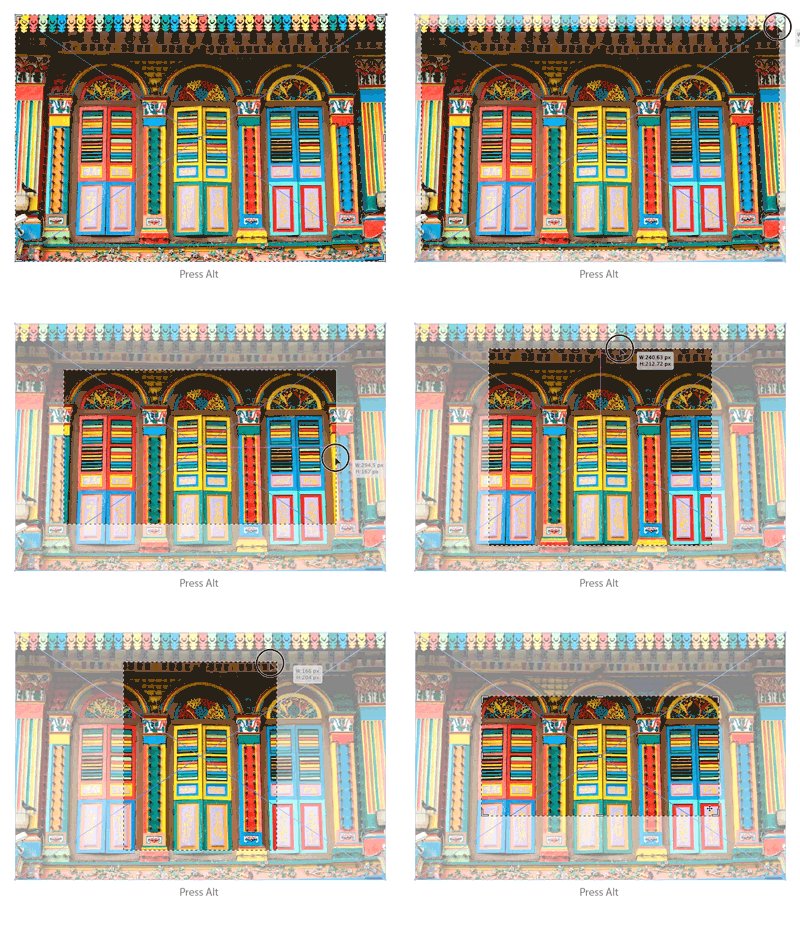
- Press Alt to scale the widget about the center.
- Use the pinch-to-zoom gesture on touch screen devices.
 The Illustrator Touch workspace for Windows tablets does not support cropping.
Reposition
Do one of the following to reposition the crop widget:
- Click-drag from anywhere within the bounds of the crop widget.
- Press the arrow keys to move the crop widget.
- Press Shift + arrow keys to move the widget by ten units (default) or as specified in your Preferences.
To reposition the crop widget precisely, use guides and grids. Smart Guides help you align the crop widget relative to other objects. Choose View > Smart Guides to enable smart guides.
You can specify the following options on the Control panel while cropping an image:

A. Pixels Per Inches (resolution) B. Reference position C. X and Y coordinates D. Width E. Constrain width and height proportions F. Height

PPI
PPI refers to the current resolution of the image. Specify the resolution in pixels per inch (ppi). If the resolution of the image is lower than the options available in the drop-down list, the options are disabled. The maximum value that you can enter equals the resolution of the original image or 300 PPI for linked artwork.
Reference Point
All transformations are performed around a fixed point called the reference point. By default, this point is at the center of the crop widget you are transforming. However, you can change the reference point to a different location using the reference point locator in the Control panel.
X and Y dimensions
The co-ordinate values of the selected reference point.
Height and Width
Specify the size of the crop widget. If the width and height fields are linked, they maintain proportions when changed. Click the link icon () icon to delink and modify the width and height values independently.
Create a custom keyboard shortcut
You can define your own keyboard shortcut for the Crop Image command. For more information, see Customize keyboard shortcuts.
Related resources
Talk to us
We would love to hear from you. Share your thoughts with the Adobe Illustrator Community.

_1-02-1?$png$&jpegSize=100&wid=507)