- Illustrator User Guide
- Get to know Illustrator
- Introduction to Illustrator
- Workspace
- Workspace basics
- Create documents
- Learn faster with the Illustrator Discover panel
- Accelerate workflows using the Contextual Task Bar
- Toolbar
- Default keyboard shortcuts
- Customize keyboard shortcuts
- Introduction to artboards
- Manage artboards
- Customize the workspace
- Properties panel
- Set preferences
- Touch Workspace
- Microsoft Surface Dial support in Illustrator
- Undo edits and manage design history
- Rotate view
- Rulers, grids, and guides
- Accessibility in Illustrator
- View artwork
- Use the Touch Bar with Illustrator
- Files and templates
- Tools in Illustrator
- Tools at a glance
- Select tools
- Navigate tools
- Paint tools
- Text tools
- Draw tools
- Modify tools
- Generative AI (not available in mainland China)
- Quick actions
- Illustrator on the iPad
- Introduction to Illustrator on the iPad
- Workspace
- Documents
- Select and arrange objects
- Drawing
- Type
- Work with images
- Color
- Cloud documents
- Basics
- Troubleshooting
- Add and edit content
- Drawing
- Drawing basics
- Edit paths
- Draw pixel-perfect art
- Draw with the Pen, Curvature, or Pencil tool
- Draw simple lines and shapes
- Draw rectangular and polar grids
- Draw and edit flares
- Trace images
- Simplify a path
- Symbolism tools and symbol sets
- Adjust path segments
- Design a flower in 5 easy steps
- Create and edit a perspective grid
- Draw and modify objects on a perspective grid
- Use objects as symbols for repeat use
- Draw pixel-aligned paths for web workflows
- Measurement
- 3D objects and materials
- Color
- Painting
- Select and arrange objects
- Select objects
- Layers
- Expand, group, and ungroup objects
- Move, align, and distribute objects
- Align, arrange, and move objects on a path
- Snap objects to glyph
- Snap objects to Japanese glyph
- Stack objects
- Lock, hide, and delete objects
- Copy and duplicate objects
- Rotate and reflect objects
- Intertwine objects
- Create realistic mockups
- Reshape objects
- Crop images
- Transform objects
- Combine objects
- Cut, divide, and trim objects
- Puppet Warp
- Scale, shear, and distort objects
- Blend objects
- Reshape using envelopes
- Reshape objects with effects
- Build new shapes with Shaper and Shape Builder tools
- Work with Live Corners
- Enhanced reshape workflows with touch support
- Edit clipping masks
- Live shapes
- Create shapes using the Shape Builder tool
- Global editing
- Type
- Add text and work with type objects
- Add basic formatting to text
- FAQs on fonts in Illustrator
- Fonts and typography
- Create type on a path
- Create bulleted and numbered lists
- Manage text area
- Add advanced formatting to text
- Format paragraphs
- Character and paragraph styles
- Special characters
- Tabs
- Scale and rotate type
- Line and character spacing
- Hyphenation and line breaks
- Spelling and language dictionaries
- Format Asian characters
- Arabic and Hebrew type
- Composers for Asian scripts
- Reflow Viewer
- Preview, add, or replace missing fonts
- Import and export text
- Identify the fonts used in images and outlined text
- Creative typography designs
- Create text designs with blend objects
- Create a text poster using Image Trace
- Create special effects
- Web graphics
- Drawing
- Import, export, and save
- Import
- Creative Cloud Libraries in Illustrator
- Save and export
- Printing
- Prepare for printing
- Printing
- Automate tasks
- Troubleshooting
- Fixed issues
- Known issues
- Crash issues
- Recover files after crash
- Repair damaged documents
- Safe mode
- File issues
- Supported file formats
- GPU device driver issues
- GPU performance issues
- Wacom device issues
- DLL file issues
- Memory issues
- Preferences file issues
- Font issues
- Printer issues
- Media issues
- Missing plugin issues
- Share crash report with Adobe
- Unable to apply effects in Illustrator
- Improve Illustrator performance
- Fixed issues
Learn how to use Pen, Pencil, Brush, Eraser and Direct Selection tool in Illustrator on the iPad to easily draw and edit your vector artwork.
Take your vector drawing and painting to the next level with Illustrator on the iPad and Apple Pencil. Illustrator's popular drawing and painting tools – Pen, Pencil, Paint Brush, Blob Brush, Eraser – will provide you a smooth and precise design experience on the iPad. It's very simple to find and use them – they are available in your left toolbar just like Illustrator on desktop. For details, see Illustrator workspace on the iPad.


Drawing and painting tools
Draw with Pen tool
- In the left toolbar, tap the Pen tool .
- To create an anchor point, tap on artboard to create corner points or tap and drag to create smooth points. While working with the Pen tool, you can also adjust the handles of a smooth point without changing to a different tool.
Useful tips and tricks
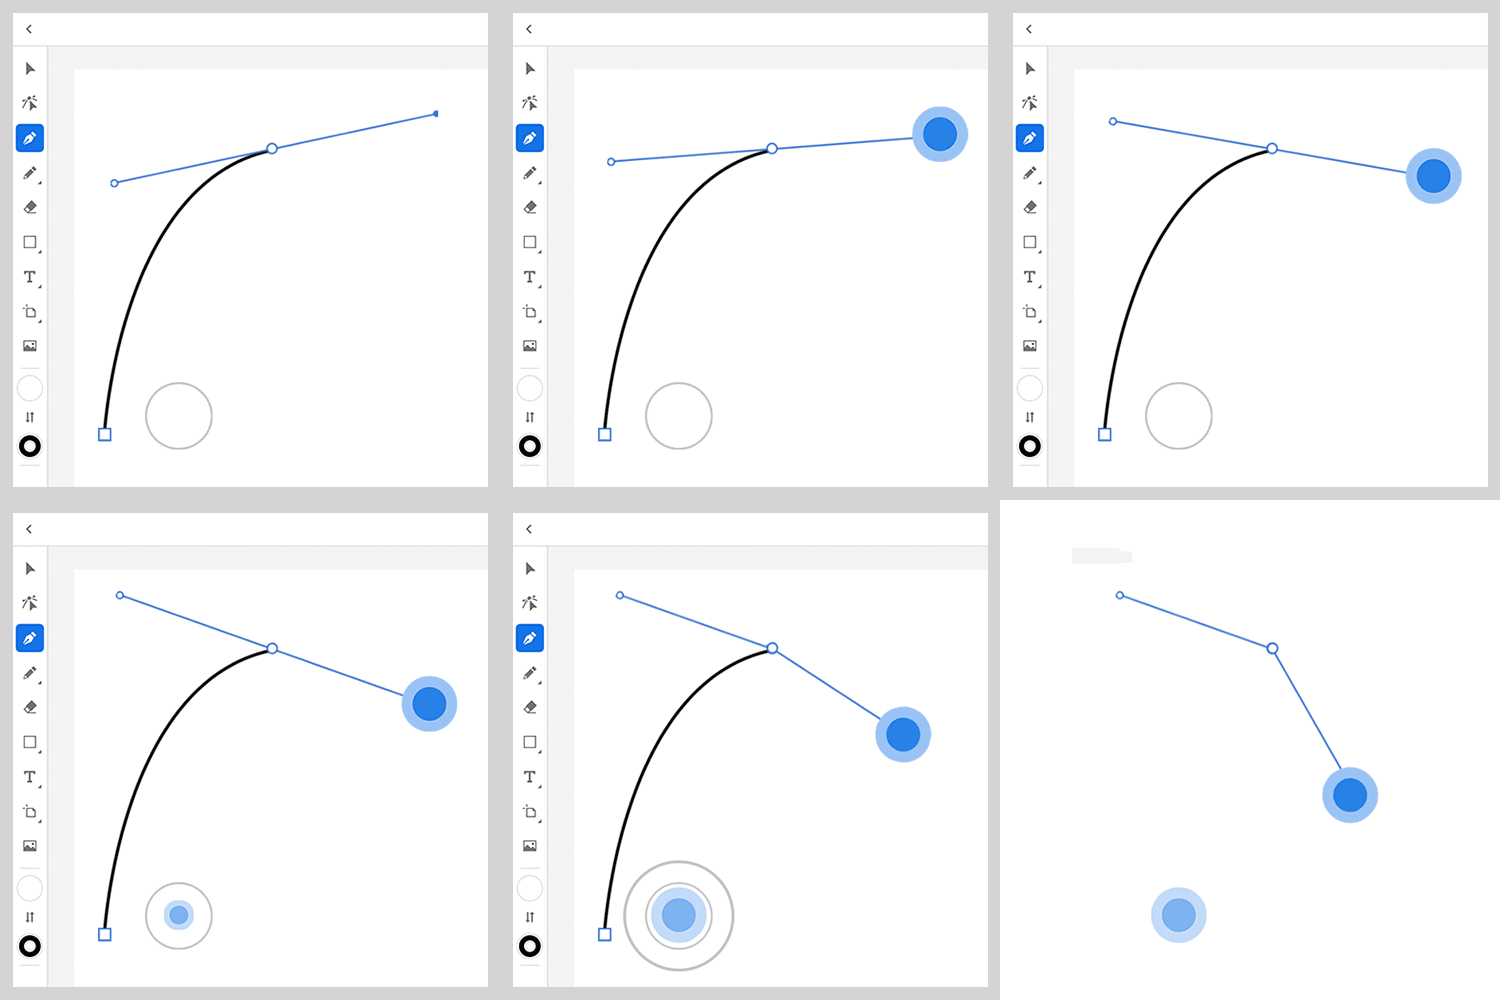
To use the primary touch shortcut, touch and hold the touch shortcut circle. To use the secondary shortcuts, touch and hold the shortcut, then drag your finger or thumb to the outer ring. For more information on the touch shortcuts, see Touch shortcuts and gestures.
Here are some handy touch shortcuts that you can use with the Pen tool:
- Break handle pairing: When drawing with the Pen tool, activate the primary touch shortcut and drag the handles of an anchor point to break the pairing.
- Add anchor points: Tap anywhere on the path to add a point. You can reposition the new anchor point using a secondary modifier.
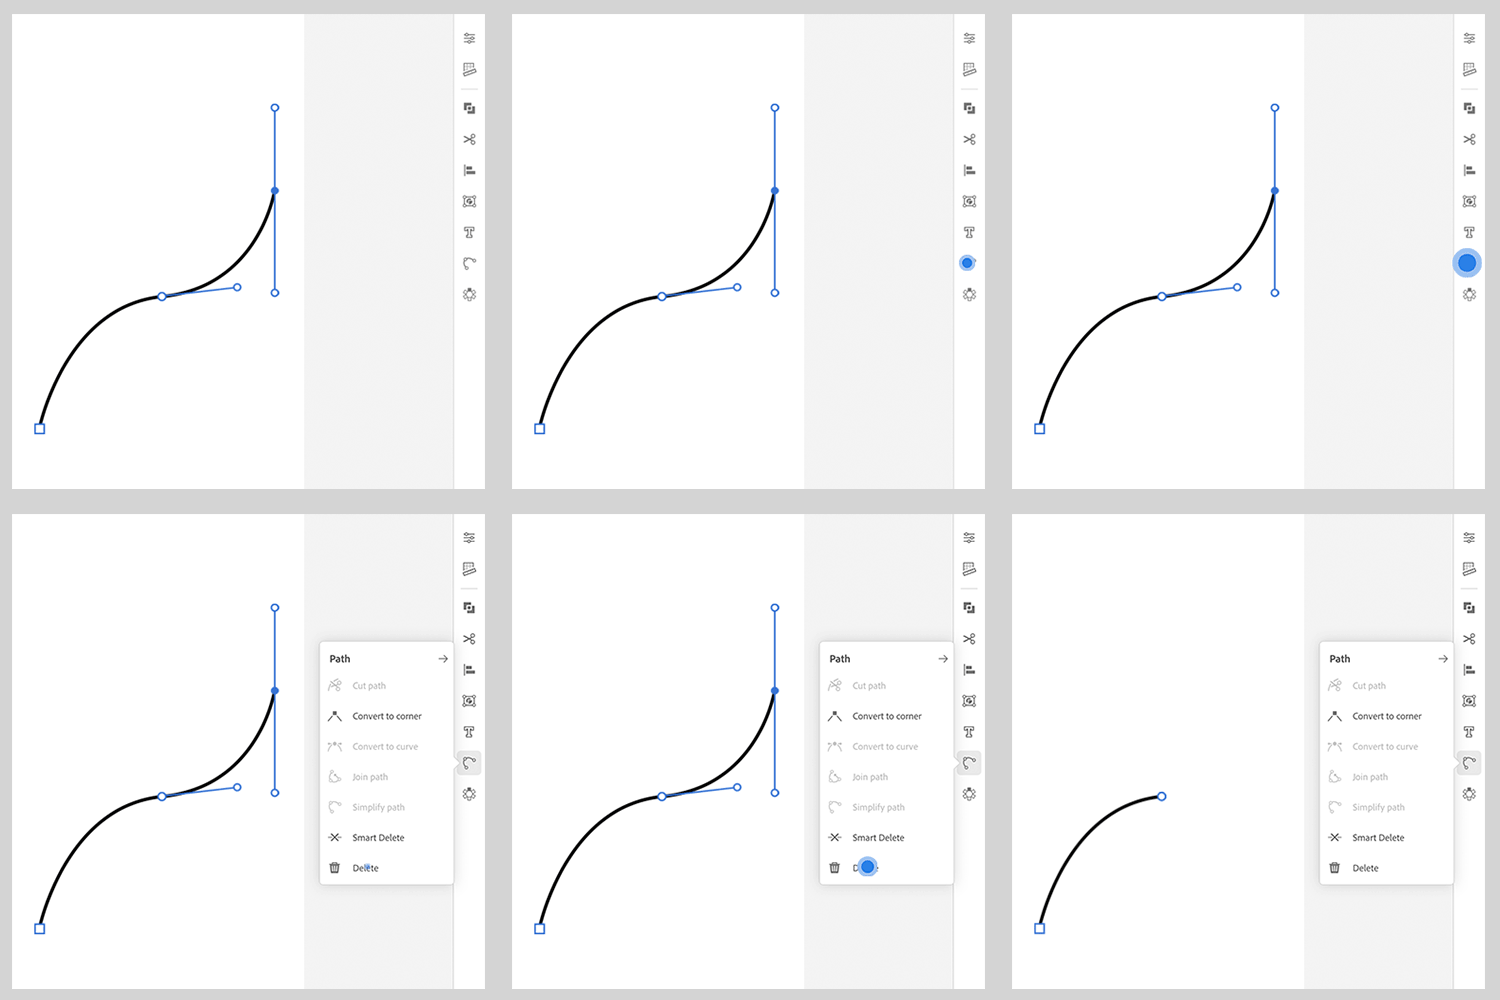
- Delete anchor handles: Select the end of a direction handle, then select Delete in the Taskbar on the right to remove the anchor handle.


- Move a point along a path: To move an anchor point along a path when drawing, enable the secondary touch shortcut (outer circle ring).
- Convert corner to a curve: Double-tap on points to convert points from corners to curves and vice versa.
![]() When drawing with the Pen tool, you can use keyboard shortcuts to control anchor points.
When drawing with the Pen tool, you can use keyboard shortcuts to control anchor points.
See also: Draw with the Pen, Curvature, or Pencil tool in Illustrator on the desktop.
- In the left toolbar, tap the Pencil tool .
- To draw a free path, drag the Pencil tool freely on the artboard.
- If you hold while drawing and then continue from that point, you create a corner point.
- If you press the primary modifier anytime while drawing with the pencil tool, you create straight lines at 45˚ or 90˚.
- If you press the secondary modifier while drawing with the Pencil tool, you can create freeform straight lines.
Set smoothing for Pencil
To set the smoothing of the Pencil tool, tap at the bottom of the toolbar.
Simply specify a smoothing value or use the slider to choose a value that works the best for you. The minimum smoothing is 0 and maximum is 10, which means smooth curves.


Use Paint Brush tool to stylize the appearance of paths. You can apply brush strokes to existing paths, or you can use the Paint Brush tool to draw a path and apply a brush stroke simultaneously.
The different types of brushes are displayed in the Paint Brush tools panel: Document, Art and Calligraphic. You can achieve the following effects using these brushes:
|
Brushes |
Effects |
|
Document |
Collection of default brushes for new or existing paths. |
|
Art |
Create strokes with artistic patterns on new or existing paths. |
|
Calligraphic |
Create strokes that resemble those drawn with the angled point of a calligraphic pen and are drawn along the center of the path. |
USe paint Brush tool


- Double tap and select to use the Paint Brush tool.
- Choose a brush from the All section in the tools panels.
- Add your favorite brushes to the Favorites section.
- Click + to create your own art or calligraphic brush.
Create your own Brush
Create document, art or calligraphic brush.
- Tap to select the object you want to use as a brush.
- Tap and then click + at the bottom of the Paint Brush tools panel.
- Add new Art Brush: Set the parameters like Brush Scale Options, Directions and Colorization and then click Save Brush to create your new Art Brush.
- Add new Calligraphic Brush: Set parameters like Roundness, Angle, Size and Pressure dynamics and then click Save Brush to create your new Calligraphic Brush.
Apply brush style to a path
Apply document, art or calligraphic brush.
- Tap to select the path you want to apply brush on from the artboard.
- Tap to choose a brush as Document, Art or Calligraphic.
- Tap on the right toolbar to modify the appearance and stroke of the brushes using the Properties section.
Add to Favourites
Here's how you add a brush to your favorites:
- Tap on the toolbar on your left.
- Tap again to choose and avail the Paint Brush tools panel.
- Click the Art or Calligraphic brush option you want to add.
- Click on the star icon to save your selected brush in the Favorites section.
See also: Brushes in Illustrator on the desktop.
Use the Blob Brush tool to paint filled shapes that you can intersect and merge with other shapes of the same color.


- In the left toolbar, double-tap or long press the Pencil tool. The Blob Brush tool is displayed in the nested tool group. Click Blob Brush.
- Choose the brush type or roundness in the options that are displayed after you select the Blob Brush tool. The default brush type is Basic round (8 pt).
- To create a point on the artboard, tap on the artboard. Drag the anchor points to edit them.
See also: Blob Brush in Illustrator on the desktop.
Set the size for Blob Brush
To set the size for Blob Brush, tap  at the botom of the toolbar. Type a size (in points) or use the slider to choose a size that works the best for you. The default size is 8pt.
Set smoothing for Blob Brush
To set the smoothing of the Blob Brush, tap at the bottom of the toolbar.
Simply specify a smoothing value or use the slider to choose a value that works the best for you. The minimum smoothing is 1, which means zero smoothing, and the maximum is 100, which means smooth curves.


To learn how to set smoothing effect in Blob brush while or after drawing a stroke, see Manage app preferences.
Set Blob Brush options


To view brush settings, click the  icon on the toolbar that is displayed when the Blob Brush tool is selected.
In the Brush settings,
- Roundness: Sets the roundness of the brush. Drag a black dot in the preview away from or toward the center, or enter a value in the Roundness text box. The higher the value, the greater the roundness.
- Angle: Determines the angle of rotation for the tool. Drag the arrowhead in the preview, or enter a value in the Angle text box.
- Pressure dynamics: Specify the pressure for your stylus (Apple Pencil) to draw dynamic brush strokes. The thickness of your brush strokes changes according to the pressure you apply on the stylus when drawing your iPad. See also: Manage app preferences.
- Merge brush strokes: Tap this option to merge the new strokes drawn over existing ones, if they have the same fill color.
- Taper ends: Control the impact of brush stroke and modify the begining and end of brush strokes.
Modify taper ends
Follow the below steps to modify the Taper ends:
- Tap Taper ends to view more options.
- In Taper mode, select Length or Velocity based on how you want to control the impact of your brush strokes.
- Drag Begin Taper or End Taper sliders to modify the beginning and end of brush strokes.
For quick editing, Eraser tool is available upfront in the toolbar. Tap  to use the Eraser tool. To set the size of the eraser, specify the size in the Eraser size option at the bottom of the toolbar or choose a value using the slider.
To use the Eraser tool, drag over the area you want to erase.
See also: Eraser tool in Illustrator on the desktop.
To view anchor points on a path, tap on the toolbar.
With the Direct Selection tool, you can easily create angles and curves in your designs or change the path direction.
When you select an anchor point, a contextual widget showing common actions is displayed on the canvas. Tap the following options in this widget to quickly edit the path directly from the canvas. Alternatively, you can tap an anchor point and choose these path editing options from the taskbar.
See also: Adjust path segments.
To edit the path, use the Heads Up Display (HUD) that appears on selecting the path or use the path editing options by tapping  in the taskbar.


A.) Cut Path: Tap this option to delete the anchor point on the path to cut the path. See also: Cut, divide, and trim objects in Illustrator on the desktop.
B.) Convert to Curve: Tap an anchor point and then tap this option to convert the connecting path into a curved line.
C.) Convert to corner: Tap the anchor point and then tap this option to convert the curved path into a corner point. The path joining this anchor point will convert into straight lines.
D.) Join path: Tap this option to join two paths together through an anchor point. See also: Join two or more paths in Illustrator on the desktop.
E.) Simplify path: Tap this option to remove unnecessary anchor points and generate a simplified optimal path for your complex artwork, without making any significant changes in the original path shape. See also: Simplify a path in Illustrator on the desktop.
F.) Smart delete: Tap an anchor point and then tap this option to delete the anchor point without breaking the path. The path is auto-joined with the nearest anchor point.
G.) Delete: Tap the anchor point and then tap this option to delete the anchor point.


See also: Edit paths in Illustrator on the desktop.
Related resources
See the following articles to do more:
Got a question or an idea?
If you have a question to ask or an idea to share, come and participate in Adobe Illustrator Community. We'd love to hear from you.