
Parameter
Last updated on
Jun 27, 2025
- After Effects User Guide
- Beta releases
- Getting started
- Workspaces
- Projects and compositions
- Importing footage
- Preparing and importing still images
- Importing from After Effects and Adobe Premiere Pro
- Importing and interpreting video and audio
- Preparing and importing 3D image files
- Importing and interpreting footage items
- Import SVG files
- Working with footage items
- Detect edit points using Scene Edit Detection
- XMP metadata
- Text and Graphics
- Text
- Motion Graphics
- Work with Motion Graphics templates in After Effects
- Use expressions to create drop-down lists in Motion Graphics templates
- Work with Essential Properties to create Motion Graphics templates
- Replace images and videos in Motion Graphics templates and Essential Properties
- Animate faster and easier using the Properties panel
- Variable Font Axes
- Drawing, Painting, and Paths
- Overview of shape layers, paths, and vector graphics
- Paint tools: Brush, Clone Stamp, and Eraser
- Taper shape strokes
- Shape attributes, paint operations, and path operations for shape layers
- Use Offset Paths shape effect to alter shapes
- Creating shapes
- Create masks
- Remove objects from your videos with the Content-Aware Fill panel
- Roto Brush and Refine Matte
- AI-powered Object Matte
- Create Nulls for Positional Properties and Paths
- Layers, Markers, and Camera
- Animation, Keyframes, Motion Tracking, and Keying
- Animation
- Keyframe
- Motion tracking
- Keying
- Transparency and Compositing
- Adjusting color
- Effects and Animation Presets
- Effects and animation presets overview
- Effect list
- Effect Manager
- Simulation effects
- Stylize effects
- Audio effects
- Distort effects
- Perspective effects
- Channel effects
- Generate effects
- Time effects
- Transition effects
- The Rolling Shutter Repair effect
- Blur and Sharpen effects
- 3D Channel effects
- Utility effects
- Matte effects
- Noise and Grain effects
- Detail-preserving Upscale effect
- Obsolete effects
- Cycore plugins
- Expressions and Automation
- Expressions
- Expression basics
- Understanding the expression language
- Using expression controls
- Syntax differences between the JavaScript and Legacy ExtendScript expression engines
- Editing expressions
- Expression errors
- Using the Expressions editor
- Use expressions to edit and access text properties
- Expression language reference
- Expression examples
- Automation
- Expressions
- Immersive video, VR, and 3D
- Construct VR environments in After Effects
- Apply immersive video effects
- Compositing tools for VR/360 videos
- Advanced 3D Renderer
- Import and add 3D models to your composition
- Import 3D models from Creative Cloud Libraries
- Create parametric meshes
- Image-Based Lighting
- Animated Environment Lights
- Enable lights to cast shadows
- Extract and animate lights and cameras from 3D models
- Tracking 3D camera movement
- Adjust Default Camera Settings for 3D compositions
- Cast and accept shadows
- Embedded 3D model animations
- Shadow Catcher
- 3D depth data extraction
- Enable in‑engine Depth of Field in Advanced 3D
- Modify materials properties of a 3D layer
- Apply Substance 3D materials
- Work in 3D Design Space
- 3D Transform Gizmos
- Single 3D Gizmo for multiple 3D layers
- Do more with 3D animation
- Preview changes to 3D designs real time with the Mercury 3D engine
- Stereoscopic 3D in After Effects
- Add responsive design to your graphics
- Views and Previews
- Rendering and Exporting
- Basics of rendering and exporting
- H.264 Encoding in After Effects
- Export an After Effects project as an Adobe Premiere Pro project
- Converting movies
- Multi-frame rendering
- Automated rendering and network rendering
- Rendering and exporting still images and still-image sequences
- Using the GoPro CineForm codec in After Effects
- Working with other applications
- Collaboration: Frame.io, and Team Projects
- Memory, storage, performance
- Knowledge Base
Use the document to learn about the immersive video effects in After Effects.
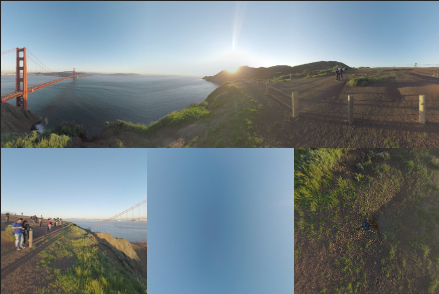
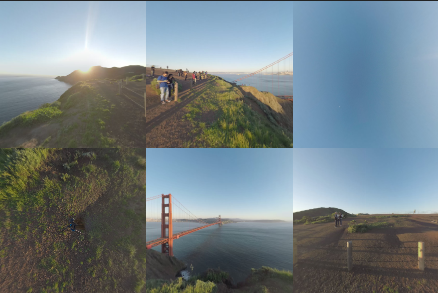
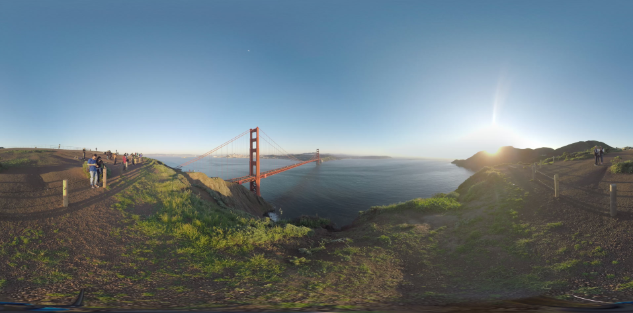
After Effects offers native immersive video effects to edit your VR 360 and VR 180 videos. You can use a host of dynamic transitions, effects, and titles to edit and enhance the immersive video experience. You can experiment with the different immersive video effects in After Effects for a seamless post-production workflow.
GPU requirements for immersive video effects
Immersive Video effects render using the GPU of your computer. Make sure to set your video rendering preference to GPU. To set, select File > Project Settings > Video Rendering and Effects > Use > Mercury GPU Acceleration (OpenCL). If your settings are set to Mercury Software Only, the effects do not render and display a warning banner - This effect requires GPU acceleration.
Apply seamless immersive video effects to your footage
You can use the spherically aware immersive video effects that compensate for distortion in equirectangular content.
To apply these effects, select Effects > Immersive Video, or search for VR in the Effects & Presets panel.


Post Effects in After Effects provide a seamless editing experience. You can apply the effects directly to the stitched 360 footage, with no distortion along the seams. You can add the following effects to your videos to enhance immersive experience:


You can use the following parameters to play around with the effect on your footage:

|
|
Description |
|---|---|
|
Frame Layout |
Sets the frame layout as Monoscopic or Stereoscopic Over/Under. |
|
Points Number |
Adjusts the number of color points that are applied to a footage. |
|
Gradient Power |
Adjusts the overall gradient power for all the color points. |
|
Gradient Blend |
Adjusts the overall blending for all the color points. The higher the number, the more the colors begin to blend together. The blending starts at the edges and moves inwards. For example, feathering around the edges. |
|
Points |
Adjusts the Color and Point of Interest for each of your color points. Each of the Points of Interests can be moved independently and can be key-framed. |
|
Opacity |
Adjusts the opacity of the overall color gradients on your footage. At 100%, the effect is opaque. At 0%, the effect is transparent. |
|
Blending Mode |
You can select from the various color blending modes for the effect on top of your original footage. The default is Normal. |
|
Stereoscopic Side-by-Side |
The Frame Layout parameter can be set to Stereoscopic Side-by-Side, in addition to the existing Monoscopic and Stereoscopic Over/Under options. |
|
Horizontal and Vertical Field of View |
The horizontal and vertical field of view can be independently set. By default, the values are 360x180. For VR 180 content, set both values to 180. |

You can use the following parameters to play around with the effect on your footage:

| Parameter | Description |
|---|---|
| Frame Layout | Sets the frame layout as Monoscopic or Stereoscopic Over/Under. |
| Fractal Type | The parameter allows you to choose between four different fractal types: Basic, Turbulent Sharp, Max, and Strings. |
| Contrast | Adjusts the image contrast for the fractal noise. |
| Brightness | Adjusts the brightness level for the fractal noise |
| Invert | Inverts the color channels of the fractal noise. |
| Complexity | Adjusts the complexity of the fractal noise. Higher the value, more detailed fractal noise, and lower the value, less detailed fractal noise. |
| Evolution | The parameter allows you to use the cycling feature to animate fractal noise. Speed of cycling changes the animation. |
| Transform |
|
| Sub settings |
|
| Random Speed | The parameter allows you to set a random speed of the fractal noise particles on your footage. |
| Opacity | Adjusts the opacity of the effect on your footage. At 100%, the effect is opaque. At 0%, the effect is transparent. |
| Blend Mode | The parameter allows you to choose from multiple blending modes. |
| Stereoscopic Side-by-Side | The Frame Layout parameter can be set to Stereoscopic Side-by-Side, in addition to the existing Monoscopic and Stereoscopic Over/Under options. |
| Horizontal and Vertical Field of View | The horizontal and vertical field of view can be independently set. By default, the values are 360x180. For VR 180 content, set both values to 180. |

You can use the following parameters to play around with the effect on your footage:

| Parameter | Description |
|---|---|
| Frame Layout | Sets the frame layout as Monoscopic or Stereoscopic Over/Under. |
| Point of Interest | Adjusts the Point of Interest, which is the central location of the effect. You can keyframe the position for movement. |
| POI Scale (Point of Interest scale) | Adjusts the scaling for the effect from the point of interest. If you set the value as 100, the effect is applied to the entire footage. Scale down the value to apply the effect to only a part of the footage. |
| POI Aspect Ratio (Point of Interest aspect ratio) | Adjusts the aspect ratio of the Point of Interest Scale. If you set the effect to the minimum value of -100, the aspect ration becomes wide and short. The maximum value of 100 makes the ratio narrow. |
| Master Amplitude | Adjusts the overall threshold value of all the effect settings together. At 100, all the effect settings remain as set by you. At a value of 0, all the effect settings scale back to 0 from your settings. |
| Distortion |
|
| Transform |
|
| Sub settings |
|
| Noise |
|
| Stereoscopic Side-by-Side | The Frame Layout parameter can be set to Stereoscopic Side-by-Side, in addition to the existing Monoscopic and Stereoscopic Over/Under options. |
| Horizontal and Vertical Field of View | The horizontal and vertical field of view can be independently set. By default, the values are 360x180. For VR 180 content, set both values to 180. |

You can use the following parameters to play around with the effect on your footage:

|
Parameter |
Description |
|---|---|
|
Frame Layout |
Adjusts the frame layout - Monoscopic or Stereoscopic Over/Under. |
|
Point of Interest |
Adjusts the position of the point of interest of the footage. You can keyframe the point of interest position for movement. |
|
Aberration (Red) |
Adjusts the scale of the Red channel of your footage. |
|
Aberration(Green) |
Adjusts the scale of the Green channel of your footage. |
|
Aberration (Blue) |
Adjusts the scale of the Blue channel of your footage. |
|
Falloff Distance |
Adjusts the falloff distance of the effect from the point of interest. The higher the value, more clear aberrations. |
|
Falloff Invert |
Restricts occurrence of chromatic aberrations around the point of interest. |
|
Stereoscopic Side-by-Side |
The Frame Layout parameter can be set to Stereoscopic Side-by-Side, in addition to the existing Monoscopic and Stereoscopic Over/Under options. |
|
Horizontal and Vertical Field of View |
The horizontal and vertical field of view can be independently set. By default, the values are 360x180. For VR 180 content, set both values to 180. |


VR Blur accurately blurs content while adjusting for the distortion in Equirectangular content.
- Blurriness: You can adjust the convolution kernel radius.
- Stereoscopic Side-by-Side: The Frame Layout parameter can be set to Stereoscopic Side-by-Side, in addition to the existing Monoscopic and Stereoscopic Over/Under options.
- Horizontal and Vertical Field of View: The horizontal and vertical field of view can be independently set. By default, the values are 360x180. For VR 180 content, set both values to 180.

You can use the following parameters to play around with the effect on your footage:

|
Parameters |
Description |
|---|---|
|
Noise Type |
Choose a noise type - Random Valued or Slat-and-Pepper speckles. |
|
Noise Level |
Adjusts the input noise level. |
|
Stereoscopic Side-by-Side |
The Frame Layout parameter can be set to Stereoscopic Side-by-Side, in addition to the existing Monoscopic and Stereoscopic Over/Under options. |
|
Horizontal and Vertical Field of View |
The horizontal and vertical field of view can be independently set. By default, the values are 360x180. For VR 180 content, set both values to 180. |

You can use the following parameters to play around with the effect on your footage:

|
Parameter |
Description |
|---|---|
|
Luma Threshold |
Defines the areas in the image that glows. Areas where luma (brightness) is higher than threshold, between 0.0 (black) and 1.0 (white). |
|
Glow Radius |
Defines the radius of glowing halo. |
|
Glow Brightness |
Multiplies the glow brightness intensity. |
|
Glow Saturation |
Multiplies the glow saturation (color) intensity. |
|
Use Tint Color |
Blends tint color to the resultant glow color. |
|
Tint Color |
Chooses tint color. |
|
Stereoscopic Side-by-Side |
The Frame Layout parameter can be set to Stereoscopic Side-by-Side, in addition to the existing Monoscopic and Stereoscopic Over/Under options. |
|
Horizontal and Vertical Field of View |
The horizontal and vertical field of view can be independently set. By default, the values are 360x180. For VR 180 content, set both values to 180. |
The VR Sharpen effect adjusts the amount of sharpness in your footage.
|
Parameter |
Description |
|---|---|
|
Sharpen Amount |
You can adjust the relative sharpen amount from 0 to 100. |
|
Stereoscopic Side-by-Side |
The Frame Layout parameter can be set to Stereoscopic Side-by-Side, in addition to the existing Monoscopic and Stereoscopic Over/Under options. |
|
Horizontal and Vertical Field of View |
The horizontal and vertical field of view can be independently set. By default, the values are 360x180. For VR 180 content, set both values to 180. |
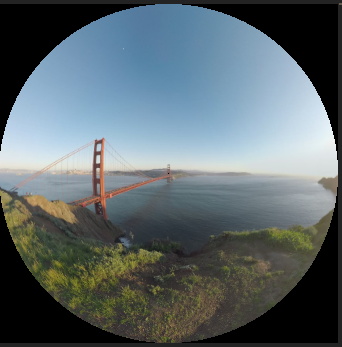
You can use VR Converter to convert your footage from 2D source, equirectangular, cubic, or spherical layouts to other VR layouts. You can also change the orientation of your footage and add logos, supers, or image patches.
The converter is divided into two functional categories:
- Input and Output formats
- Re-orient Camera View

VR Converter formats
VR Converter can take inputs and provide outputs in the following formats:
VR Converter Input formats:
- Fisheye (FullDome)
- Cube-map Facebook 3:2
- Cube-map Pano2VR 3:2
- Cube-map GearVR 6:1
- Equirectangular 16:9
- 2D Source
- Cube-map 4:3
- Sphere-map
- Equirectangular 2:1
VR Converter Output formats:
|
Output formats |
Example |
|---|---|
|
Cube-map Pano2VR 3:2 |
|
|
Cube-map GearVR 6:1 |
|
|
Fisheye (FullDome) |
|
|
Equirectangular 16:9 |
|
|
Cube-map Facebook 3:2 |
|
|
Equirectangular 2:1 |
|


Re-orient Camera View
You can change the camera orientation of your footage without restiching your camera views with the orientation tools in VR Converter:
- Tilt (X-Axis)
- Pan (Y Axis)
- Roll (Z Axis)
Adjust the value of the settings to achieve different results. You can keyframe the controls and achieve results such as camera tilts, pans, and rolls.
You can add text, logos, and graphics, and other 2D elements to your Monoscopic or Stereoscopic footage with the VR Plane to Sphere effect.
To work with the effect, use the following steps:
-
Import or create 2D element in your composition.
-
Select Effects > Immersive Video, and drag the effect to the timeline.
-
Adjust the effect parameters. The parameters include:

VR Plane to Sphere settings
VR Plane to Sphere settings - Frame layout: Select Monoscopic layout for non-stereo (non 3D) output. Select Stereoscopic for stereo 3D output.
- Scale (Degrees): Adjusts the size of your 2D element.
- Stereo Disparity (Degrees): Sets the distance between the left and right view to increase or decrease the amount of the 3D pop out effect. You can keyframe the parameter to allow for a change in stereo effect.
- Feather: Feathers the edges of the footage.
- Rotate Source: Adjusts the X, Y, or Z rotation of the 2D element relative to the anchor point. You can keyframe the parameter.
- Rotate Projection: Adjusts the X, Y, or Z rotation of the position of your element in the 360-degrees spherical environment.
- Stereoscopic Side-by-Side: The Frame Layout parameter can be set to Stereoscopic Side-by-Side, in addition to the existing Monoscopic and Stereoscopic Over/Under options.
- Horizontal and Vertical Field of View: The horizontal and vertical field of view can be independently set. By default, the values are 360x180. For VR 180 content, set both values to 180.

You can use the following parameters to play around with the effect on your footage:

|
Parameter |
Description |
|---|---|
|
Frame Layout |
Select Monoscopic layout for non-stereo (non 3D) output. Select Stereoscopic for stereo 3D output. |
|
Invert Rotation |
Adjusts the tilt, pan, and roll, and inverts them. |
|
Tilt (X axis), Pan (Y axis), Roll (Z axis) |
Readjusts the focal point and straightens the horizon, and adds camera movements to your footage. |
|
Stereoscopic Side-by-Side |
The Frame Layout parameter can be set to Stereoscopic Side-by-Side, in addition to the existing Monoscopic and Stereoscopic Over/Under options. |
|
Horizontal and Vertical Field of View |
The horizontal and vertical field of view can be independently set. By default, the values are 360x180. For VR 180 content, set both values to 180. |
The VR Sphere to Plane effect helps you convert 360° spherical VR footage into a flat 2D view, allowing you to extract specific views or angles from equirectangular footage.

|
Parameter |
Description |
|---|---|
|
Input Format |
Define the format of the 360° footage you're using. |
|
Output Frame Width |
Determine the horizontal resolution of the output frame. A higher width results in a higher-resolution flat view. |
|
Output Frame Ratio |
Control the aspect ratio of the output. Selecting Unchanged maintains the ratio based on the input or composition. |
|
Rotate Projection |
Rotate the camera view within the 360° footage:
|