Draw a path using Shape or Pen tool. Drawing a mask path is similar to drawing a shape path.
See Create a shape or mask by dragging with shape tools and Create a Bezier shape or mask using the Pen tool.


You can create shapes and masks with the Rectangle and Pen tool in After Effects. When you create a mask or shape layer, keep the following things in mind:
Shortcuts for the Shape tool is Q, and the Pen tool is G.
You can create one or more masks for each layer in a composition using any of the following methods:
Draw a path using Shape or Pen tool. Drawing a mask path is similar to drawing a shape path.
See Create a shape or mask by dragging with shape tools and Create a Bezier shape or mask using the Pen tool.
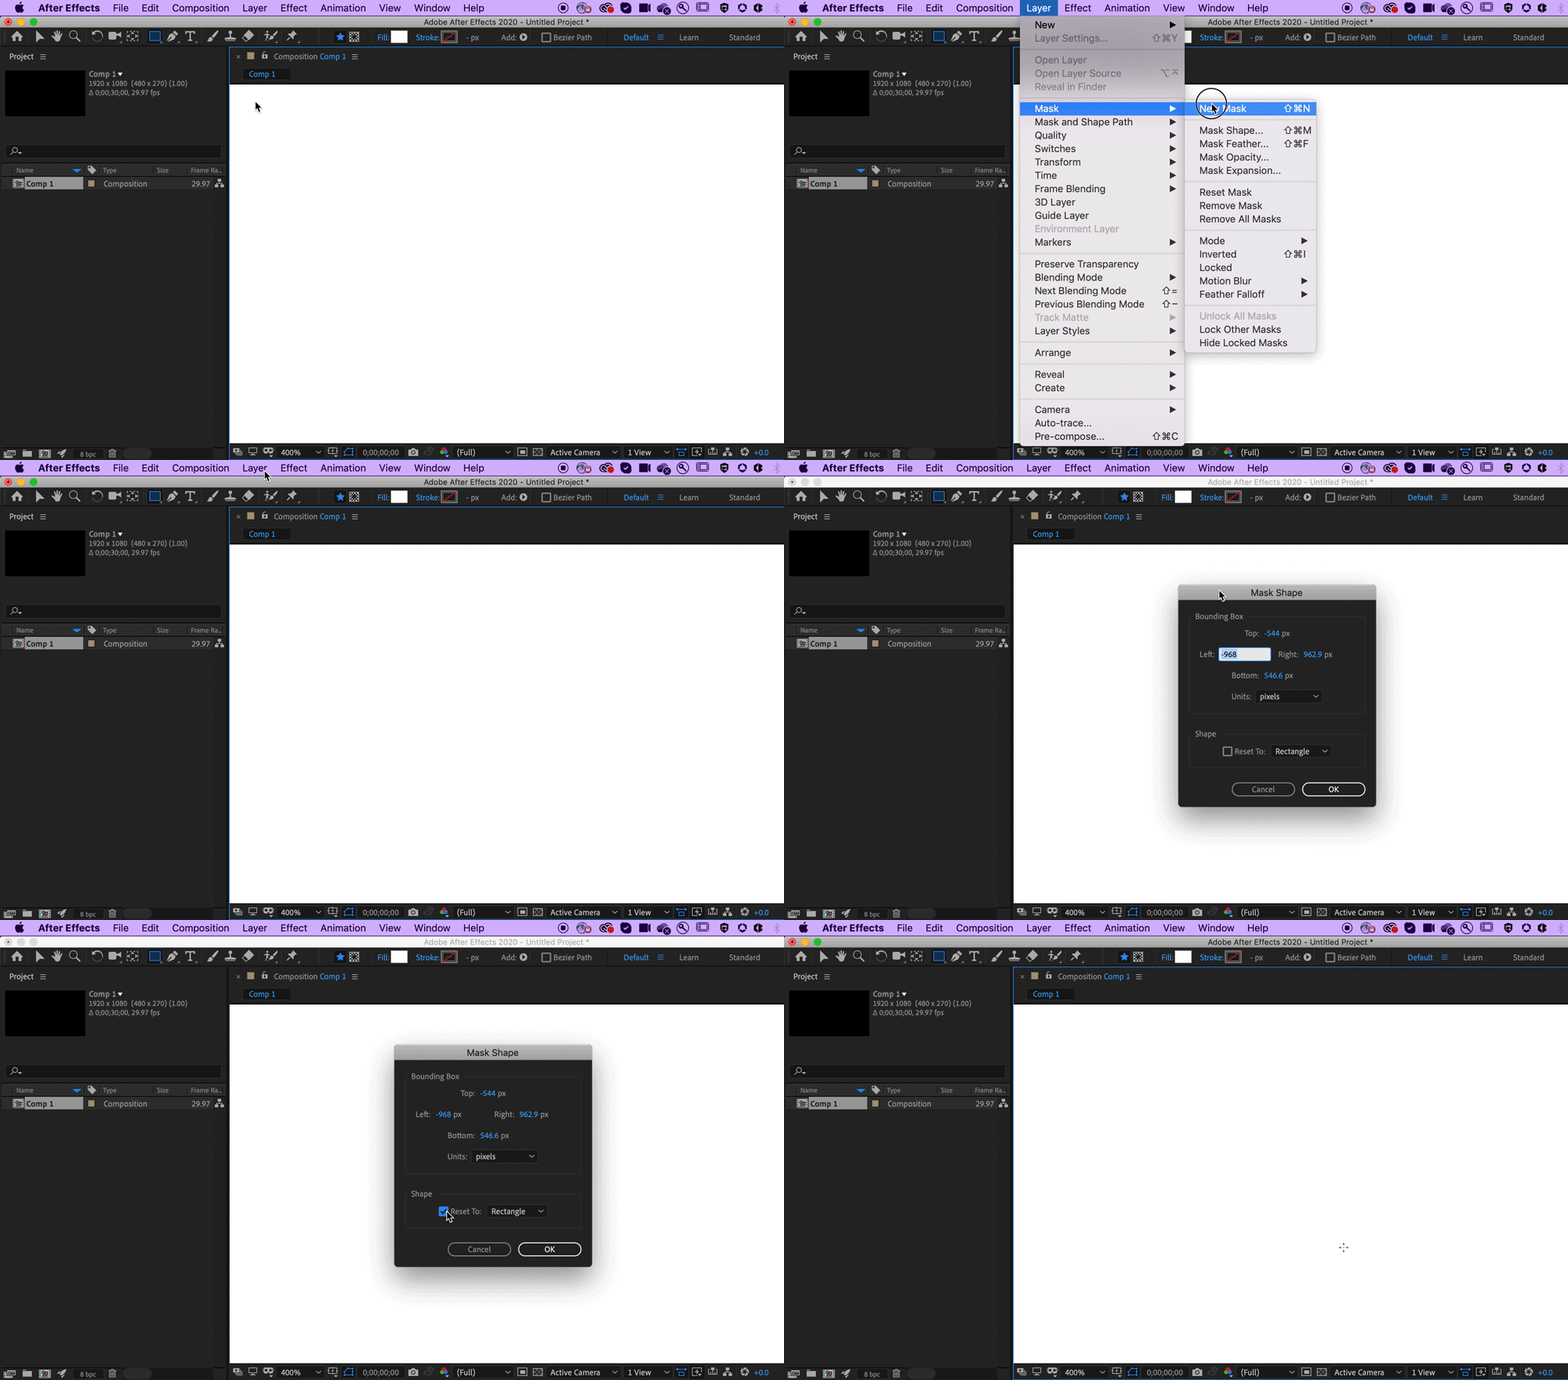
Specify the dimensions of the mask path numerically in the Mask Shape dialog box.
Convert a shape path to a mask path by copying the shape’s path to the Mask Path property.
Trace color or alpha channel values to create a mask using the Auto-trace command.
Paste a path copied from another layer or from Adobe Illustrator or Photoshop.
Convert a text layer to one or more editable masks on a solid-color layer by using the Create Masks From Text command.
Use captured shapes to create motion graphics.
To create a mask that you can move independently of the primary layer that it is masking, do the following:
The shape tools are the Rectangle ![]() , Rounded Rectangle
, Rounded Rectangle ![]() , Ellipse
, Ellipse ![]() , Polygon
, Polygon ![]() , and Star
, and Star ![]() tools.
tools.
To activate and cycle through the shape tools, press Q.
A polygon is a star without an Inner Radius or Inner Roundness property. So, the name of the shape created for a polygon or a star is the same: polystar.
You can create a mask by dragging with a shape tool on a selected layer in the Composition or Layer panel.
To draw a mask on a shape layer, select the Tool Creates Mask ![]() button in the Tools panel with a shape tool active.
button in the Tools panel with a shape tool active.
To learn more, see how to create shapes by dragging shape tools.


Select a layer in the Composition panel, or display a layer in the Layer panel.
Choose Layer > Mask > New Mask. A new mask appears in the Composition or Layer panel with its handles at the outer edges of the frame.
Choose Layer > Mask > Mask Shape.
Select Reset To, choose Rectangle or Ellipse from the Shape menu, and specify the size and location of the bounding box for the mask.
When you apply Auto-trace, affected layers are automatically set to Best Quality to ensure accurate results.
To reduce the number of masks created by Auto-trace, apply a keying effect to the layer to isolate your subject before applying Auto-trace.
In the Timeline panel, do one of the following:
Select one or more layers and choose Layer > Auto-trace.
Current Frame
Creates mask keyframes at only the current frame.
Work Area
Creates mask keyframes for frames within the work area.
Once done, select from any of the following options:


Invert: It inverts the input layer before searching for edges.


Blur: It blurs the original image before generating the tracing result. Use it to reduce small artifacts and to smooth jagged edges. Deselect this to closely trace details in a high-contrast image.


Tolerance: How far, in pixels, the traced path is allowed to deviate from the contours of the channel.


Threshold: Specifies, as a percentage, the value that a pixel’s channel must have for that pixel to be part of an edge. Pixels with channel values over the threshold are mapped to white and are opaque; pixels with values under the threshold are mapped to black and are transparent.


Minimum Area: Specifies the smallest feature in the original image that is traced. For example, a value of 4 removes features smaller than 2 pixels wide by 2 pixels high from the tracing result.


Corner Roundness: Specifies the roundness of the mask curve at vertices. Enter a higher value for smoother curves.


Apply To New Layer: Applies the mask to a new solid the same size as the selected layer. It is automatically selected for layers that have Collapse Transformations enabled.


Preview: Select to preview the mask results and the results of the various options of the Auto-trace command.
Select the destination for the new mask:
In the Tools panel, double-click the Rectangle ![]() , Rounded Rectangle
, Rounded Rectangle ![]() , Ellipse
, Ellipse ![]() , Polygon
, Polygon ![]() , or Star
, or Star ![]() tool.
tool.
The Create Shapes From Text command extracts the outlines for each character, creates shapes from the outlines, and puts the shapes on a new shape layer. You can then use these shapes as you would any other shapes.
The Create Masks From Text command extracts the outlines for each character, creates masks from the outlines, and puts the masks on a new solid-color layer. You can then use these masks as you would any other masks.


You can copy position keyframes, anchor point keyframes, or an effect control point’s position keyframes and paste those keyframes into a selected mask path or shape path. When you create mask paths or shape paths from motion paths, make sure that you copy keyframes from a single Position property only—do not copy the keyframes of any other property.
Draw a motion path with Motion Sketch and then paste the path into a mask path or shape path.
When copying between a mask path to a motion path, keep in mind that the mask path’s values are expressed in the coordinate system of the layer (layer space), whereas the motion path’s values are expressed in the coordinate system of the composition (composition space). This difference causes the pasted path to be offset, requiring you to reposition the path after pasting it. (See Coordinate systems: composition space and layer space.)


In the Timeline panel, select the name of the Position property or Anchor Point property from which you want to copy the motion path. (This selects all keyframes. To select only some of the keyframes of a motion path, Shift+click them.)
Choose Edit > Copy.
To create a mask, select the layer on which to create the mask, and choose Layer > Mask > New Mask.
In the Timeline panel, select the name of the Mask Path property for the mask into which to paste the keyframes from the motion path.
Choose Edit > Paste.
Create stunning 3D animations in After Effects
Animate characters and illustrations, add motion to text, and more.