Этот процесс управляемого редактирования демонстрирует добавление графического объекта или видео поверх фонового видео. Нажимайте кнопки «Назад» и «Далее», чтобы перейти к предыдущему или следующему шагу управляемого редактирования.
- Get to know Premiere Elements
- Adobe Premiere Elements User Guide
- Introduction to Adobe Premiere Elements
- Workspace and workflow
- Working with projects
- 360° and VR Video Editing
- Importing and adding media
- Arranging clips
- Editing clips
- Reduce noise
- Select object
- Candid Moments
- Color Match
- Color Fonts and Emojis
- Smart Trim
- Freehand Crop
- Delete All Gaps
- Change clip speed and duration
- Split clips
- Freeze and hold frames
- Adjusting Brightness, Contrast, and Color - Guided Edit
- Stabilize video footage with Shake Stabilizer
- Replace footage
- Working with source clips
- Trimming Unwanted Frames - Guided Edit
- Trim clips
- Editing frames with Auto Smart Tone
- Artistic effects
- Color Correction and Grading
- Applying transitions
- Special effects basics
- Effects reference
- Applying and removing effects
- Create a black and white video with a color pop - Guided Edit
- Time remapping - Guided edit
- Effects basics
- Working with effect presets
- Finding and organizing effects
- Editing frames with Auto Smart Tone
- Fill Frame - Guided edit
- Create a time-lapse - Guided edit
- Best practices to create a time-lapse video
- Applying special effects
- Use pan and zoom to create video-like effect
- Transparency and superimposing
- Reposition, scale, or rotate clips with the Motion effect
- Apply an Effects Mask to your video
- Adjust temperature and tint
- Create a Glass Pane effect - Guided Edit
- Create a picture-in-picture overlay
- Applying effects using Adjustment layers
- Adding Title to your movie
- Removing haze
- Creating a Picture in Picture - Guided Edit
- Create a Vignetting effect
- Add a Split Tone Effect
- Add FilmLooks effects
- Add an HSL Tuner effect
- Fill Frame - Guided edit
- Create a time-lapse - Guided edit
- Animated Sky - Guided edit
- Select object
- Animated Mattes - Guided Edit
- Double exposure- Guided Edit
- Special audio effects
- Movie titles
- Creating titles
- Adding shapes and images to titles
- Adding color and shadows to titles
- Apply Gradients
- Create Titles and MOGRTs
- Add responsive design
- Editing and formatting text
- Text Styles and Style Browser
- Align and transform objects
- Motion Titles
- Appearance of text and shapes
- Exporting and importing titles
- Arranging objects in titles
- Designing titles for TV
- Applying styles to text and graphics
- Adding a video in the title
- Disc menus
- Sharing and exporting your movies
Этот процесс управляемого редактирования научит создавать наложение «Картинка в картинке». Можно поместить графический объект или видео поверх фонового видео.
Чтобы создать наложение «Картинка в картинке» с помощью управляемого редактирования, выполните следующие действия.
-

Создание наложения «Картинка в картинке» 
Создание наложения «Картинка в картинке» -
Нажмите «Добавить медиаданные», чтобы импортировать видеоклип, в который нужно добавить музыкальное сопровождение. Пропустите этот шаг, если видеоклип уже добавлен на шкалу времени.
-
Выберите нужный вариант импорта медиаданных.
-
Выберите «Управляем.» > «Создание наложения "Картинка в картинке"».
-
Переместите индикатор текущего времени в точку, где должен начинаться эффект «Картинка в картинке».
-
Откройте окно обозревателя файлов и перетащите видео, которое должно воспроизводиться на переднем плане.
-
Выберите вариант «Картинка в картинке».
-
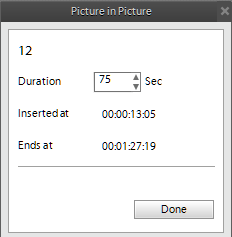
Введите продолжительность в диалоговом окне «Картинка в картинке». Можно увеличить или уменьшить продолжительность эффекта «Картинка в картинке».

Настройка продолжительности эффекта «Картинка в картинке» 
Настройка продолжительности эффекта «Картинка в картинке» -
Настройте позицию наложения, перетащите ее в нужное место на панели «Монитор».
-
Измените размер маркера в углу видеоклипа или графики и перетащите его, чтобы изменить размер или поворот наложения. Нажмите «Готово».