Select a clip in the timeline.
- Adobe Premiere Pro User Guide
- Beta releases
- Getting started
- Hardware and operating system requirements
- Creating projects
- Workspaces and workflows
- Frame.io
- Import media
- Importing
- Importing from Avid or Final Cut
- Searching for imported media
- File formats
- Working with timecode
- Editing
- Edit video
- Sequences
- Create and change sequences
- Set In and Out points in the Source Monitor
- Add clips to sequences
- Rearrange and move clips
- Find, select, and group clips in a sequence
- Remove clips from a sequence
- Change sequence settings
- Edit from sequences loaded into the Source Monitor
- Simplify sequences
- Rendering and previewing sequences
- Working with markers
- Add markers to clips
- Create markers in Effect Controls panel
- Set default marker colors
- Find, move, and delete markers
- Show or hide markers by color
- View marker comments
- Copy and paste sequence markers
- Sharing markers with After Effects
- Source patching and track targeting
- Scene edit detection
- Generative Extend
- Cut and trim clips
- Video
- Audio
- Overview of audio in Premiere Pro
- Edit audio clips in the Source Monitor
- Audio Track Mixer
- Adjusting volume levels
- Edit, repair, and improve audio using Essential Sound panel
- Enhance Speech
- Enhance Speech FAQs
- Audio Category Tagging
- Automatically duck audio
- Remix audio
- Monitor clip volume and pan using Audio Clip Mixer
- Audio balancing and panning
- Advanced Audio - Submixes, downmixing, and routing
- Audio effects and transitions
- Working with audio transitions
- Apply effects to audio
- Measure audio using the Loudness Radar effect
- Recording audio mixes
- Editing audio in the timeline
- Audio channel mapping in Premiere Pro
- Use Adobe Stock audio in Premiere Pro
- Overview of audio in Premiere Pro
- Text-Based Editing
- Advanced editing
- Best Practices
- Video Effects and Transitions
- Overview of video effects and transitions
- Effects
- Types of effects in Premiere Pro
- Modern transitions, effects, and animations in Premiere Pro
- Apply and remove effects
- Use FX badges
- Effect presets
- Metadata effect in Premiere Pro
- Automatically reframe video for different social media channels
- Color correction effects
- Effects Manager
- Change duration and speed of clips
- Adjustment Layers
- Stabilize footage
- Transitions
- Titles, Graphics, and Captions
- Properties panel
- About Properties panel
- Edit text
- Edit shapes
- Change the appearance of text and shapes
- Apply gradients
- Linked and Track Styles
- Working with style browser
- Draw with the Pen tool
- Align objects
- Add Responsive Design features to your graphics
- Edit audio
- Edit video
- Mask with shape
- Create reveal animations using masking techniques
- Create, apply, and redefine text styles
- Add Responsive Design features to your graphics
- Captions
- Motion Graphics Templates
- Best Practices: Faster graphics workflows
- Retiring the Legacy Titler FAQs
- Upgrade Legacy titles to Source Graphics
- Properties panel
- Fonts and emojis
- Animation and Keyframing
- Compositing
- Color Correction and Grading
- Overview: Color workflows in Premiere Pro
- Color Settings
- Auto Color
- Get creative with color using Lumetri looks
- Adjust color using RGB and Hue Saturation Curves
- Correct and match colors between shots
- Using HSL Secondary controls in the Lumetri Color panel
- Create vignettes
- Looks and LUTs
- Lumetri scopes
- Timeline tone mapping
- HDR for broadcasters
- Enable DirectX HDR support
- Color management
- About color management
- How color management works
- Auto Detection of Log Camera Formats and Raw Media
- Disable color management
- Manage source media colors in the Program Monitor
- Configure clips for color management using Clip Modify
- Configure sequence color management
- Customize color presets for new or existing sequences
- Configure a sequence’s output color space
- Color management options
- Color management and Lumetri Color
- Premiere Pro and After Effects color management compatibility
- Working with color managed iPhone media
- Frequently asked questions
- Color management and new version compatibility FAQ
- Exporting media
- Export video
- Export Preset Manager
- Workflow and overview for exporting
- Quick export
- Exporting for the Web and mobile devices
- Export a still image
- Content Credentials in Premiere Pro and Adobe Media Encoder
- Exporting projects for other applications
- Exporting OMF files for Pro Tools
- Export to Panasonic P2 format
- Create and export HDR videos for YouTube on Macintosh
- Export settings
- Best Practices: Export faster
- Collaborative editing
- Collaboration in Premiere Pro
- Get started with collaborative video editing
- Create Team Projects
- Add and manage media in Team Projects
- Invite and manage collaborators
- Share and manage changes with collaborators
- View auto saves and versions of Team Projects
- Manage Team Projects
- Linked Team Projects
- Frequently asked questions
- Long form and Episodic workflows
- Working with other Adobe applications
- Organizing and Managing Assets
- Improving Performance and Troubleshooting
- Set preferences
- Reset and restore preferences
- Recovery Mode
- Working with Proxies
- Check if your system is compatible with Premiere Pro
- Premiere Pro for Apple silicon
- Eliminate flicker
- Interlacing and field order
- Smart rendering
- Control surface support
- Best Practices: Working with native formats
- Removal of software rendering options
- Knowledge Base
- Known issues
- Fixed issues
- Fix Premiere Pro crash issues
- Why do my Premiere Pro exports look washed out?
- Unable to migrate settings after updating Premiere Pro
- Green and pink video in Premiere Pro or Premiere Rush
- How do I manage the Media Cache in Premiere Pro?
- Fix errors when rendering or exporting
- Troubleshoot issues related to playback and performance in Premiere Pro
- Set preferences
- Extensions and plugins
- Video and audio streaming
- Monitoring Assets and Offline Media
Apply a vignette to achieve a look that is faded out at the edges, and bright at the center.
Vignettes are a subtle way to direct your audience’s eyes to a specific subject in the frame, such as a person or a landscape.


You can create vignettes in Premiere Pro in the following ways:
- Using the Vignette option in the Lumetri Color panel - a vignette created using this method creates a vignette that surrounds your frame. This is also the easiest way to create a vignette.
- Using masks - Creating a mask allows you to control the shape of the vignette and is very effective for adding drama for scenarios such as interviews.
Create a vignette that surrounds your frame
The Vignette controls in the Lumetri Color panel let you control the size, shape, and amount of lightening or darkening of the edges.
To create a vignette:
-
-
In the Vignette section of the Lumetri Color panel, adjust the following controls:
- Amount: Sets the amount of lightening or darkening along the edges of an image. Type a number in the box, or move the slider to gradually shade the clip. Move the slider to the left shifting your numbers to a negative value. This adds a vignette that surrounds your frame.
- Midpoint: Specifies the width of area affected by the Amount slider. Move the slider, or type a lower number to affect more of the image. Type a higher number to restrict the effect to the edges of the image.
- Roundness: Specifies the size (roundness) of the vignette. Negative values cause an exaggerated vignette effect, and positive values cause a less visible vignette.
- Feather: Defines the edge of the vignette. A smaller value creates a harder, sharper edge. A larger value creates a softer, thicker edge.
Controls for creating a vignette in the Lumetri Color panel Controls for creating a vignette in the Lumetri Color panel
Create a vignette using masks
Using masks allows you to control the shape of your vignette and achieve really dramatic effects.
-
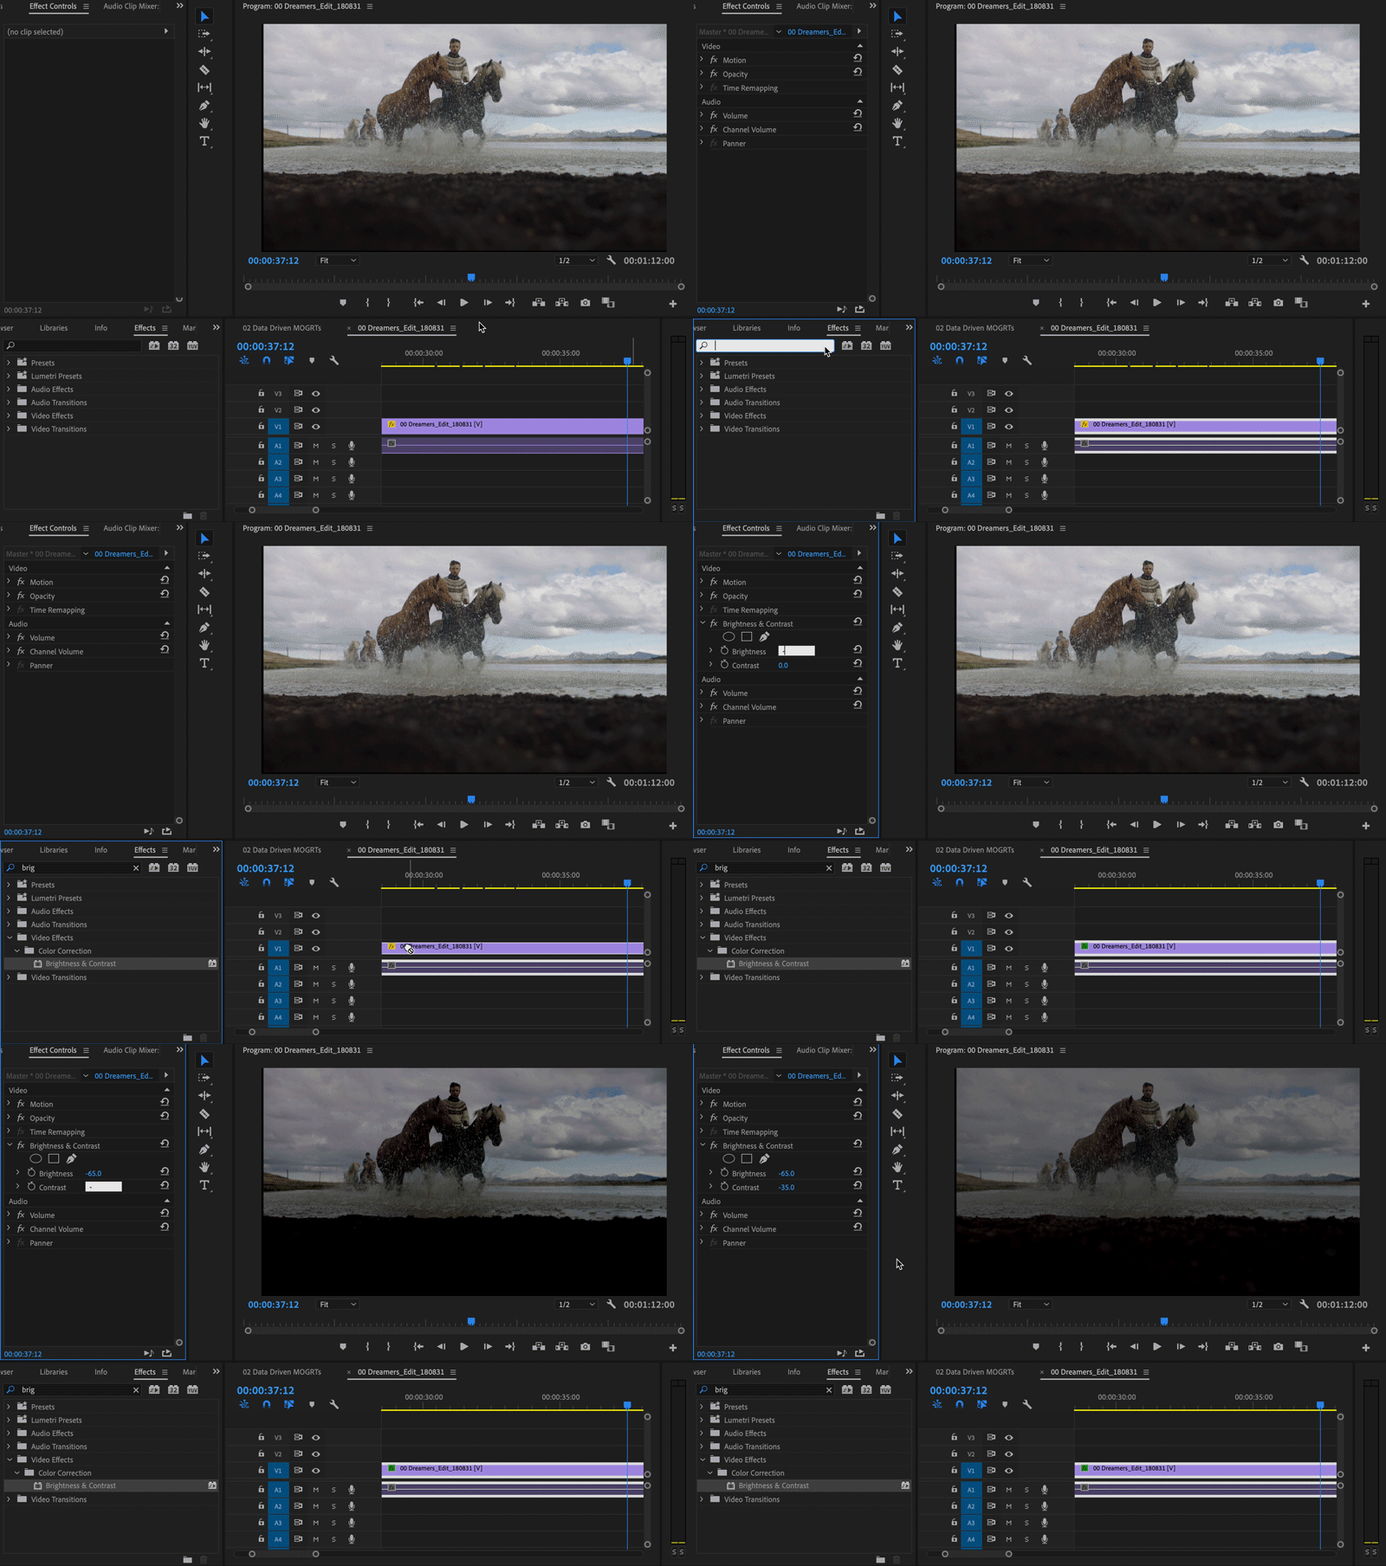
Select a clip in the timeline.
-
From the Effects panel, drag the Brightness & Contrast effect on to your clip.
-
Decrease the brightness and contrast of the effect.

Changing the brightness and contrast of an effect 
Changing the brightness and contrast of an effect -
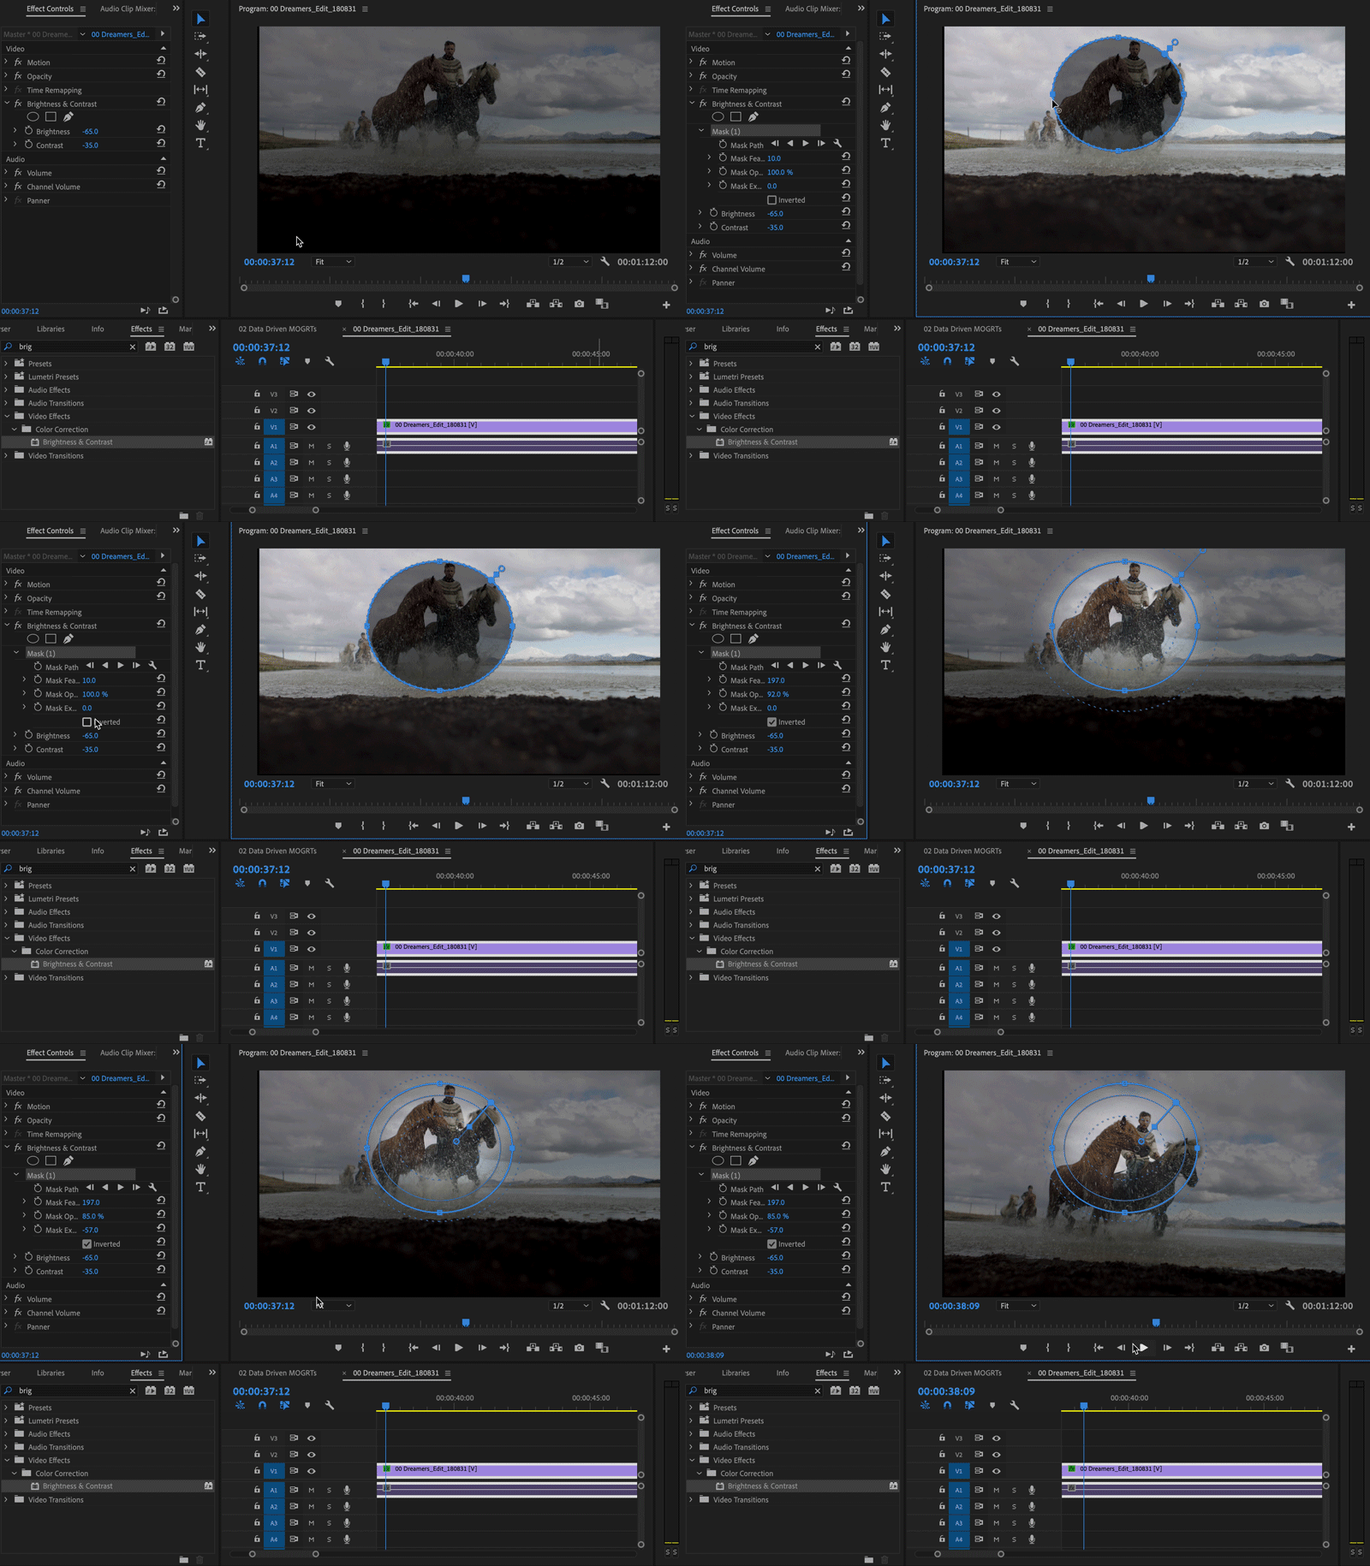
Draw a mask using the Pen tool, or use the Circle or Square shape masks in the Brightness & Contrast section of the Effect Controls panel.
-
After drawing the mask, select Inverted in the Effect Controls panel, so that the darker layer surrounds the masked subject.
-
Adjust feathering, mask opacity and mask expansion to adjust the vignette.

Adjusting the mask 
Adjusting the mask
![]() Use mask tracking to ensure that your mask automatically follows the subject.
Use mask tracking to ensure that your mask automatically follows the subject.
Have a question or an idea?
If you have a question to ask or an idea to share, come and participate in our Premiere Pro community. We would love to hear from you and see your work.
