- What's new
-
Get started
-
Technical requirements
- Adobe Premiere technical requirements
- GPU and GPU Driver requirements
- Storage recommendations
- Processor, memory, and GPU recommendations
- Hardware-accelerated decoding and encoding
- Enable hardware accelerated decoding support
- Supported codecs and drivers for hardware-accelerated decoding
- Enable Hardware Encoding in Premiere
- Install macOS updates for Apple Metal GPU Acceleration
- Enable Mercury Playback Engine (GPU accelerated) renderer
- Adobe Premiere 25.x technical requirements
- Adobe Premiere 24.x technical requirements
- Download and install
-
Preferences and settings
- Preferences overview
- General preferences
- Set Appearance preferences
- AI Models preferences
- Audio preferences
- Audio Hardware preferences
- Auto Save preferences
- Collaboration preferences
- Color preferences
- Control Surface preferences
- Graphics preferences
- Labels preferences
- Media preferences
- Media Analysis & Transcription preferences
- Memory preferences
- Playback preferences
- Timeline preferences
- Trim preferences
- Display video on a second monitor
- Best practices for film and TV productions
- Display Premiere interface on a second monitor
- Set up accessibility features
- Keyboard shortcuts
- Set up Directx HDR for Windows
- Use touch and gesture controls
- Workflows, workspaces, and panels
-
Customize the Project panel
- Customization options for the Project panel
- Customize the Icon View in Project panel
- Customize metadata in Freeform View in Project panel
- Customize Freeform view in Project panel
- Customize List View in Project panel
- Align and reset clips to grid in Freeform View in Project panel
- Create layouts in Freeform View in Project panel
- Customize the position of the Project panel
- List View columns
- Restore or delete layouts in Freeform View in Project panel
-
Source and Program Monitor adjustments
- Overview of Source Monitor and Program Monitor
- Set display quality for Source and Program Monitors
- Adjust magnification for Source and Program Monitors
- Enable High Quality Playback
- Choose a display mode
- Gang Source and Program Monitor
- Set display options for interlaced footage
- Compare edits to clips in the Program Monitor
- Open or clear a clip in the Source Monitor
- Navigate clips in the Source menu in the Source Monitor
- Display controls in the Source and Program Monitors
- Time controls in the Source and Program Monitors
- View safe zones in the monitors
- Change the unit of measurement
- Add or remove guides
- Snap objects to guides
- Nudge clips in Program Monitor
- Save, export, and import custom guides
- Enable Dropped Frame Indicator
- Display metadata as overlays
- Set overlay settings
- Set In and Out points in the Source Monitor
-
Technical requirements
-
Organize media
-
Create projects
- Overview of projects
- Create new projects
- Open projects
- Copy projects
- Consolidate and archive projects
- Move projects to another computer
- Delete projects
- Edit multiple open projects
- Save workspace when editing multiple projects simultaneously
- Project locking with multiple open projects
- Backward compatibility of projects
- Create your own project templates
-
Import files
- Import still images
- Import images as an image sequence
- Import Photoshop and Illustrator files
- Resize imported images
- Import a Premiere Elements project
- Record audio
- Record a voice-over on an audio track from the Timeline
- Record audio using the Audio Track Mixer
- Mute input during recording
- Supported file formats
- Blackmagic RAW support
- Import media from Firefly to Premiere on desktop
- Import media from Firefly Boards to Premiere on desktop
- Importing digital audio
- Audio sample rates in Premiere
- Audio conforming specifications
- Import projects as project shortcuts
- Import and export presets
- Import selected Premiere sequences
- Import XML files from Final Cut Pro X
- Import Avid Media Composer project files
-
Organize files
- Overview of bins
- Add and delete bins
- Open and close bins
- Manage bins
- Change bin behaviors
- Sort and view bins
- Search for media using media intelligence
- Locate and link offline files
- Relink offline media automatically
- Manually locate and relink offline media
- Consolidate duplicate folders
- Search for audio using media intelligence
- Search for similar visuals using media intelligence
- Media intelligence and Search panel
- Manage media intelligence metadata
- Freeze a frame for a portion of a clip using Time Remapping
- Search options in Premiere
- Find assets using the Find dialog
-
Apply labeling
- Overview of markers
- Add a marker to a clip
- Copy and paste sequence markers
- Find, move, and delete markers
- Set default marker colors
- Show or hide markers by color
- View and edit marker properties
- Share markers with After Effects
- Overview of timecode
- Enter timecode
- View Sequence Timecode
- Choose timecode display format
- View source timecode in the Program Monitor
- Change timecode display format
- Timecode display options
- Set clip timecode manually
- Label colors in sequence tabs
- Transfer files
- Ingest proxy workflow
-
Edit metadata
- Metadata in Premiere
- Edit XMP metadata
- Search metadata in the Metadata panel
- Show or hide metadata in Premiere
- Save or delete metadata sets
- Create metadata schemas and properties
- View clip data in the Metadata panel
- Link clip data to XMP metadata
- Display metadata as overlays
- Display overlays in Multi-Camera View
- Create overlay settings
- Overlay settings reference
- Import, export, or delete overlay settings
-
Create projects
-
Edit projects
-
Intro to editing
- Add or remove clips
- Aspect ratios
- Set the aspect ratio of a sequence
- Pixel aspect ratio
- Frame aspect ratio
- Aspect ratio preservation
- Correct aspect ratio misinterpretations
- Convert a subclip to a Source clip
- Add media to the timeline using Source Patching
- Work with clips on the timeline using Track Targeting
- Create a subclip from the Project panel
- Create a subclip from the Timeline
- Adjust media start and end times of a subclip
- Apply Multi Transitions across audio and video clips
- Use built-in Adobe Stock panel
- Edit video in Premiere
- Creating clips for offline editing
- Create low-resolution clips for offline editing
- Edit video using the Properties panel
-
Edit video using Text-based editing
- Overview of Text-Based editing
- Add clips to the timeline using Text-Based Editing
- Transcribe video
- Edit transcripts using Text-Based Editing
- Detect and delete pauses in transcripts
- Transcribe individual source files
- Edit speaker names in transcription
- Edit sequences using Text-Based Editing
- Remove all instances of one speaker in transcript
- Multichannel audio support in Text-Based Editing
- Trim clips
-
Change clip speed
- Different ways to change clip speed and duration
- Change clip speed and duration using the Speed/Duration command
- Change clip speed and duration using the Rate Stretch tool
- Change clip speed and duration using Time Remapping
- Apply Time Interpolation Methods to adjust clip speed
- Remove Time Remapping from a clip
- Freeze a video frame for the duration of a clip
-
Change clip sequence
- Create a sequence
- Navigation controls in the timeline
- Navigate sequences in the timeline
- Change sequence settings
- Sequence settings reference
- Sequence presets and settings
- Create a custom sequence preset
- Copy and paste clips
- Different ways to move clips
- Rearrange clips on the timeline
- Add tracks
- Delete tracks
- Rename tracks
- Lift and paste frames
- Edit track appearance
- Sync Lock to prevent changes
- Track Lock to prevent changes
- Simplify a sequence
- Find clips in a sequence
- Select clips
- Group clips
- Snap clips
- Enable or disable a clip
- Detect edit points using Scene Edit Detection
- Remove clips from a sequence
- Modify clip properties
- Set up multi-camera sequences for editing
- Compare edits to source clips
- Correct mistakes
-
Edit VR content
- VR editing in Premiere
- VR auto-detection
- Interpret VR footage
- Assign VR properties to sequences
- 360-degree panning
- VR assignments
- Hide VR video view controls
- Immersive video effects and transitions
- Three-axis video rotation
- Assembling Ambisonics Audio
- Monitor Ambisonics audio
- Restage correctly aligned video and audio
- Publish VR videos
- VR editing in Premiere
- Edit with Generative AI
- Edit nested sequences
-
Intro to editing
-
Add text and images
-
Use Motion Graphics templates
- Overview of Motion Graphics templates
- Install Motion Graphics templates
- Add Motion Graphic templates to a sequence
- Organize Motion Graphics templates
- Browse and sort Motion Graphics templates
- Customize Motion Graphics templates
- Use Motion Graphics templates from Adobe Stock
- Use data-driven Motion Graphics templates
- Media Replacement in Motion Graphics templates
- Where do I get Motion Graphics templates
-
Stylize text
- Create titles
- Create text styles
- Apply styles to a sub-selection of the text
- Style parameters when applying from the style browser
- Replace fonts
- Create Linked and Track Styles
- Apply Linked and Track Styles
- Redefine Linked and Track Styles
- Parameters when applying as a Linked style or Track style
- Use color fonts
- Use emojis
- About Properties panel
-
Insert images and graphics
- Create responsive graphics
- Preserve intro and outro animations while creating Responsive Design graphics
- Group text and graphic layers
- Create clip layers
- Create credit rolls
- Add gradients
- Animate layers using the Effect Controls panel
- Animate layers using the Properties panel
- Rename layers
- Export graphic as a Motion Graphics template
- Create Source Graphics
- Mask with text or shape using Properties panel
- Find and replace text using the Graphics tab
- Check spelling using the Graphics tab
- Work with Motion Graphics templates in Premiere
- Different ways to work with graphics
- Edit text in Graphics tab
- Tips for authoring Motion Graphics templates
- Create markers in the Effect Controls panel
- Draw objects
- Align and distribute objects
-
Insert captions
- Captions overview
- Auto transcribe video using Speech-to-Text
- Find and replace text in transcript
- Create captions
- Create styles for captions
- Translate captions
- Languages supported by Speech-to-Text
- Supported file formats for captions
- Import caption file from third-party service
- Download language packs from Creative Cloud
- Deploy language packs for Teams and Enterprise users
- Download language packs from within Premiere
-
Use Motion Graphics templates
-
Add video effects
- Types of effects
-
Apply video effects
- Apply effects
- Remove effects
- Copy and paste clip effects
- Find and group effects
- About Effect Controls panel
- Adjust controls in the Effect Controls panel
- View effects in the Effect Controls panel
- Effect presets
- Create effect presets
- Apply effect presets
- Use FX badges
- Manage effects and plug-ins
- Create adjustment layers
- Resize adjustment layers
- About Source clips
- Apply effects to Source clips
- Enable or disable Source clips effects in thumbnails
-
Effects and transitions library
- List of Video transitions
- List of Video Dissolve transitions
- Adjust effects
- Blur and Sharpen effects
- Channel effects
- Color Correction effects
- Distort effects
- Generate effects
- Image Control effects
- Immersive Video effects
- Keying effects
- Apply and customize Chromakey using the Ultra Key effect
- Ultra Key effect parameters
- Noise and Grain effects
- Perspective effects
- Stylize effects
- Time effects
- Transform effects
- Transition effects
- Utility effects
- Video effects
- Effects and transitions reorganization
- List of effects and transitions
-
Control effects and transitions using keyframes
- Adjust effect speed
- About keyframes
- Add keyframes
- Select keyframes
- Copy and paste keyframes
- Set keyframes to snap
- Delete keyframes
- Keyframes and graphs in panels
- Edit keyframes graphs
- View keyframes and properties in the Timeline panel
- View keyframes in the Effect Controls panel
- Move the Current Time Indicator to a keyframe
- Control effect changes using keyframe interpolation
- Change the keyframe interpolation method
- Filter properties in the Effect Controls panel
- Adjust or reset controls in the Effect Controls panel
- Control change using Bezier keyframe interpolation
- Create masks and composites
-
Commonly used effects
- Auto Reframe overview
- Add Auto Reframe effect to sequences
- Add Auto Reframe effect to clips
- Apply Motion effect
- Edit vector graphics using Vector Motion effect
- Stabilize shaky footage using Warp Stabilizer
- Warp Stabilizer settings
- Create fade-in video effects
- Add lightning effects
- Create a Jacob’s ladder effect
- Effects and transitions removed from Adobe Premiere
- Create vignettes using Lumetri Color
- Create vignettes using masks
- Create a counting leader
- Create color bars and a 1-kHz tone
- Create a black video
- Create a color matte
- Create a transparent video clip
-
Apply video transitions
- Transitions overview
- Set and apply default transitions
- Apply single-sided transitions
- Copy and paste transitions
- Align and reposition transitions
- Reposition the center of a transition
- Change transition settings
- Replace transitions
- Move cuts and transitions simultaneously
- Change transition duration using the Effect Controls panel
- Morph Cut overview
- Apply morph cut to smoothen jump cuts
- Morph Cut transition options
- Clip handles settings
- Video transitions using clip handles
-
Work with masks
- Redesigned Rectangle, Ellipse, and Pen tools
- Object masking in Premiere
- Create masks using shapes
- Refining and combining masks
- Apply effects to existing unassigned masks in Premiere
- Copy, paste or move masks
- Adjust mask properties
- Mask tracking tools in Premiere
- Adjust masks at the clip or frame level in Premiere
- Track masks
- Masking tool actions and modifiers
- Work with composites
-
Add audio effects
-
Basic audio editing
- Audio editing concepts
- Extract audio from clips
- Link audio and video clips
- Synchronize audio and video
- Synchronize clips in the Timeline panel
- Merge clips in the Project panel
- Merge clips in the Timeline panel
- Use the timecode from an audio primary clip to create a merged clip
- Edit merged clips
- Edit metadata of merged clips
- Limitations of merged clips
- View audio and video waveforms in the Source Monitor
- Edit audio clips in the Source Monitor
-
Advanced audio techniques
- Audio channel mapping
- Audio Track Mixer overview
- Create a submix
- Map source audio channels on import
- Change source audio channel mapping
- Map to audio output device hardware channels
- Break a stereo track into mono tracks
- Use mono clips as stereo clips
- Edit a multi-clip link in the Source Monitor
- Clean audio with bulk mute or bleep
- Remix audio in Audition to match video duration
- Assign multiple audio channels
-
Adjust volume and levels
- Automatically tag audio
- Apply Enhance Speech
- Audio editing with Essential Sound panel
- Improve dialogue clarity
- Repair dialogue
- Create a Reverb effect
- Automatically duck audio
- Create audio presets
- Adjust gain in audio
- Adjust track volume
- Auto-match audio loudness
- Monitor volume levels
- Use Dynamic Audio Waveforms
- Enhance Speech technical requirements
- Live waveform editing
- Global mute in Premiere (beta)
-
Apply audio effects
- Audio effects library
- Loudness Meter overview
- Apply Loudness Meter to a track
- Measure the loudness of your track
- Edit Loudness Meter settings
- Remix audio in Premiere
- Remix tool considerations in Premiere
- Set automation modes for Audio Clip Mixer
- Audio panning and balancing controls in Audio Track Mixer
- Pan or balance a stereo track
- Pan or balance an adaptive track
- Pan or balance a track in the timeline
- Record changes to sound tracks
- Add effects to audio tracks
- Copy and paste audio effects in the timeline
- Adjust audio track effects in the Timeline
- Designate a track effect as pre-fade or post-fade
- Channelize effects
- Copy and move effects in Audio Track Mixer
- Audio Track Mixer automation modes
- Set Automatch Time for Touch mode and Read mode
- Specify automated keyframe creation
- Remix in Premiere
- Apply audio transitions
- Use Adobe Stock audio
-
Basic audio editing
-
Correct color
- Color correction fundamentals
-
Add color effects
- Color Correction effects overview
- Available color correction effects
- Correct color using RGB curves
- Correct color using Hue and Saturation curves
- Install custom Look-up Table files
- Add Look-up Tables
- Save or export Look-up Tables
- Use Auto Color
- Correct color using color wheels
- Match color between shots
- Correct color using HSL Secondary Controls
- Available Lumetri Scopes
- Apply Lumetri looks
- Display Lumetri Scopes
-
Set up Color Management
- Color Management overview
- How Color Management works
- Color Management and Lumetri Color
- Color Management options
- Manage source media colors in the Program Monitor
- Configure sequence Color Management
- Configure clips for Color Management using Clip Modify
- Customize color presets for new or existing sequences
- Configure sequence’s output color space
- Disable Color Management
- Premiere and After Effects Color Management compatibility
- Tone mapping in Premiere
-
Render and export
-
Render sequences for playback
- Render a section of a sequence
- Render and replace media in a sequence
- Replace rendered clips with original media
- Use preview files when rendering
- Delete preview files
- Preview on a television monitor
- Play clips in Source Monitor
- Play active sequence in Program Monitor
- Play back in a continuous loop
- Play clips with preroll and postroll
- Match a frame with its source
- Smart rendering supported formats
-
Export files
- Export video
- Export a still frame
- Export a still image
- Export transcripts
- Export caption tracks
- Export selected captions
- Export text from Motion Graphics
- Best practices for exporting video for social media and phones
- Export videos for social media channels
- Export a project as an EDL file
- Export a project as a Final Cut Pro XML file
- Export videos with Content Credentials
- Export video and audio files
- Export directly to Adobe Media Encoder
- Export options in Premiere
- Export OMF files for Pro Tools
- Supported features for exporting OMF files for Pro Tools
- Quickly export a video file
- Export AAF files
- Supported export file formats
- Create and export HDR videos for YouTube on Mac
- Overview of export settings
- Basic video settings
- Video encoding settings
- Preset Manager overview
- Create and save custom presets
- Manage presets
- Export from Avid Media Composer to Premiere
- Stream video
-
Render sequences for playback
-
Collaborate with others
-
Collaborate using Team Projects
- About Team Projects
- When to use Team Projects and when to use Productions
- Collaboration using Team Projects
- Create Team Projects
- Create linked Team Projects
- Add media
- Manage media
- Connect to Team Projects service
- Invite collaborators to existing Team Projects
- Accept an invitation to collaborate
- View online collaborators
- Remove collaborators from Team Projects
- Search and filter Team Projects
- Archive Team Projects
- Delete archived Team Projects
- Restore archived Team Projects
- Publish an edited sequence with changes
- Visual cues during collaboration
- Offline editing and cloud sync status
- View versions of a Team Project
- Create a new Team Project from a version
- Specify Auto Save cache location
- Sequence Locking
- Sequence Locking for offline editing
- View auto saves
- Convert Premiere projects to Team Projects
-
Share for review using Frame.io
- Frame.io overview
- Upload media to Frame.io
- Add comments on shared projects
- Add collaborators using the Frame.io panel
- Remove collaborators using the Frame.io panel
- Share for review with Frame.io
- Import comments as markers
- Integrate Adobe Workfront with Frame.io
- About cloud rendering
- Cloud rendering with Frame.io
- Cloud rendering in Premiere FAQ
- Set up cloud rendering
- Invite collaborators to co-edit a project
- Collaborate using Creative Cloud Libraries
-
Collaborate using Productions
- Move clips and sequences between projects in a Production
- How clips, markers, and labels work in a Production
- Copy clips across projects
- Find and edit source clips
- General best practices for using Productions on shared storage
- Server time and productions
- Storage vendors who have tested Productions
- About Productions
- Configure Productions settings
- Create a Production
- Build a Production
- Change project lock status in Production
- Productions FAQ
- Learning from broadcast production
- Bring media into the editing application
- Edit and enhance content
- Incorporate branded graphics and audio elements
- Collaborate with other teams and team members
- Export for viewing platforms
- Broadcast workflow lessons for individuals and small teams
- Collaboration in Premiere
-
Collaborate using Team Projects
-
Troubleshooting
-
Limitations and known issues
- Known and fixed issues in Adobe Premiere
- iPhone HDR clips are unsupported for Generative Extend
- Unable to send media from Firefly to Premiere
- Projects saved in v25.6.0 cannot be opened in other v25.x versions
- Software rendering update
- Generative Extend known issues
- UI errors when using obsolete effects in on macOS Dark Mode
- Files conformed each time project opens
- Creative Cloud Synced files End of life for Premiere
- Networks and removable media with Digital Video
- Common issues in Premiere on Apple silicon Macs
- Media issues
- Crash issues
- Preferences and settings issues
- Export issues
- Audio issues
-
Playback issues
- Timeline doesn’t show video preview
- Not able to optimize playback performance
- Hardware setup not optimal for playback performance
- Audio playback keep getting stuck
- Optimize playback performance for H.264 and H.265 media
- Troubleshoot sequence and file-interpretation settings
- Choppy playback and poor performance issue
- Slow rendering and playback
- Imports only audio in project bin
- Premiere exports look washed out
-
Limitations and known issues
-
Use Premiere with other apps
- Install plugins and extensions
- Third-party plug-ins and tools
-
Working with other Adobe applications
- Transfer of information from Premiere to Audition
- Edit Premiere Sequences in Adobe Audition
- Edit Premiere audio clips in Audition
- Share assets between After Effects and Premiere using Dynamic Link
- Import After Effects compositions
- Replace clips with a dynamically linked After Effects composition
- Delete dynamically linked compositions or clips
- Make a dynamically linked composition offline
- Relink a dynamically linked composition
- Copy clips from Premiere to After Effects
- Copy from After Effects to Premiere
- Import Photoshop files into Premiere
- Create a Photoshop file in a project
- Edit still images in Premiere using Photoshop
- Share assets between After Effects and Premiere using Dynamic Link
- Replace clips with a dynamically linked After Effects composition
- Create a dynamically linked composition
- Import an After Effects composition
- Delete a dynamically linked composition or clip
- Modify a dynamically linked composition in After Effects
- Make a dynamically linked composition offline
- Relink a dynamically linked composition
- How Premiere works with Audition for audio editing
- Work with Photoshop and Premiere
Correct color using RGB curves
Learn how to use RGB Curves to make quick and precise color adjustments to achieve natural-looking results.
Curves feature allows you to make quick and precise color adjustments using two types of curves—RGB Curves and Hue Saturation Curves.
RGB Curves
You can edit curves using two approaches:
- Using the RGB Curves available in the Lumetri Color panel.
- Using the RGB Curves effect available in the Effect Controls panel.

A. Curves settings that you can adjust in the Effect Controls panel B. Curves settings that you can adjust in the Lumetri Color panel
Adjust luma and tonal ranges using control points
RGB Curves let you adjust luma and tonal ranges across the clip using curves. The master curve controls the Luma. Initially, the master curve is represented as a straight white diagonal line. Adjusting the master curve adjusts the values of all three RGB channels simultaneously.

Some common ways you can manipulate control points

To add highlights, drag a control point to the upper-right area of the line. To add shadows, drag a control point to the lower-left area.

Selectively adjust tonal values for RGB channels. To adjust different tonal areas, add control points directly to the curve.
To lighten or darken the tonal area, drag a control point up or down. To increase or decrease the contrast, drag a control point left or right.

To delete a control point, press Ctrl (Windows) or command (macOS) and select the control point.

You can add warm tones to a video clip using the RGB Curves. In this example, the white and red lines are used to increase the warm tones in the clip. The blue and green lines are used to decrease the presence of blues and greens in the clip. A reddish tint is added to the clip, making it appear warmer.
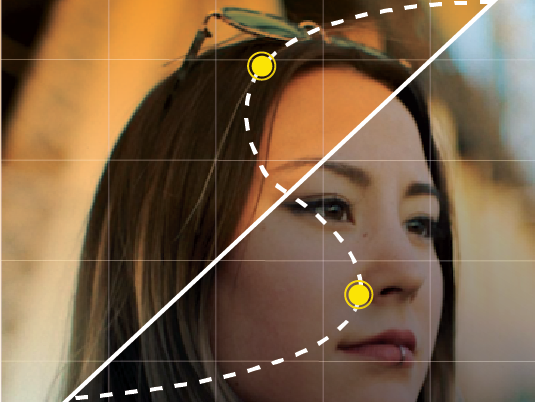
Add natural-looking contrast using S curves

You can edit an image's contrast using RGB Curves. In this example, an S curve enhances the contrast, making the guy look less pale. The blue color of the sky also appears brighter.

Craft the perfect story with Premiere
Find the best-in-class video-editing tools all in one place.