User Guide Cancel

Send in Bulk

  1. Welcome to Adobe Acrobat Sign for Government
    1. First steps for new accounts
    2. Claiming an email domains
    3. Connecting Okta to a federated identity solution
    4. Manually create/edit users in Okta
      1. Creating individual users manually
      2. Creating multiple users via CSV import
      3. Add or Remove a group from a user profile
      4. Elevating a user to Account/Privacy administrator status
      5. Changing your Okta password
  2. Configure Acrobat Sign
    1. Configuration Overview
    2. System requirements
    3. Branding
      1. Company and Hostname
      2. Logos
      3. Email header/footer images
    4. User access to features
    5. User experience within the application
      1. Allowed Signature types
      2. Signature order options
      3. Self Signing workflows
    6. Recipient experience when interacting with agreements
    7. Transaction security
    8. Compliance information
      1. GDPR
      2. HIPAA
      3. eVaulting Chattle paper
      4. IVES
  3. Administrator processes
    1. Admin guide overview
    2. Users
      1. Manage users in the Gov CloudCreating users
      2. Add users to a group
      3. Remove a user from group membership
      4. Update users in bulk
      5. Users in Multiple Groups (UMG)
        1. Overview
        2. Differences in UMG enabled accounts
    3. Groups
      1. Create a group
      2. Delete a group
      3. Modify a group name
      4. Modify group-level settings
    4. Templates
      1. Edit shared templates
      2. Transfer template ownership
    5. Custom workflow designer
      1. Create a custom workflow
    6. GDPR deletion processes
      1. Delete a user
      2. Delete agreements
    7. Sandbox
  4. User environment and processes
    1. Support resources
    2. Transaction limits
    3. Page layouts
      1. Home page
      2. Send page
      3. Manage page
      4. Reports page
    4. Configure your profile
      1. "My Profile" overview
      2. Change your email address
      3. Define your signature
      4. Configure your event and alert notifications
      5. Define your language preferences
      6. Define your personal email footer
      7. Review account sharing
      8. Configure auto delegation
    5. Send agreements
      1. Compose an agreement to send for signature
      2. Recipient signing order
        1. Sequential or parallel signing
        2. Hybrid signing (Both sequential and parallel)
        3. Recipient groups
      3. Written signatures
      4. Send an agreement to yourself only
      5. Send in Bulk
      6. Sending from a template on the Manage page
      7. Sign agreements
      8. Fill and Sign a document
      9. Self Signing
      10. Signing a document from an email link
      11. Sign a document from the Manage page
    6. Custom workflow designer
      1. Overview
      2. Create a new sending workflow
      3. Edit a sending workflow
      4. Activate/Deactivate a workflow
      5. Send agreements using a workflow
    7. Manage agreements
      1. Search for agreements
      2. View Agreements
      3. Activity history and Audit Report
      4. Add a note to an agreement
      5. Set a reminder
      6. Cancel a reminder
      7. Add an expiration date
      8. Modify/Delete an expiration date
      9. Modify the files of a sent agreement
      10. Replace the current recipient
      11. Upload a signed agreement
      12. Share an individual agreement
      13. Download an agreement
      14. Download the individual files of an agreement
      15. Download the audit report
      16. Download the signer identity report
      17. Download the field data from an agreement
      18. Cancel an agreement
      19. Hide an agreement from view
    8. Reporting
      1. Create a report with classic reporting
      2. Report charts and data exports
        1. Overview
        2. User permissions for report charts and exports
      3. Data Exports
        1. Create a data export
        2. Open and edit a data export
        3. Refresh the data in an existing export
        4. Download the CSV from a data export
      4. Report Charts
        1. Create a report chart
        2. Open and edit a report chart
        3. Rename a data export/report chart
        4. Duplicate a data export/report chart
        5. Delete a data export/report chart
    9. API
      1. API Swagger documentation
      2. Webhooks

Send in Bulk by using a .CSV file to import the recipients and their details

You can use a CSV file to import your recipients' email addresses and merge custom data into fields on the document for each recipient. You can also customize the message in the email sent to each signer requesting that they sign the document.

.CSV stands for Comma-Separated Value and Excel files can be saved in this format.

Note:

This video shows how to set up and use a .CSV file in a Send in Bulk transaction. It also shows how to track the status of all documents sent in the Send in Bulk transaction. 


Setting up your .CSV

Before setting up your .CSV, it's necessary to know the names of the fields in your document. There's a different way to do this depending on how you added fields to the document:

  • If the document was created with Tags (Text or PDF), use the field name you defined in the tag. For example, has the field name of Address1.
  • If you used the Drag and Drop Environment, edit your document and double-click the field. The name of that field is at the top of that properties window.

Once you know the names of the fields on your document, open either the sample found on the Send in Bulk send page, or create an Excel file.

Note:
  • There must be a minimum of two unique email addresses in the CSV file.
  • The sender’s email address cannot be in the CSV.
  • The number of transactions that can be generated using the Send in Bulk feature is limited based on the tier of service:
    • Enterprise and business tier customers can generate up to 300 transactions
    • Acrobat Pro with advanced e‑sign for teams and Adobe Acrobat Sign Professional customers can generate up to 50 transactions
    • Acrobat Pro with advanced e‑sign can generate up to 50 transactions
    • Team trials can generate up to five transactions
    • Enterprise trials can generate up to three transactions
  1. The first row is the field names and information tags. For custom fields you've added, add the field names to the column header.

    The information tags are as follows:

    _es_signer_email (Mandatory) The signer’s email address

    _es_signer_name (Optional) Signer name used in the signature

    _es_signer_fullname (Optional) Signer name appearing in the document

    _es_signer_company (Optional) Signer Company

    _es_signer_title (Optional) Signer Title

    _es_agreement_message (Optional) The message included in the email sent to the signer.
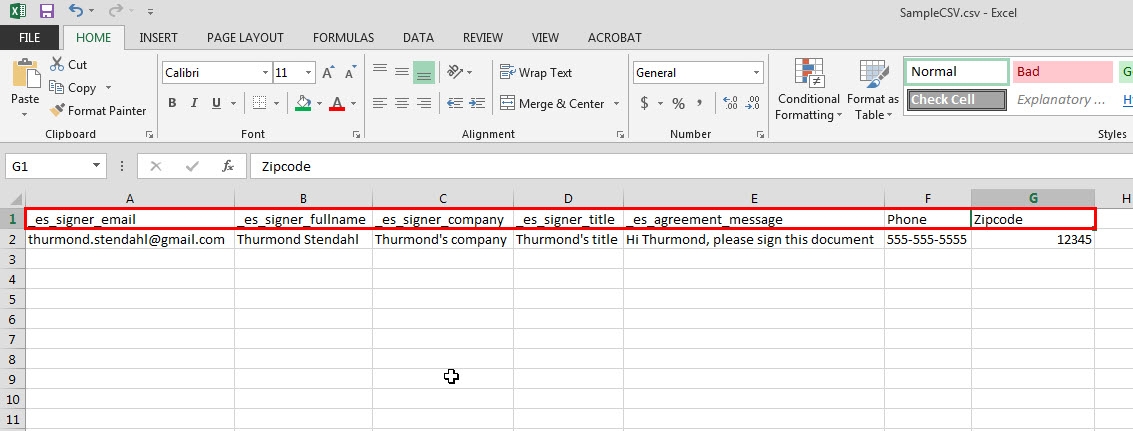
    The other names used (Phone and ZIP code) are the custom fields we've added to the document.

    Information tags in CSV

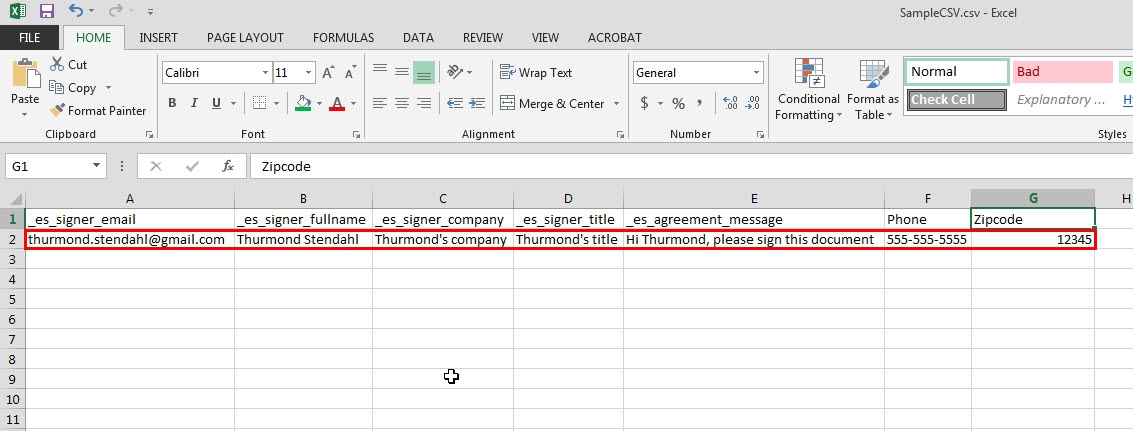
  2. The next row is filled with the information specific to the signers. Here we set the email addresses, full name, company name, title, custom message, and the other information for our custom fields.

    Signer information filled

  3. Finally, save the file as a .CSV(Comma delimited)(*.csv), to your local system.

    • Customers who use double-byte characters must save the CSV file in CSV UTF-8 (Comma delimited)(*.csv) format
    Saving CSV to your local system


Sending using the .CSV

  1. Once you've created your .CSV, click Send in bulk on the Home page.

    Send Mega Sign from Home page

  2. On the Send in Bulk send page, click the Import Recipients and Merge Fields from File link to use your .CSV for sending.

    Import recipients and merge fields from file

  3. Click Upload.

    Upload

  4. Find and attach the CSV file you want to use.

  5. Configure the other options as desired:

    • Identity verification - Set this to apply a second-factor authentication
    • I need to sign - Check this box if you (the sender) need to counter sign the documents.
    • Agreement Name - The name of the agreement as it appears in the Manage page.
    • Message - The global message that is included in the Please Sign email (if no other message is explicitly imported with the .csv).
    • Language - What language should be used in the email and on-screen instructions.
    • Set an expiration date for this document (Optional) - Defines a number of days that the agreement remains viable before automatically expiring.
    • Set password to open signed PDF (Optional) - Defines a password to be applied to secure the signed document.
    • Preview, position signatures or add form fields - Allows the sender to place fields on the template.

    When done, click Next

    Select options and send

    Note:

    A Send in Bulk agreement left in a Prefill or Draft state will automatically expire 24 hours after the creation time.

Adding automatic document expiration

Automatic document expiration allows for account and group level configuration. Expiration can be defined for a default time limit, with an optional setting to permit the sender to edit the default value.

Document expiration is measured in whole days (24-hour increments) starting when the agreement is created.  For example, if you configure an agreement for expiration in 3 days, the agreement expires exactly 72 hours after the agreement is sent (if not completed).

Each recipient must complete the signature process before the deadline. Any individual agreement not completed before the deadline is automatically expired.

Set expiration date

Note:

The account or group administrator can configure document expiration to ignore the expiration deadline if the remaining recipients are internal (counter-signers).

 Adobe

Get help faster and easier

New user?

Adobe MAX 2024

Adobe MAX
The Creativity Conference

Oct 14–16 Miami Beach and online

Adobe MAX

The Creativity Conference

Oct 14–16 Miami Beach and online

Adobe MAX 2024

Adobe MAX
The Creativity Conference

Oct 14–16 Miami Beach and online

Adobe MAX

The Creativity Conference

Oct 14–16 Miami Beach and online