- Adobe Animate User Guide
- Introduction to Animate
- Animation
- Animation basics in Animate
- How to use frames and keyframes in Animate
- Frame-by-frame animation in Animate
- How to work with classic tween animation in Animate
- Brush Tool
- Motion Guide
- Motion tween and ActionScript 3.0
- About Motion Tween Animation
- Motion tween animations
- Creating a Motion tween animation
- Using property keyframes
- Animate position with a tween
- How to edit motion tweens using Motion Editor
- Editing the motion path of a tween animation
- Manipulating motion tweens
- Adding custom eases
- Creating and applying Motion presets
- Setting up animation tween spans
- Working with Motion tweens saved as XML files
- Motion tweens vs Classic tweens
- Shape tweening
- Using Bone tool animation in Animate
- Work with character rigging in Animate
- How to use mask layers in Adobe Animate
- How to work with scenes in Animate
- Interactivity
- How to create buttons with Animate
- Convert Animate projects to other document type formats
- Create and publish HTML5 Canvas documents in Animate
- Add interactivity with code snippets in Animate
- Creating custom HTML5 Components
- Using Components in HTML5 Canvas
- Creating custom Components: Examples
- Code Snippets for custom Components
- Best practices - Advertising with Animate
- Virtual Reality authoring and publishing
- Workspace and workflow
- Creating and managing Paint brushes
- Using Google fonts in HTML5 Canvas documents
- Using Creative Cloud Libraries and Adobe Animate
- Use the Stage and Tools panel for Animate
- Animate workflow and workspace
- Using web fonts in HTML5 Canvas documents
- Timelines and ActionScript
- Working with multiple timelines
- Set preferences
- Using Animate authoring panels
- Create timeline layers with Animate
- Export animations for mobile apps and game engines
- Moving and copying objects
- Templates
- Find and Replace in Animate
- Undo, redo, and the History panel
- Keyboard shortcuts
- How to use the timeline in Animate
- Creating HTML extensions
- Optimization options for Images and Animated GIFs
- Export settings for Images and GIFs
- Assets Panel in Animate
- Multimedia and Video
- Transforming and combining graphic objects in Animate
- Creating and working with symbol instances in Animate
- Image Trace
- How to use sound in Adobe Animate
- Exporting SVG files
- Create video files for use in Animate
- How to add a video in Animate
- Draw and create objects with Animate
- Reshape lines and shapes
- Strokes, fills, and gradients with Animate CC
- Working with Adobe Premiere Pro and After Effects
- Color Panels in Animate CC
- Opening Flash CS6 files with Animate
- Work with classic text in Animate
- Placing artwork into Animate
- Imported bitmaps in Animate
- 3D graphics
- Working with symbols in Animate
- Draw lines & shapes with Adobe Animate
- Work with the libraries in Animate
- Exporting Sounds
- Selecting objects in Animate CC
- Working with Illustrator AI files in Animate
- Applying blend modes
- Arranging objects
- Automating tasks with the Commands menu
- Multilanguage text
- Using camera in Animate
- Graphic filters
- Sound and ActionScript
- Drawing preferences
- Drawing with the Pen tool
- Platforms
- Convert Animate projects to other document type formats
- Custom Platform Support
- Create and publish HTML5 Canvas documents in Animate
- Creating and publishing a WebGL document
- How to package applications for AIR for iOS
- Publishing AIR for Android applications
- Publishing for Adobe AIR for desktop
- ActionScript publish settings
- Best practices - Organizing ActionScript in an application
- How to use ActionScript with Animate
- Accessibility in the Animate workspace
- Writing and managing scripts
- Enabling Support for Custom Platforms
- Custom Platform Support Overview
- Working with Custom Platform Support Plug-in
- Debugging ActionScript 3.0
- Enabling Support for Custom Platforms
- Exporting and Publishing
- How to export files from Animate CC
- OAM publishing
- Exporting SVG files
- Export graphics and videos with Animate
- Publishing AS3 documents
- Export animations for mobile apps and game engines
- Exporting Sounds
- Best practices - Tips for creating content for mobile devices
- Best practices - Video conventions
- Best practices - SWF application authoring guidelines
- Best practices - Structuring FLA files
- Best Practices to optimize FLA files for Animate
- ActionScript publish settings
- Specify publish settings for Animate
- Exporting projector files
- Export Images and Animated GIFs
- HTML publishing templates
- Working with Adobe Premiere Pro and After Effects
- Quick share and publish your animations
- Troubleshooting
Creating and organizing layers
Layers enable you to organize the artwork in your document. You can draw and edit objects on one layer without affecting objects on another layer. In areas of the Stage with nothing on a layer, you can see through it to the layers below.
To draw, paint, or otherwise modify a layer or folder, select the layer in the timeline to make it active. A pencil icon next to a layer or folder name in the timeline indicates that the layer or folder is active. Only one layer can be active at a time (although more than one layer can be selected at a time).
When you create an Animate document, it contains only one layer. To organize the artwork, animation, and other elements in your document, add more layers. You can also hide, lock, or rearrange layers. The number of layers you can create is limited only by your computer’s memory. Layers do not increase the file size of your published SWF file. Only the objects you place into layers add to the file size.
To organize and manage layers, create layer folders and place layers in them. You can expand or collapse layer folders in the timeline without affecting what you see on the stage. Use separate layers or folders for sound files, ActionScript, frame labels, and frame comments. Using separate layers helps you find these items quickly to edit them.
To enable creating sophisticated effects, use special guide layers to make drawing and editing easier, and to make mask layers.
There are five types of layers you can use in Animate:
Normal layers contain most of the artwork in an fla file.
Mask layers contain objects used as masks to hide selected portions of layers below them. For more information, see Using mask layers.
Masked layers are layers beneath a mask layer that you associate with the mask layer. Only the portion of the masked layer revealed by the mask is visible. For more information, see Using mask layers.
Guide layers contain strokes that can be used to guide the arrangement of objects on other layers. Also, you can use to guide the motion of classic tween animations on other layers. For more information, see Guide layers and Create classic tween motion along a path.
Guided layers are layers associated with a guide layer. The objects on the guided layer can be arranged or animated along the strokes on the guide layer. Guided layers can contain static artwork and classic tweens, but not motion tweens.
Motion Tween layers contain objects animated with motion tweens. For more information, see About tweened animation.
Armature layers contain objects with inverse kinematics bones attached. For more information, see Using the Bone Tool for inverse kinematics animation.
Normal, Mask, Masked, and Guide layers can contain motion tweens or inverse kinematic bones. When these items are present in one of these layers, there are limitations to the types of content that can be added to the layer. For more information, see Motion tweens and Using the Bone Tool for inverse kinematics animation.
Creating a layer
When you create a layer, it appears above the selected layer. The newly added layer becomes the active layer.
-
Do one of the following:
Click the new layer button
 at the bottom of the timeline.
Select Insert > Timeline > Layer.
Right-click (Windows) or control+click (Macintosh) a layer name in the timeline and select Insert Layer from the context menu.
Creating a layer folder
-
Do one of the following:
Select a layer or folder in the Timeline and select Insert > Timeline > Layer Folder.
Right-click (Windows) or control+click (Macintosh) a layer name in the Timeline and select Insert Folder from the context menu. The new folder appears above the layer or folder you selected.
Click the new folder icon
 at the bottom of the Timeline. The new folder appears above the layer or folder you selected.
Organizing layers and layer folders
To organize your document, rearrange layers and folders in the Timeline.
Layer folders organize your workflow by letting you place layers in a tree structure. To see the layers a folder contains without affecting which layers are visible on the Stage, expand or collapse the folder. Folders can contain both layers and other folders, allowing you to organize layers in much the same way you organize files on your computer.
The layer controls in the timeline affect all layers within a folder. For example, locking a layer folder locks all layers within that folder.
- To move a layer or layer folder into a layer folder, drag the layer or layer folder name to the destination layer folder name.
- To change the order of layers or folders, drag one or more layers or folders in the Timeline to the desired position.
- To expand or collapse a folder, click the triangle to the left of the folder name.
- To expand or collapse all folders, right-click (Windows) or control+click (Macintosh) and select Expand All Folders or Collapse All Folders.
Renaming a layer or folder
By default, Animate assigns names to new layers by the order in which they are created: Layer 1, Layer 2, and so on. To better reflect their contents, rename layers.
-
Do one of the following:
Double-click the name of the layer or folder in the timeline and enter a new name.
Right-click (Windows) or Control-click (Macintosh) the name of the layer or folder and select Properties from the context menu. Enter the new name in the Name box and click OK.
Select the layer or folder in the Timeline and select Modify > Timeline > Layer Properties. Enter the new name in the Name box and click OK.
Selecting a layer or folder
-
Do one of the following:
Click the name of a layer or folder in the Timeline.
Click any frame in the Timeline of the layer to select.
Select an object on the Stage that is located in the layer to select.
To select contiguous layers or folders, Shift-click their names in the Timeline.
To select non-contiguous layers or folders, Control-click (Windows) or Command-click (Macintosh) their names in the Timeline.
Copying frames from a single layer
-
Select a range of frames in a layer. To select the entire layer, click the layer name in the Timeline.
-
Select Edit > Timeline > Copy Frames.
-
Click the frame where you want to begin pasting and select Edit > Timeline > Paste Frames. To replace the exact number of copied frames on the target timeline, use the Paste and Overwrite Frames option.
Paste and overwrite frames workflow A. Select frames and copy. B. Right-click the frame on which you want to paste and select Paste and Overwrite Frames. C. The pasted frames overwrite the exact number of frames on the timeline.
Paste and overwrite frames workflow
Copying frames from a layer folder
-
To select the entire folder, collapse the folder (click the triangle to the left of the folder name in the Timeline) and click the folder name.
-
Select Edit > Timeline > Copy Frames.
-
To create a folder, select Insert > Timeline > Layer Folder.
-
Click the new folder and select Edit > Timeline > Paste Frames.
Deleting a layer or folder
-
To select the layer or folder, click its name in the Timeline or any frame in the layer.
-
Do one of the following:
Click the delete layer button in the Timeline.
Drag the layer or folder to the Delete Layer button.
Right-click (Windows) or Control+click (Macintosh) the layer or folder name and select Delete Layers from the context menu.
 When you delete a layer folder, all the enclosed layers and their content are also deleted.
Locking or unlocking one or more layers or folders
To lock a layer or folder, click in the lock column to the right of the name. To unlock the layer or folder, click in the Lock column again.
To lock all layers and folders, click the padlock icon. To unlock all layers and folders, click it again.
To lock or unlock multiple layers or folders, drag through the Lock column.
To lock all other layers or folders, use Alt+click (Windows) or Option+click (Macintosh) in the lock column. To unlock all layers or folders, use Alt+click or Option+click (Macintosh) in the lock column again.
Copying and pasting layers (CS5.5 only)
You can copy entire layers and layer folders in the timeline and paste them into the same timeline or separate timelines. Any type of layer can be copied.
When you copy and paste layers, the layer folder structure of copied layers is preserved.
-
Select one or more layers in the timeline by clicking the layer name. Shift+click to select contiguous layers. Control+click (Windows) or Command+click (Macintosh) to select non-contiguous layers.
-
Choose Edit > Timeline > Copy Layers or Cut Layers. You can also right-click the layers and choose Copy Layers or Cut Layers from the context menu.
-
In the timeline you want to paste into, select the layer immediately below where you want the pasted layers to be inserted.
-
Choose Edit > Timeline > Paste Layers.
The layers appear in the timeline above the layer you selected. If you have a layer folder selected, the pasted layers appear inside the folder.
To place a layer into a mask or guide layer, you must first select a layer under that mask or guide and then paste. You cannot paste either a mask, guide, or folder layer underneath a mask or guide layer.
You can also duplicate layers by selecting layers and choosing Edit > Timeline > Duplicate Layers. The new layers have the word “copy” appended to the layer name.
Setting properties to multiple layers
-
In Animate, create a FLA file or open an existing file.
-
Select those layers whose properties you want to modify, right-click, and select Properties.
-
In the Layer Properties dialog, modify the properties.
-
Click OK.
Showing or hiding a layer or folder
A red X next to the name of a layer or folder in the timeline indicates that a layer or folder is hidden. In the publish settings, you can choose whether hidden layers are included when you publish a SWF file.
To hide a layer or folder, click in the Eye column to the right of the layer or folder name in the timeline. To show the layer or folder, click in it again.
To hide all the layers and folders in the timeline, click the eye icon. To show all layers and folders, click it again.
To show or hide multiple layers or folders, drag through the eye icon column.
To hide all layers and folders other than the current layer or folder, Alt+click (Windows) or Option-click (Macintosh) in the Eye icon column. To show all layers and folders, Alt+click or Option-click it again.
Viewing the contents of a layer as outlines
To distinguish which layer an object belongs to, display all objects on a layer as colored outlines.
To display all objects on that layer as outlines, click in the Outline column to the right of the layer’s name. To turn off outline display, click in it again.
To display objects on all layers as outlines, click the outline icon. To turn off outline display on all layers, click it again.
To display objects on all layers other than the current layer as outlines, Alt+click (Windows) or Option-click (Macintosh) in the Outline column. To turn off the outline display for all layers, Alt+click or Option-click in it again.
![]() Motion paths on the layer also use the layer outline color.
Motion paths on the layer also use the layer outline color.
Change a layer’s outline color
-
Do one of the following:
Double-click the layer’s icon (the icon to the left of the layer name) in the timeline.
Right-click (Windows) or Control-click (Macintosh) the layer name and select Properties from the context menu.
Select the layer in the timeline and select Modify > Timeline > Layer Properties.
-
In the Layer Properties dialog, click the Outline color palette, select a new color, and click OK.
Viewing layers and layer folders
Showing or hiding a layer or folder
A red X next to the name of a layer or folder in the Timeline indicates that a layer or folder is hidden. In the publish settings, you can choose whether hidden layers are included when you publish a SWF file.
To hide a layer or folder, click in the Eye column to the right of the layer or folder name in the timeline. To show the layer or folder, click in it again.
To hide all the layers and folders in the timeline, click the eye icon. To show all layers and folders, click it again.
To show or hide multiple layers or folders, drag through the eye icon column.
To hide all layers and folders other than the current layer or folder, Alt+click (Windows) or Option-click (Macintosh) in the eye icon column. To show all layers and folders, Alt+click or Option-click it again.
Viewing the contents of a layer as outlines
To distinguish which layer an object belongs to, display all objects on a layer as colored outlines.
To display all objects on that layer as outlines, click in the Outline column to the right of the layer’s name. To turn off outline display, click in it again.
To display objects on all layers as outlines, click the outline icon. To turn off outline display on all layers, click it again.
To display objects on all layers other than the current layer, Alt+click (Windows) or Option-click (Macintosh) in the outline column. To turn off the outline display for all layers, Alt+click or Option-click in it again.
Changing an outline color of a layer
-
Do one of the following:
Double-click the layer’s icon (the icon to the left of the layer name) in the timeline.
Right-click (Windows) or Control+click (Macintosh) the layer name and select Properties from the context menu.
Select the layer in the timeline and select Modify > Timeline > Layer Properties.
-
In the Layer Properties dialog, click the Outline color palette, select a new color, and click OK.
![]() Motion paths on the layer also use the layer outline color.
Motion paths on the layer also use the layer outline color.
Setting layer transparency
-
In Animate, create an fla file or open an existing one.
-
Shift+click the eye icon column in the timeline to set the visibility to transparent.
 Shift+click has no effect on the hidden layers.
-
Use any of the following options to set layer transparency:
- Right-click any layer and select Properties from the context menu. In the Layer Properties dialog, select Visibility>Transparent.
- Right-click any layer and select Show Others Transparent.
Layer Properties Layer Properties -
Click OK.
![]() Layer transparency has no effect on hidden layers.
Layer transparency has no effect on hidden layers.
Using advanced layers
In Animate, with Advanced Layers mode, all layers in timeline are published as symbols. Advanced layers mode allows you to access the following features:
Advanced Layers mode is enabled by default. You can enable or disable Advanced Layers using Modify > Document settings. After applying the changes, click Make default to preserve current setting for the subsequent documents and across Animate sessions.
While accessing these symbols using script in Animate, you have to call them using layer as an object. For example, when you are not using advanced layers, you can directly access a symbol using a script similar to the following sample:
getchildbyname("symbol1");
But, when you use advanced layers, you can access the symbol only through a layer by using a script similar to the following sample:
Layer=getchildbyname("L1");
Layer.getchildbyname("symbol1");
A sample code to access symbols using advanced layers for AS3 document type:
Var Layer:MovieClip =MovieClip(getchildbyname("L1"));
Layer.getchildbyname("symbol1");
A sample code to access symbols using advanced layers for HTML5 canvas document type:
Layer=this.getchildbyname("L1");
Layer.getchildbyname("symbol1");
The following illustration depicts how you can access a symbol using script with advanced layers and without advanced layers.


![]() The size of your published animation projects can increase when you use advanced layers in Animate. If you find any issues while accessing camera or layer depth features, check if the advanced layers is ON. If it is disabled, enable it to get expected behavior.
The size of your published animation projects can increase when you use advanced layers in Animate. If you find any issues while accessing camera or layer depth features, check if the advanced layers is ON. If it is disabled, enable it to get expected behavior.
Applying layer effects
The filters and color effects used to be applicable only to movie clips. With the advanced layers, filters and color effects can now be applied to a selective frame(s), which in turn applies to all its content including shapes, drawing objects, graphic symbols, and so on. Layer effects can also be tweened using classic, shape, and IK tweens across frames.
You can apply layer effects on individual or on multiple frames by selecting desired frames. You can also apply layer effects on all the frames of layer by selecting the entire layer. Layer effects can also be applied on symbol's timeline such as movie clip and graphic symbol and across all the scenes.
![]() Layer effects can be applied only when Advanced Layers mode is ON. You may have to enable Advanced Layers mode explicitly for files to use this functionality.
Layer effects can be applied only when Advanced Layers mode is ON. You may have to enable Advanced Layers mode explicitly for files to use this functionality.
Using filters for frames
To add filters on a particular frame, first select the frame. Properties Inspector panel loads the frame specific properties. Click the + icon in Filters drop-down list.


When you add filters on frames, the Property Inspector appears as shown in the following screenshot.
You can set the properties for each of the filters as per your requirement and apply them at a frame level. Tweening is applicable for all the frame filters.


![]() Layer effects are supported only on ActionScript 3 document type. Motion tween and camera layers do not support layer effects.
Layer effects are supported only on ActionScript 3 document type. Motion tween and camera layers do not support layer effects.
Using color effects
To apply color effect on a particular frame, first select the frame. Property Inspector panel loads the frame specific properties. Choose any of the desired color property from Property Inspector panel.


Using blend modes
To apply blend modes on a particular frame, first select the frame and choose a blending mode listed under Display section of the Frame Properties panel.
When you apply blending on layers or frames, it gets applied to all of its contents including shapes, drawing objects, and graphic symbols. All objects on one layer blend with objects on another layer according to the blending mode applied to that frame.


For more information on blend modes, see Applying blend modes.
How to enhance your animations using Layer Effects
Applying layer depth
As an Animator, you can place the layers in different planes of 2D animation creating an illusion of depth.
You can dynamically change depths of layers from Layer Depth panel. To open layer depth panel, click Window > Layer Depth.


![]() You can set the minimum and maximum values of layer depth within -5000 to 10000 range.
You can set the minimum and maximum values of layer depth within -5000 to 10000 range.
As shown in the above screenshot, the layer depth values are displayed next to each layer name for a given frame.
- Hover the mouse on each value, click, and drag slider to your right or left.
- To decrease the depth, drag slider to your left. To increase the depth, drag slider to your right.
- You can use lower positive values to represent objects that are closer and higher positive values to represent far-away objects.
You can tween the layer depth values in any of the tween spans for your animation.
Each layer is represented with unique colored lines in layer depth panel. You can view the colors representing each of the layers in timeline.
You can also increase or decrease the depth of objects in each layer by moving the multi-colored lines up or down.
- To decrease depth of objects in a layer, click and drag the line in upward direction.
- To increase depth of objects in a layer, click and drag the line in downward direction.
An illustration depicting animations with and without layer depth:




An illustration depicting an animation when layer depth is applied:
You can use the camera on multi-plane layers to create a parallax effect or to zoom into the content on a plane. You can also lock the camera on a specific layer, or apply camera effects at runtime using interactive APIs. For more information, see Creating parallax effect with camera and layer depth.
![]() Layer depth is applicable only on main timeline.
Layer depth is applicable only on main timeline.
Maintain size for layer depth
You can change layer depth of objects without affecting the size and position of objects. To use maintain size functionality, click the Maintain size button at the upper-right corner of the Layer Depth panel.
You can use maintain size option in two modes:
- Click Maintain size button and modify the layer depth of the desired layer. Maintain Size button toggles up automatically.
- Press and hold the Alt key to temporarily enable Maintain size option while dragging the layer depth values.


Applying layer depth at runtime
You can also introduce camera on objects at runtime and apply effects by using camera APIs. For more information, see Using interactive camera at runtime.
Layer depth API for AS3
You can manage the layers at runtime by using APIs. For example, at runtime when you want to introduce an extra layer in the animation or decrease the depth of one of the layers in the animation.
|
Method |
Prototype |
Example |
Description |
|---|---|---|---|
|
setLayerZDepth |
fl.Layer.setLayerZDepth(timeline, |
fl.Layer.setLayerZDepth("layerName", 100); |
Set Z depth value of a particular layer. |
|
getLayerZDepth |
fl.Layer.getLayerZDepth(layerName) :zDepth |
fl.Layer.getLayerZDepth("layerName"); |
Return the Z depth value of a particular layer. |
|
addNewLayer |
fl.Layer.addNewLayer(layerName, |
fl.Layer.addNewLayer("layerName",-80); |
Add new layer to timeline and set the Z depth. |
|
removeLayer |
fl.Layer.removeLayer(layerName) |
fl.Layer.removeLayer("layerName"); |
Remove a layer from timeline. |
Layer depth API for HTML canvas
|
Method |
Prototype |
Example |
Description |
|---|---|---|---|
|
setLayerZDepth |
AdobeAn.Layer.setLayerZDepth(layerName, |
console.log(fl.Layer.setLayerZDepth |
Set Z depth value of a particular layer. |
|
getLayerZDepth |
AdobeAn.Layer.getLayerZDepth(layerName) |
console.log(fl.Layer.getLayerZDepth |
Return the Z depth value of a particular layer. |
Layer parenting
Animate allows you to parent one layer to another. Layer parenting is an easy way to allow one layer/object of your animation to control over the other layer/object. As an animation designer or a game designer, you can speed up your animation time as you can control movements of different parts of a character more easily.
Layer parenting view requires the Advanced layers to be enabled. By default, Advanced layers is switched ON for new files. You can enable layer parenting view by clicking the hierarchy symbol icon at the top-right corner of timeline.


![]() Parenting for warped objects works only when the child layer object’s transformation point is on the parent layer object.
Parenting for warped objects works only when the child layer object’s transformation point is on the parent layer object.
Parent and child layers
In parenting view, when you drag layer 1 over to layer 2, then layer 1 becomes the child of the parent layer 2. The object on the child layer inherits the position and rotation of the object on the parent layer apart from carrying its own properties. So, when you move or rotate the parent, the child also moves or rotates along with the parent. You can create multiple parent-child relationships to create a hierarchy.
Parenting layers
You can connect one layer to another layer, by clicking on the layer handle (color head) and dragging it over the other layer. Alternatively, you can click anywhere on the horizontal rectangular space adjacent to layer name and drag it over the other layer. You can also use single click on any layer and choose the parent layer for it from the pop-up list.
A dotted line appears adjacent to the layer’s color head as soon as you click and try to drag the line. A parent-child connection establishes between the two layers as soon as you release the click and drag action.


The left most color head in the layer parenting view hierarchy represents the parent. The parent-child hierarchy moves from left to right.
You can remove the connection by clicking on any layer’s color head and dragging the dotted line and releasing it. Alternatively, you can click on the horizontal space and click Remove parent as shown in the screenshot below.


In the screenshots below, you can see the before and after views of layers hierarchy and positions when you use layer parenting.


A sample illustration representing the usage of layer parenting for human body parts is show below.


In the above illustration,
- Torso is the parent of all the parts of the body.
- Legs_thigh is the parent of various other parts of a leg such as Sneaker, Leg_lower, and Ankle.
- Head is a child of the parent, Neck and Torso is the parent of Neck. So, whenever you drag the neck away from the body, the head part also moves along with it.
![]() Parenting is a frame property you need to set for each key-frame on the child layer. On a key-frame, you can break or re-parent the child layer to another parent layer.
Parenting is a frame property you need to set for each key-frame on the child layer. On a key-frame, you can break or re-parent the child layer to another parent layer.
Starting Animate 2022, layer parenting has been enhanced to propagate Scale, Skew, and Flip properties in addition to Position and Rotation properties of the parent object. By default, all the properties are propagated however the scale, skew and flip propagation can be turned OFF or turned ON from the Parenting popup which can be invoked by long pressing Show Parenting view button in the Timeline panel as shown below.
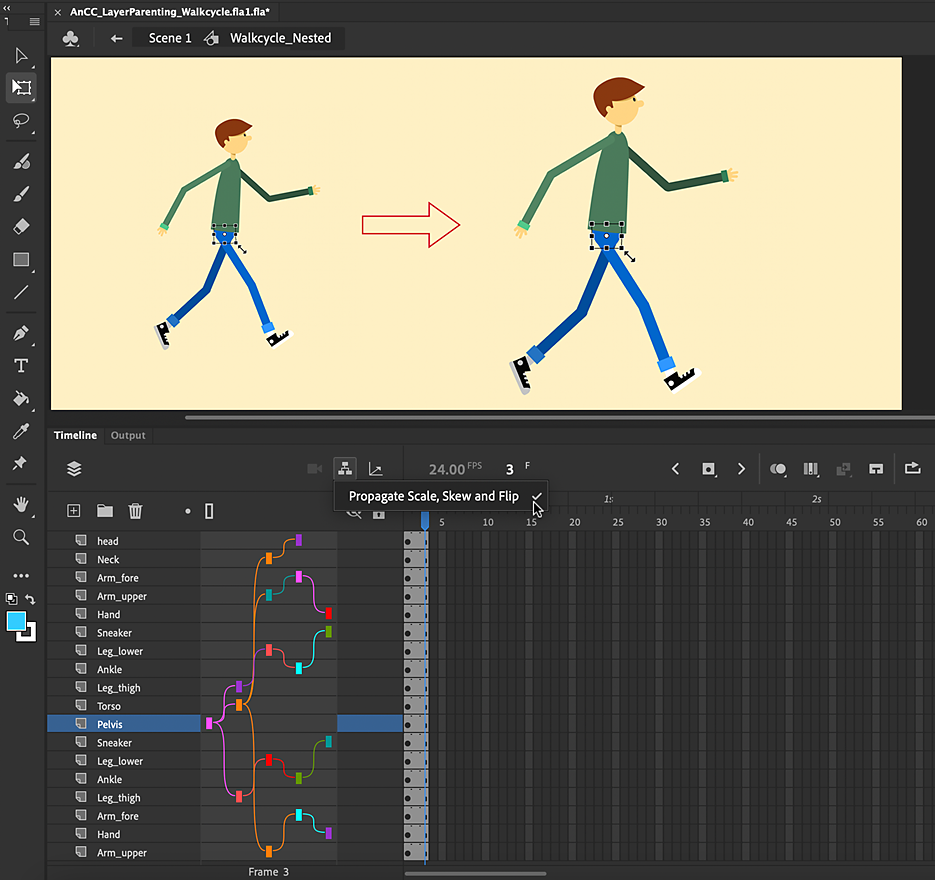

In addition, propagate scale, skew and flip settings can be toggled for momentary changes using a modifier key when transformed using the Free Transform tool. Temporary override of this setting can be done by holding the Accent(`) key while Scaling or Skewing the object using the Free Transform tool. This comes in handy when you want to momentarily toggle the propagation behavior for the newly supported properties.


