- Photoshop User Guide
- Introduction to Photoshop
- Photoshop and other Adobe products and services
- Photoshop on mobile (not available in mainland China)
- Photoshop on the iPad (not available in mainland China)
- Photoshop on the iPad | Common questions
- Get to know the workspace
- System requirements | Photoshop on the iPad
- Create, open, and export documents
- Add photos
- Work with layers
- Draw and paint with brushes
- Make selections and add masks
- Retouch your composites
- Work with adjustment layers
- Adjust the tonality of your composite with Curves
- Apply transform operations
- Crop and rotate your composites
- Rotate, pan, zoom, and reset the canvas
- Work with Type layers
- Work with Photoshop and Lightroom
- Get missing fonts in Photoshop on the iPad
- Japanese Text in Photoshop on the iPad
- Manage app settings
- Touch shortcuts and gestures
- Keyboard shortcuts
- Edit your image size
- Livestream as you create in Photoshop on the iPad
- Correct imperfections with the Healing Brush
- Create brushes in Capture and use them in Photoshop on the iPad
- Work with Camera Raw files
- Create and work with Smart Objects
- Adjust exposure in your images with Dodge and Burn
- Auto adjustment commands in Photoshop on the iPad
- Smudge areas in your images with Photoshop on the iPad
- Saturate or desaturate your images using Sponge tool
- Content aware fill for iPad
- Photoshop on the web (not available in mainland China)
- Photoshop (beta) (not available in mainland China)
- Generative AI (not available in mainland China)
- Common questions on generative AI in Photoshop
- Generative Fill in Photoshop on the desktop
- Generate Image with descriptive text prompts
- Generative Expand in Photoshop on the desktop
- Replace background with Generate background
- Get new variations with Generate Similar
- Select an AI model for generative control
- Generative Fill in Photoshop on the iPad
- Generative Expand in Photoshop on the iPad
- Generative AI features in Photoshop on the web
- Content authenticity (not available in mainland China)
- Cloud documents (not available in mainland China)
- Photoshop cloud documents | Common questions
- Photoshop cloud documents | Workflow questions
- Manage and work with cloud documents in Photoshop
- Upgrade cloud storage for Photoshop
- Unable to create or save a cloud document
- Solve Photoshop cloud document errors
- Collect cloud document sync logs
- Invite others to edit your cloud documents
- Share documents for review
- Workspace
- Workspace basics
- Preferences
- Learn faster with the Photoshop Discover Panel
- Create documents
- Place files
- Default keyboard shortcuts
- Customize keyboard shortcuts
- Tool galleries
- Performance preferences
- Contextual Task Bar
- Use tools
- Presets
- Grid and guides
- Touch gestures
- Use the Touch Bar with Photoshop
- Touch capabilities and customizable workspaces
- Technology previews
- Metadata and notes
- Place Photoshop images in other applications
- Rulers
- Show or hide non-printing Extras
- Specify columns for an image
- Undo and history
- Panels and menus
- Position elements with snapping
- Position with the Ruler tool
- Organize, share, and collaborate with Projects
- Refine Adobe Firefly generations
- Image and color basics
- How to resize images
- Work with raster and vector images
- Image size and resolution
- Acquire images from cameras and scanners
- Create, open, and import images
- View images
- Invalid JPEG Marker error | Opening images
- Viewing multiple images
- Customize color pickers and swatches
- High dynamic range images
- Match colors in your image
- Convert between color modes
- Color modes
- Erase parts of an image
- Blending modes
- Choose colors
- Customize indexed color tables
- Image information
- Distort filters are unavailable
- About color
- Color and monochrome adjustments using channels
- Choose colors in the Color and Swatches panels
- Sample
- Color mode or Image mode
- Color cast
- Add a conditional mode change to an action
- Add swatches from HTML CSS and SVG
- Bit depth and preferences
- Layers
- Layer basics
- Nondestructive editing
- Create and manage layers and groups
- Select, group, and link layers
- Place images into frames
- Layer opacity and blending
- Mask layers
- Apply Smart Filters
- Layer comps
- Move, stack, and lock layers
- Mask layers with vector masks
- Manage layers and groups
- Layer effects and styles
- Edit layer masks
- Extract assets
- Reveal layers with clipping masks
- Generate image assets from layers
- Work with Smart Objects
- Blending modes
- Combine multiple images into a group portrait
- Combine images with Auto-Blend Layers
- Align and distribute layers
- Copy CSS from layers
- Load selections from a layer or layer mask's boundaries
- Knockout to reveal content from other layers
- Selections
- Get started with selections
- Make selections in your composite
- Select and Mask workspace
- Select with the marquee tools
- Select with the lasso tools
- Adjust pixel selections
- Move, copy, and delete selected pixels
- Create a temporary quick mask
- Select a color range in an image
- Convert between paths and selection borders
- Channel basics
- Save selections and alpha channel masks
- Select the image areas in focus
- Duplicate, split, and merge channels
- Channel calculations
- Get started with selections
- Image adjustments
- Replace object colors
- Perspective warp
- Reduce camera shake blurring
- Healing brush examples
- Export color lookup tables
- Adjust image sharpness and blur
- Understand color adjustments
- Apply a Brightness/Contrast adjustment
- Adjust shadow and highlight detail
- Levels adjustment
- Adjust hue and saturation
- Adjust vibrance
- Adjust color saturation in image areas
- Make quick tonal adjustments
- Apply special color effects to images
- Enhance your image with color balance adjustments
- High dynamic range images
- View histograms and pixel values
- Match colors in your image
- Crop and straighten photos
- Convert a color image to black and white
- Adjustment and fill layers
- Curves adjustment
- Blending modes
- Target images for press
- Adjust color and tone with Levels and Curves eyedroppers
- Adjust HDR exposure and toning
- Dodge or burn image areas
- Make selective color adjustments
- Image repair and restoration
- Image enhancement and transformation
- Drawing and painting
- Paint symmetrical patterns
- Draw rectangles and modify stroke options
- About drawing
- Draw and edit shapes
- Create star or any other pointed shape
- Painting tools
- Create and modify brushes
- Blending modes
- Add color to paths
- Edit paths
- Paint with the Mixer Brush
- Brush presets
- Gradients
- Gradient interpolation
- Fill and stroke selections, layers, and paths
- Draw with the Pen tools
- Create patterns
- Generate a pattern using the Pattern Maker
- Manage paths
- Manage pattern libraries and presets
- Draw or paint with a graphics tablet
- Create textured brushes
- Add dynamic elements to brushes
- Gradient
- Paint stylized strokes with the Art History Brush
- Paint with a pattern
- Sync presets on multiple devices
- Migrate presets, actions, and settings
- Text
- Filters and effects
- Saving and exporting
- Color Management
- Web, screen, and app design
- Video and animation
- Printing
- Automation
- Troubleshooting
Type in Adobe Photoshop consists of vector-based type outlines—mathematically defined shapes that describe the letters, numbers, and symbols of a typeface. Many typefaces are available in more than one format, the most common formats being Type 1 (also called PostScript fonts), TrueType, OpenType, New CID, and CID nonprotected (Japanese only).
Photoshop preserves vector-based type outlines and uses them when you scale or resize type, save a PDF or EPS file, or print the image to a PostScript printer. As a result, it’s possible to produce type with crisp, resolution-independent edges.
If you import bitmap type layers created in older versions of Photoshop or Photoshop Elements, choose Type > Update All Text Layers to convert to vector type.
About type layers
Type layers aren’t created for images in Multichannel, Bitmap, or Indexed Color mode, because these modes don’t support layers. In these modes, type appears on the background as rasterized text.
When you create type, a new type layer is added to the Layers panel. After you create a type layer, you can edit the type and apply layer commands to it.
Once you make a change to a type layer that requires it to be rasterized, however, Photoshop converts the vector-based type outlines to pixels. Rasterized type no longer has vector outlines and is uneditable as type. See Rasterize type layers.
You can make the following changes to a type layer and still edit the type:
- Change the orientation of type.
- Apply anti-aliasing.
- Convert between point type and paragraph type.
- Create a work path from type.
- Apply transformation commands from the Edit menu, except for Perspective and Distort.
To transform part of the type layer, you must first rasterize the type layer.
Use layer styles.
Use fill shortcuts (see Keys for painting).
Warp type to conform to a variety of shapes.
Entering type
There are three ways to create type: at a point, inside a paragraph, and along a path.
Point type is a horizontal or vertical line of text that begins where you click in the image. Entering text at a point is a useful way to add a few words to your image.
Paragraph type uses boundaries to control the flow of characters, either horizontally or vertically. Entering text this way is useful when you want to create one or more paragraphs, such as for a brochure.


Type on a path flows along the edge of an open or a closed path. When you enter text horizontally, characters appear along the path perpendicular to the baseline. When you enter text vertically, characters appear along the path parallel to the baseline. In either case, the text flows in the direction in which points were added to the path.
If you enter more text that can fit within a paragraph boundary or along a path, a small box or circle containing a plus symbol (+) appears in place of a handle in the corner of the boundary or anchor point at the end of the path.
Clicking in an image with a type tool puts
the type tool in edit mode. When the tool is in edit mode, you can
enter and edit characters as well as perform some other commands
from the various menus; however, certain operations require that
you first commit changes to the type layer. To determine whether
a type tool is in edit mode, look in the options bar—if you see
the Commit button ![]() and the
Cancel button
and the
Cancel button ![]() , the
type tool is in edit mode.
, the
type tool is in edit mode.
Enter point type
When you enter point type, each line of type is independent—the line expands or shrinks as you edit it, but it doesn’t wrap to the next line. The type you enter appears in a new type layer.
-
Select the Horizontal Type tool
 or
the Vertical Type tool
  .
.
-
Click in the image to set an insertion point for the type. The small line through the I‑beam marks the baseline of the type (the imaginary line on which type rests). For vertical type, the baseline marks the center axis of the characters.
-
Select additional type options in the options bar, Character panel, or Paragraph panel.
-
Enter the characters. To begin a new line, press Enter (Windows) or Return (Mac OS).Note
You can also transform point type while in edit mode. Hold down the Ctrl (Windows) or Command (Mac OS) key. A bounding box appears around the type. You can grab a handle to scale or skew the type. You can also rotate the bounding box.
-
When you finish entering or editing the type, do one of the following:
Click the Commit button
 in
the options bar.
in
the options bar.Press the Enter key on the numeric keypad.
Press Ctrl+Enter (Windows) or Command+Return (Mac OS).
Select any tool in the toolbox; click in the Layers, Channels, Paths, Actions, History, or Styles panel; or select any available menu command.
Enter paragraph type
When you enter paragraph type, the lines of type wrap to fit the dimensions of the bounding box. You can enter multiple paragraphs and select a paragraph justification option.
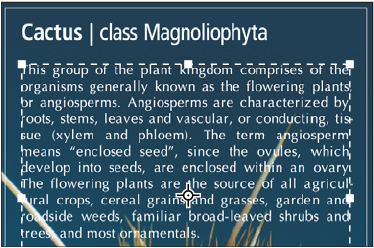
You can resize the bounding box, causing the type to reflow within the adjusted rectangle. You can adjust the bounding box while you enter type or after you create the type layer. You can also use the bounding box to rotate, scale, and skew type.
-
Select the Horizontal Type tool
 or
the Vertical Type tool
  .
.
-
Do one of the following:
Drag diagonally to define a bounding box for the type.
Hold down Alt (Windows) or Option (Mac OS) as you click or drag to display the Paragraph Text Size dialog box. Enter values for Width and Height, and click OK.
-
Select additional type options in the options bar, Character panel, Paragraph panel, or Layer > Type submenu.
-
Enter the characters. To begin a new paragraph, press Enter (Windows) or Return (Mac OS). If you enter more type than can fit in the bounding box, the overflow icon
 appears
on the bounding box.
-
If desired, resize, rotate, or skew the bounding box.
-
Commit the type layer by doing one of the following:
Click the Commit button
 in
the options bar.
in
the options bar.Press the Enter key on the numeric keypad.
Press Ctrl+Enter (Windows) or Command+Return (Mac OS).
Select any tool in the toolbox; click in the Layers, Channels, Paths, Actions, History, or Styles panel; or select any available menu command.
The type you enter appears in a new type layer.
Paste lorem-ipsum placeholder text
Lorem-ipsum placeholder text lets you quickly fill a text block for layout purposes.
-
Select a type tool, and click to insert the cursor in an existing text line or box.
-
Choose Type > Paste Lorem Ipsum.
Resize or transform a type bounding box
-
Display the bounding box handles of paragraph type. With the Type tool
 active,
select the type layer in the Layers panel, and click in
the text flow in the image.
Note
active,
select the type layer in the Layers panel, and click in
the text flow in the image.
NoteYou can transform point type while in edit mode. Hold down the Ctrl (Windows) or Command (Mac OS) key, and a bounding box appears around the type.
To resize the bounding box, position the pointer over a handle—the pointer turns into a double arrow
 —and drag. Shift-drag to maintain the proportions of the bounding box.
To rotate the bounding box, position the pointer outside the bounding border—the pointer turns into a curved, two‑sided arrow
 —and drag. Shift-drag to constrain the rotation to 15° increments. To change the center of rotation, Ctrl-drag (Windows) or Command-drag (Mac OS) the center point to a new location. The center point can be outside the bounding box.
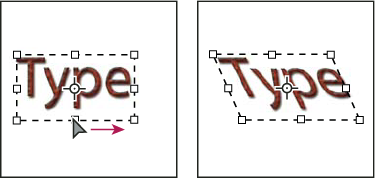
To skew the bounding box, hold down Ctrl (Windows) or Command (Mac OS) and drag one of the middle handles. The pointer turns into an arrowhead
 .
.

Skewing type using the bounding box 
Skewing type using the bounding box To scale the type as you resize the bounding box, Ctrl-drag (Windows) or Command-drag (Mac OS) a corner handle.
To resize the bounding box from the center point, Alt-drag (Windows) or Option-drag (Mac OS) a corner handle.
Convert between point type and paragraph type
You can convert point type to paragraph type to adjust the flow of characters within a bounding box. Alternatively, you can convert paragraph type to point type to make each text line flow independently from the others. When you convert from paragraph type to point type, a carriage return is added at the end of each line of type (with the exception of the last line).
-
Select the type layer in the Layers panel.
-
Choose Type > Convert To Point Text or Type > Convert To Paragraph Text.
NoteWhen you convert paragraph type to point type, all characters that overflow the bounding box are deleted. To avoid losing text, adjust the bounding box so that all type is visible prior to conversion.
