- Photoshop User Guide
- Introduction to Photoshop
- Photoshop and other Adobe products and services
- Photoshop on mobile (not available in mainland China)
- Photoshop on the iPad (not available in mainland China)
- Photoshop on the iPad | Common questions
- Get to know the workspace
- System requirements | Photoshop on the iPad
- Create, open, and export documents
- Add photos
- Work with layers
- Draw and paint with brushes
- Make selections and add masks
- Retouch your composites
- Work with adjustment layers
- Adjust the tonality of your composite with Curves
- Apply transform operations
- Crop and rotate your composites
- Rotate, pan, zoom, and reset the canvas
- Work with Type layers
- Work with Photoshop and Lightroom
- Get missing fonts in Photoshop on the iPad
- Japanese Text in Photoshop on the iPad
- Manage app settings
- Touch shortcuts and gestures
- Keyboard shortcuts
- Edit your image size
- Livestream as you create in Photoshop on the iPad
- Correct imperfections with the Healing Brush
- Create brushes in Capture and use them in Photoshop on the iPad
- Work with Camera Raw files
- Create and work with Smart Objects
- Adjust exposure in your images with Dodge and Burn
- Auto adjustment commands in Photoshop on the iPad
- Smudge areas in your images with Photoshop on the iPad
- Saturate or desaturate your images using Sponge tool
- Content aware fill for iPad
- Photoshop on the web (not available in mainland China)
- Photoshop (beta) (not available in mainland China)
- Generative AI (not available in mainland China)
- Common questions on generative AI in Photoshop
- Generative Fill in Photoshop on the desktop
- Generate Image with descriptive text prompts
- Generative Expand in Photoshop on the desktop
- Replace background with Generate background
- Get new variations with Generate Similar
- Select an AI model for generative control
- Generative Fill in Photoshop on the iPad
- Generative Expand in Photoshop on the iPad
- Generative AI features in Photoshop on the web
- Content authenticity (not available in mainland China)
- Cloud documents (not available in mainland China)
- Photoshop cloud documents | Common questions
- Photoshop cloud documents | Workflow questions
- Manage and work with cloud documents in Photoshop
- Upgrade cloud storage for Photoshop
- Unable to create or save a cloud document
- Solve Photoshop cloud document errors
- Collect cloud document sync logs
- Invite others to edit your cloud documents
- Share documents for review
- Workspace
- Workspace basics
- Preferences
- Learn faster with the Photoshop Discover Panel
- Create documents
- Place files
- Default keyboard shortcuts
- Customize keyboard shortcuts
- Tool galleries
- Performance preferences
- Contextual Task Bar
- Use tools
- Presets
- Grid and guides
- Touch gestures
- Use the Touch Bar with Photoshop
- Touch capabilities and customizable workspaces
- Technology previews
- Metadata and notes
- Place Photoshop images in other applications
- Rulers
- Show or hide non-printing Extras
- Specify columns for an image
- Undo and history
- Panels and menus
- Position elements with snapping
- Position with the Ruler tool
- Organize, share, and collaborate with Projects
- Refine Adobe Firefly generations
- Image and color basics
- How to resize images
- Work with raster and vector images
- Image size and resolution
- Acquire images from cameras and scanners
- Create, open, and import images
- View images
- Invalid JPEG Marker error | Opening images
- Viewing multiple images
- Customize color pickers and swatches
- High dynamic range images
- Match colors in your image
- Convert between color modes
- Color modes
- Erase parts of an image
- Blending modes
- Choose colors
- Customize indexed color tables
- Image information
- Distort filters are unavailable
- About color
- Color and monochrome adjustments using channels
- Choose colors in the Color and Swatches panels
- Sample
- Color mode or Image mode
- Color cast
- Add a conditional mode change to an action
- Add swatches from HTML CSS and SVG
- Bit depth and preferences
- Layers
- Layer basics
- Nondestructive editing
- Create and manage layers and groups
- Select, group, and link layers
- Place images into frames
- Layer opacity and blending
- Mask layers
- Apply Smart Filters
- Layer comps
- Move, stack, and lock layers
- Mask layers with vector masks
- Manage layers and groups
- Layer effects and styles
- Edit layer masks
- Extract assets
- Reveal layers with clipping masks
- Generate image assets from layers
- Work with Smart Objects
- Blending modes
- Combine multiple images into a group portrait
- Combine images with Auto-Blend Layers
- Align and distribute layers
- Copy CSS from layers
- Load selections from a layer or layer mask's boundaries
- Knockout to reveal content from other layers
- Selections
- Get started with selections
- Make selections in your composite
- Select and Mask workspace
- Select with the marquee tools
- Select with the lasso tools
- Adjust pixel selections
- Move, copy, and delete selected pixels
- Create a temporary quick mask
- Select a color range in an image
- Convert between paths and selection borders
- Channel basics
- Save selections and alpha channel masks
- Select the image areas in focus
- Duplicate, split, and merge channels
- Channel calculations
- Get started with selections
- Image adjustments
- Replace object colors
- Perspective warp
- Reduce camera shake blurring
- Healing brush examples
- Export color lookup tables
- Adjust image sharpness and blur
- Understand color adjustments
- Apply a Brightness/Contrast adjustment
- Adjust shadow and highlight detail
- Levels adjustment
- Adjust hue and saturation
- Adjust vibrance
- Adjust color saturation in image areas
- Make quick tonal adjustments
- Apply special color effects to images
- Enhance your image with color balance adjustments
- High dynamic range images
- View histograms and pixel values
- Match colors in your image
- Crop and straighten photos
- Convert a color image to black and white
- Adjustment and fill layers
- Curves adjustment
- Blending modes
- Target images for press
- Adjust color and tone with Levels and Curves eyedroppers
- Adjust HDR exposure and toning
- Dodge or burn image areas
- Make selective color adjustments
- Image repair and restoration
- Image enhancement and transformation
- Drawing and painting
- Paint symmetrical patterns
- Draw rectangles and modify stroke options
- About drawing
- Draw and edit shapes
- Create star or any other pointed shape
- Painting tools
- Create and modify brushes
- Blending modes
- Add color to paths
- Edit paths
- Paint with the Mixer Brush
- Brush presets
- Gradients
- Gradient interpolation
- Fill and stroke selections, layers, and paths
- Draw with the Pen tools
- Create patterns
- Generate a pattern using the Pattern Maker
- Manage paths
- Manage pattern libraries and presets
- Draw or paint with a graphics tablet
- Create textured brushes
- Add dynamic elements to brushes
- Gradient
- Paint stylized strokes with the Art History Brush
- Paint with a pattern
- Sync presets on multiple devices
- Migrate presets, actions, and settings
- Text
- Filters and effects
- Saving and exporting
- Color Management
- Web, screen, and app design
- Video and animation
- Printing
- Automation
- Troubleshooting
Learn the basics of working with layers in Photoshop on the iPad.
Try the mobile app
Try out the latest features and enhancements in the Photoshop app on the iPad for general availability.
Topics in this article:
Layers contain the images, fonts, and objects that make up a layered file. Layers enable you to move, edit, and work with content on one layer without affecting the content within your other layers. Use layers to perform tasks such as compositing multiple images, adding text to an image, and applying filters and adjustments.
Layers are arranged in a stack and can be viewed by tapping either the compact or detailed layer view from the taskbar in the workspace.


You can choose to view the layers in your document and other layer information from the taskbar. The available layer view options are compact, detailed, or hidden layer view.
Compact layer view
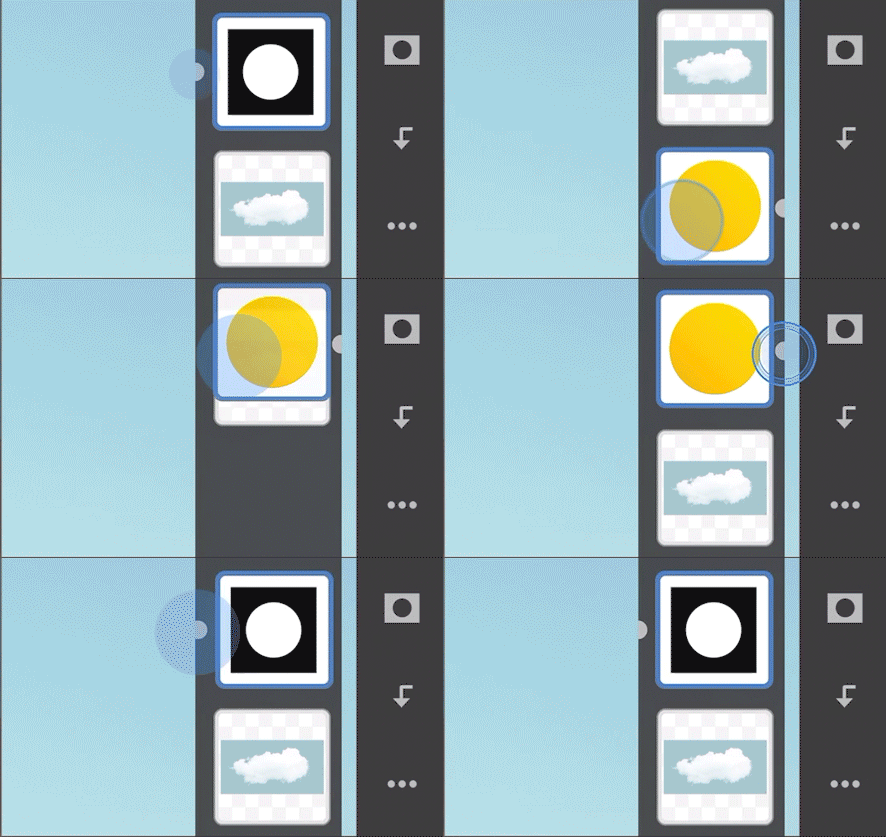

Tap ![]() from the taskbar to view layer thumbnails only. Swipe left on a thumbnail to see applied mask, if one has been applied to the layer.
from the taskbar to view layer thumbnails only. Swipe left on a thumbnail to see applied mask, if one has been applied to the layer.
Detailed layer view
Tap ![]() from the taskbar to view layer names, visibility, and thumbnails of the layer and applied mask, if one has been applied to the layer.
from the taskbar to view layer names, visibility, and thumbnails of the layer and applied mask, if one has been applied to the layer.
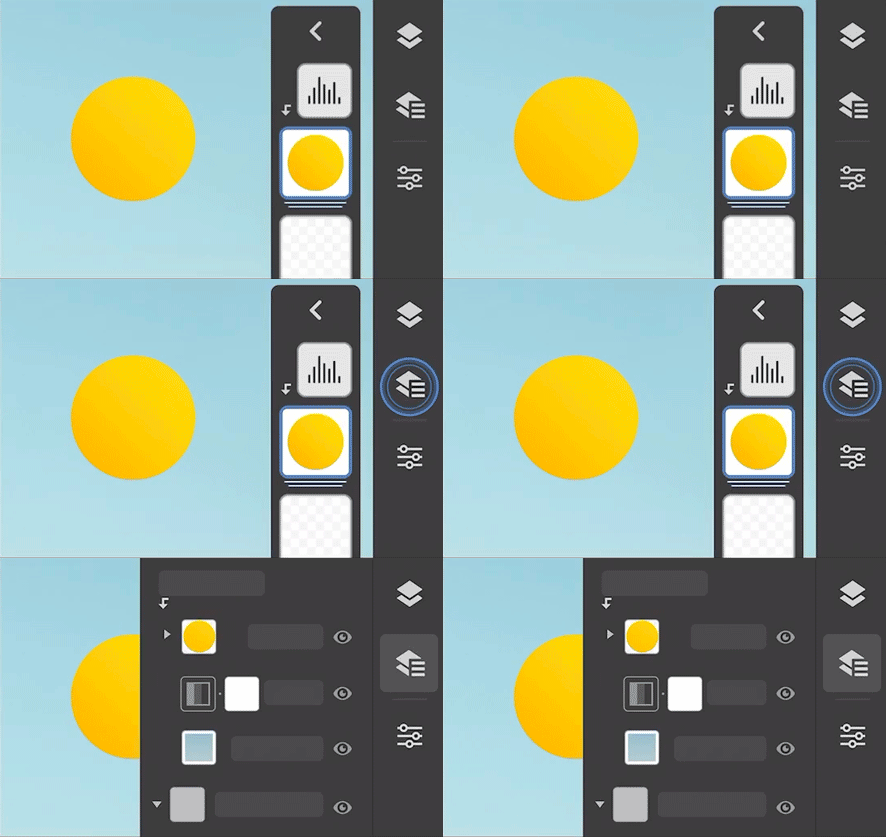

Hidden layer view
Deselect the compact layer view and detail layer view to hide both layer views from the canvas.
View generative variations in the Properties panel
Introduced in Photoshop on the iPad 5.0 (September 2023 release)
Choose from variations of an image previously created using Generative Fill on Photoshop desktop or the web in Photoshop on the iPad and experiment to create AI-generated variations of objects, effects, or even patterns.
Select the Generative Fill layer in your PSD file, go to Layer properties, and navigate to Generative to select your preferred option from the Variations panel.
Anything is possible with generative layer variations--- try it to see what you can create on Photoshop desktop and the web.
Tap from the taskbar to access layer properties:
Thumbnail: Displays the layer thumbnail and name.
Blending options: You can create various special effects using blending options — Opacity and Blend mode.
- Opacity: Use the Opacity slider to adjust the overall opacity level of a layer. Opacity determines to what degree the selected layer is obscured or revealed. A layer with 1% opacity appears nearly transparent, whereas one with 100% opacity appears opaque. To learn more about how opacity works in Photoshop, see Layer opacity and blending.
- Blend mode: A layer’s blending mode determines how its pixels blend with underlying pixels in the image. You can choose from a list of special effects using blending modes available in the drop-down list. To learn more about blending options in Photoshop, see Blending modes.
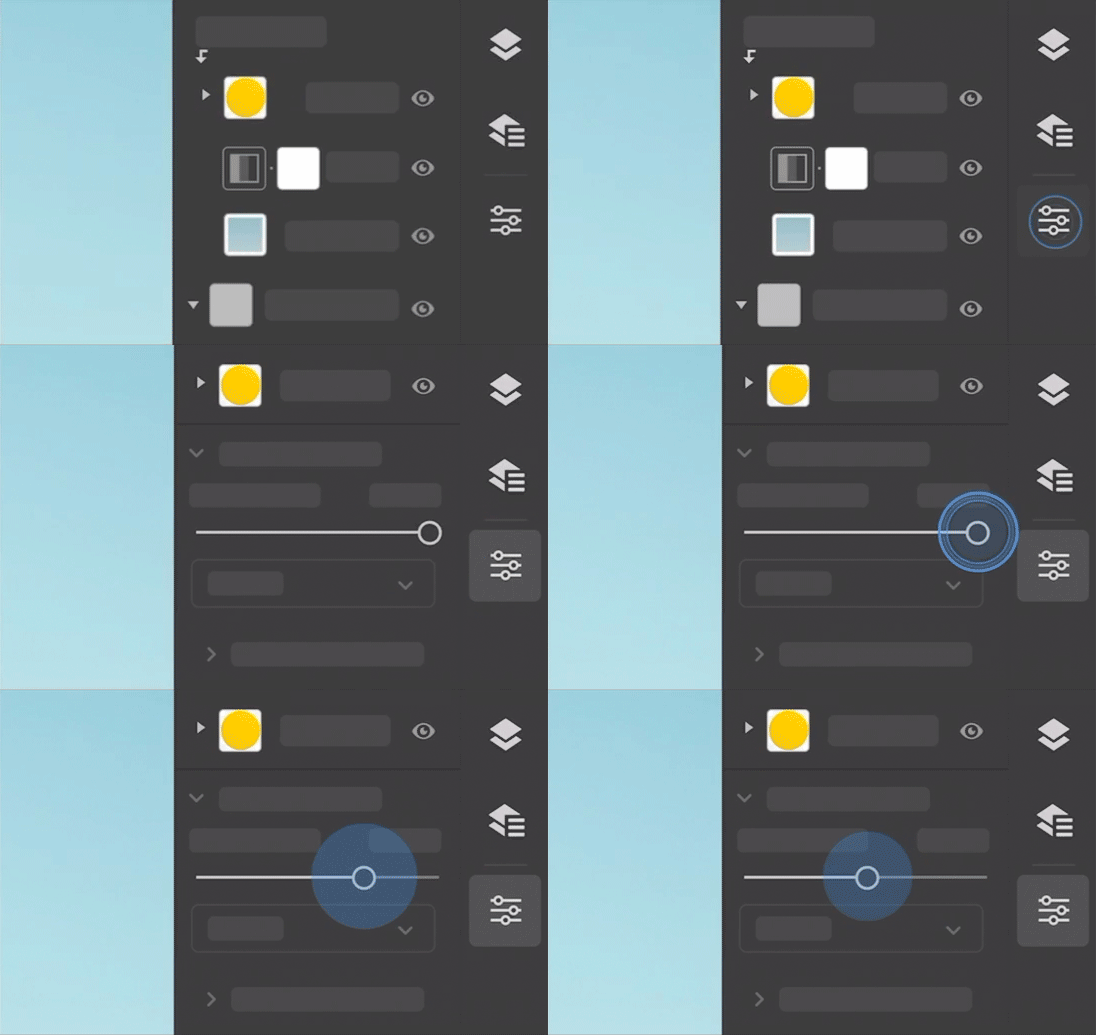

Add clipped adjustment: Adds a clipped adjustment layer to the current layer — Brightness/Contrast, Black and white, Color balance, Curves, Exposure, Hue/Saturation, Levels, and Vibrance.
Effects: This feature is not supported on iPad yet. Adobe is working to add more Photoshop capabilities and workflows that can be used while on your iPad, in future releases.
Smart filters: This feature is not supported on iPad yet. Adobe is working to add more Photoshop capabilities and workflows that can be used while on your iPad, in future releases.
Dimensions: Displays the dimensions of the current layer bounds.
Add and name a layer
Tap ![]() from the taskbar, to add a new layer. The new layer is inserted above the currently selected layer. To name or rename a layer, open the detailed layer (
from the taskbar, to add a new layer. The new layer is inserted above the currently selected layer. To name or rename a layer, open the detailed layer (![]() ) view. Double tap the layer name to bring up the Rename layer dialog. Type a name for the layer and tap Rename to confirm the name.
) view. Double tap the layer name to bring up the Rename layer dialog. Type a name for the layer and tap Rename to confirm the name.
You can also long press ![]() to bring up additional layer options — New layer, Adjustment layer, New empty group, and Paste as new layer.
to bring up additional layer options — New layer, Adjustment layer, New empty group, and Paste as new layer.
Layer visibility
You can choose to show or hide the contents of a particular layer with the layer visibility (![]() ) option available in the taskbar. Tap
) option available in the taskbar. Tap ![]() from the taskbar, or from the detailed layer view to hide the contents of a selected layer. Tap again to view the contents of that layer.
from the taskbar, or from the detailed layer view to hide the contents of a selected layer. Tap again to view the contents of that layer.
Layer mask
You can add a mask to a layer to show parts of the layer and hide others by tapping on the layer mask (![]() ) icon. In the areas where the layer is masked (hidden), the layers below are visible. Masking layers is a valuable compositing technique for combining multiple photos into a single image or for removing a person or object from a photo.
) icon. In the areas where the layer is masked (hidden), the layers below are visible. Masking layers is a valuable compositing technique for combining multiple photos into a single image or for removing a person or object from a photo.
You can edit a layer mask to add or subtract from the masked region. Areas you paint in black on the mask, hides those areas of the layer while areas you paint white on the mask are visible. For areas you paint on the mask in shades of gray, the layer appears in various levels of transparency.
Tap the mask visibility (![]() ) icon to temporarily make the mask invisible, so that you can see the entire layer without the mask applied.
) icon to temporarily make the mask invisible, so that you can see the entire layer without the mask applied.
By default, a layer or group is linked to its layer mask. To break the link between a layer and a mask, tap (![]() ). This allows you to move the layer image and the mask independent of one another.
). This allows you to move the layer image and the mask independent of one another.
Clipping mask
A clipping mask allows you to use the content of one layer to mask the layers above it. The masking is determined by the content of the bottom or base layer. The non-transparent content of the base layer clips (reveals) the content of the layers above it in the clipping mask. All other content in the clipped layer is masked out. When the layer to be clipped is selected, tap the clipping mask (![]() ) icon and the layer below it is used to clip the layer. More layers can be placed on top and clipped to the same shape.
) icon and the layer below it is used to clip the layer. More layers can be placed on top and clipped to the same shape.
The top layer is the layer to be clipped. The middle layer determines what is clipped. The bottom layer is the lower layer that shows through when the top layer is clipped.


Filters and adjustments
Tap ![]() from the taskbar to bring up the Filters and adjustments panel.
from the taskbar to bring up the Filters and adjustments panel.
Gaussian blur: Applies the selected amount (from .1 to 1000) of Gaussian blur to a layer.
Invert: Inverts the contents of the layer.
Liquify: Corrects and modifies images and clears distortions.


Use the Liquify filter on the iPad to correct and modify images, clear distortions, and create cool artistic effects.
You can warp, smooth, twirl, pucker, or bloat the pixels of your image by adjusting the size of the brush and make subtle or drastic edits.


Liquify filter has been disabled for text layers, smart objects, Layers (size more that 8192 X 8192 pixels), mask, and color modes including Grayscale, Lab color, RGB (16 Bits and 32 Bits), CMYK (16 Bits and 32 Bits).
Add Stroke or Drop shadow effects to a layer by navigating to Layer properties > Effects > Add layer effect.


Your designated layer will be marked with the icon, and you'll be able to make adjustments for different sliders, such as Blend mode, Opacity, Size, Distance, Spread, Size, and Position.


You can also use the Layer effect actions three-dot icon to hide or delete actions or reset to default.
Tap ![]() from the taskbar to bring up the Layer actions panel.
from the taskbar to bring up the Layer actions panel.
Lock layer: Locks the layer so it can’t be edited.
Delete layer: Deletes the active layer.
Rename layer: Renames the active layer.
Add clipped adjustment: Adds a clipped adjustment layer to the selected layer.
Add layer effects: Adds Stroke or Drop shadow layer effects to a layer
Begin multi-select mode: Allows you to select multiple layers.
Duplicate layer: Duplicates the active layer.
Copy layer: Allows you to copy a selection or layer to be pasted.
Select all: Selects all contents of the active layer.
Load as selection: Selects all the nontransparent areas on a layer, or if a layer mask exists all the unmasked areas. Selecting these areas is useful when you want to select text or image content that is surrounded by or contains transparent areas or to create a selection that excludes masked areas on a layer.
Convert to smart object: Transforms operations on a layer—Scale and Rotate, Skew, Distort, and Perspective—without losing original image data or quality because these transformations don't affect the original image data.
Flatten layer: Brings all layers of a multi-layered document to one plane.
Merge down: Merges the active layer with the layer below it.
Merge visible: Merges all visible layers into the active layer.


Auto-select the preferred layer straight from the canvas
Select your preferred layer or bounding box directly on the canvas without navigating to its thumbnail view on the taskbar. Or, once selected, tap outside the transform bounding box and move the layer.
You can also add text to images, apply filters, and make adjustments without slowing down your workflow.
This feature is enabled by default but can be disabled from the Move tool settings. Toggle between Individual Layer and Group to work with either individual or group layers.
You can select multiple layers to work with. Select the compact layer view or the detailed layer view, and tap the layer actions (![]() ) icon. Select Begin multi-select mode from the layer actions panel that opens. In the Select layer mode, checkboxes appear next to each layer thumbnail in the layer view. Tap only those checkboxes that are next to layer thumbnails you want to select. Tap Done in the Select layer mode, or Cancel to exit selection.
) icon. Select Begin multi-select mode from the layer actions panel that opens. In the Select layer mode, checkboxes appear next to each layer thumbnail in the layer view. Tap only those checkboxes that are next to layer thumbnails you want to select. Tap Done in the Select layer mode, or Cancel to exit selection.
Group and ungroup layers
You can select multiple layers that you want to group as described above. Tap the folder icon (![]() ) to group the layers together. To ungroup layers, do the following:
) to group the layers together. To ungroup layers, do the following:
- Select the grouped layer.
- Tap the three dots icon (
 ) on the taskbar .
 - Tap the open folder (
 ) icon to ungroup layers.
Reorder layers
To reorder a layer, long-press the thumbnail of the layer you want to move and then move it to the desired location in the layer stack.