If you have a question to ask or an idea to share, come and participate in Adobe XD Community. We would love to hear from you and see your creations.
- Adobe XD User Guide
- Introduction
- Design
- Artboards, guides, and layers
- Shapes, objects, and path
- Text and fonts
- Components and states
- Masking and effects
- Layout
- Videos and Lottie animations
- Prototype
- Create interactive prototypes
- Animate prototypes
- Object properties supported for auto-animate
- Create prototypes with keyboard and gamepad
- Create prototypes using voice commands and playback
- Create timed transitions
- Add overlays
- Design voice prototypes
- Create anchor links
- Create hyperlinks
- Preview designs and prototypes
- Share, export, and review
- Share selected artboards
- Share designs and prototypes
- Set access permissions for links
- Work with prototypes
- Review prototypes
- Work with design specs
- Share design specs
- Inspect design specs
- Navigate design specs
- Review and comment design specs
- Export design assets
- Export and download assets from design specs
- Group sharing for enterprise
- Back up or transfer XD assets
- Design systems
- Cloud documents
- Integrations and plugins
- Work with external assets
- Work with design assets from Photoshop
- Copy and paste assets from Photoshop
- Import or open Photoshop designs
- Work with Illustrator assets in Adobe XD
- Open or import Illustrator designs
- Copy vectors from Illustrator to XD
- Plugins for Adobe XD
- Create and manage plugins
- Jira integration for XD
- Slack plugin for XD
- Zoom plug-in for XD
- Publish design from XD to Behance
- XD for iOS and Android
- Troubleshooting
- Known and fixed issues
- Installation and updates
- Launch and crash
- Cloud documents and Creative Cloud Libraries
- Prototype, publish, and review
- Import, export, and working with other apps
Learn how to create scroll groups that scroll independently from the rest of the artboard.
Scroll groups in Adobe XD lets you define areas within an artboard that scroll independently from the rest of the artboard to create horizontal or vertical scroll effects. Scroll groups are handy when designing UI elements such as image carousel, product sliders, or interactive maps.
Read on to learn how to use horizontal, vertical, and a combination of both horizontal and vertical scroll groups in XD.


Before you proceed
Ensure that you are familiar with the design, prototype, and share modes in XD.
Limitation
Scroll groups does not work in design specs. As a workaround, add scroll groups in a separate artboard and publish them as part of the design specs.
Create a horizontal scroll effect
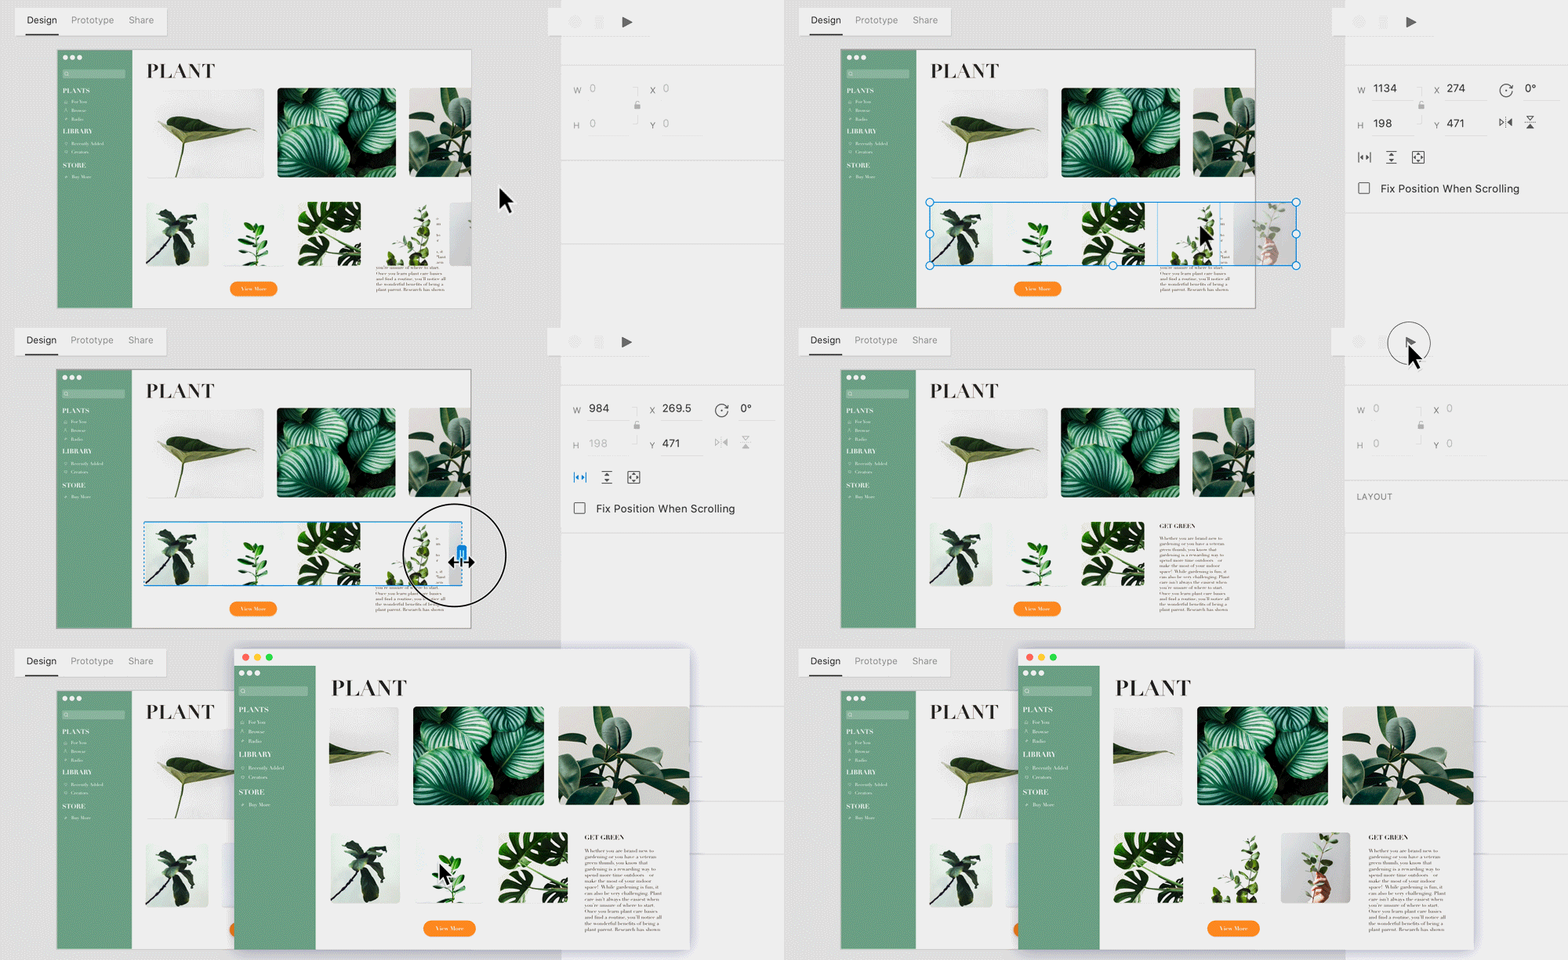
Want to prototype a carousel using horizontal scroll? Watch this animated illustration and follow these steps to learn how to create a horizontal scroll effect.


- In the Design mode, select the objects that you want to turn into a scrollable group.
- Click the
 icon in the Property Inspector. The viewport automatically adjusts its dimensions to provide an instant preview experience. You can also use ⇧⌘H in macOS and Shift + Ctrl +H in Windows to create a horizontal scroll effect.
- To preview the entire horizontal scroll effect, click
 .
.
Create a vertical scroll effect
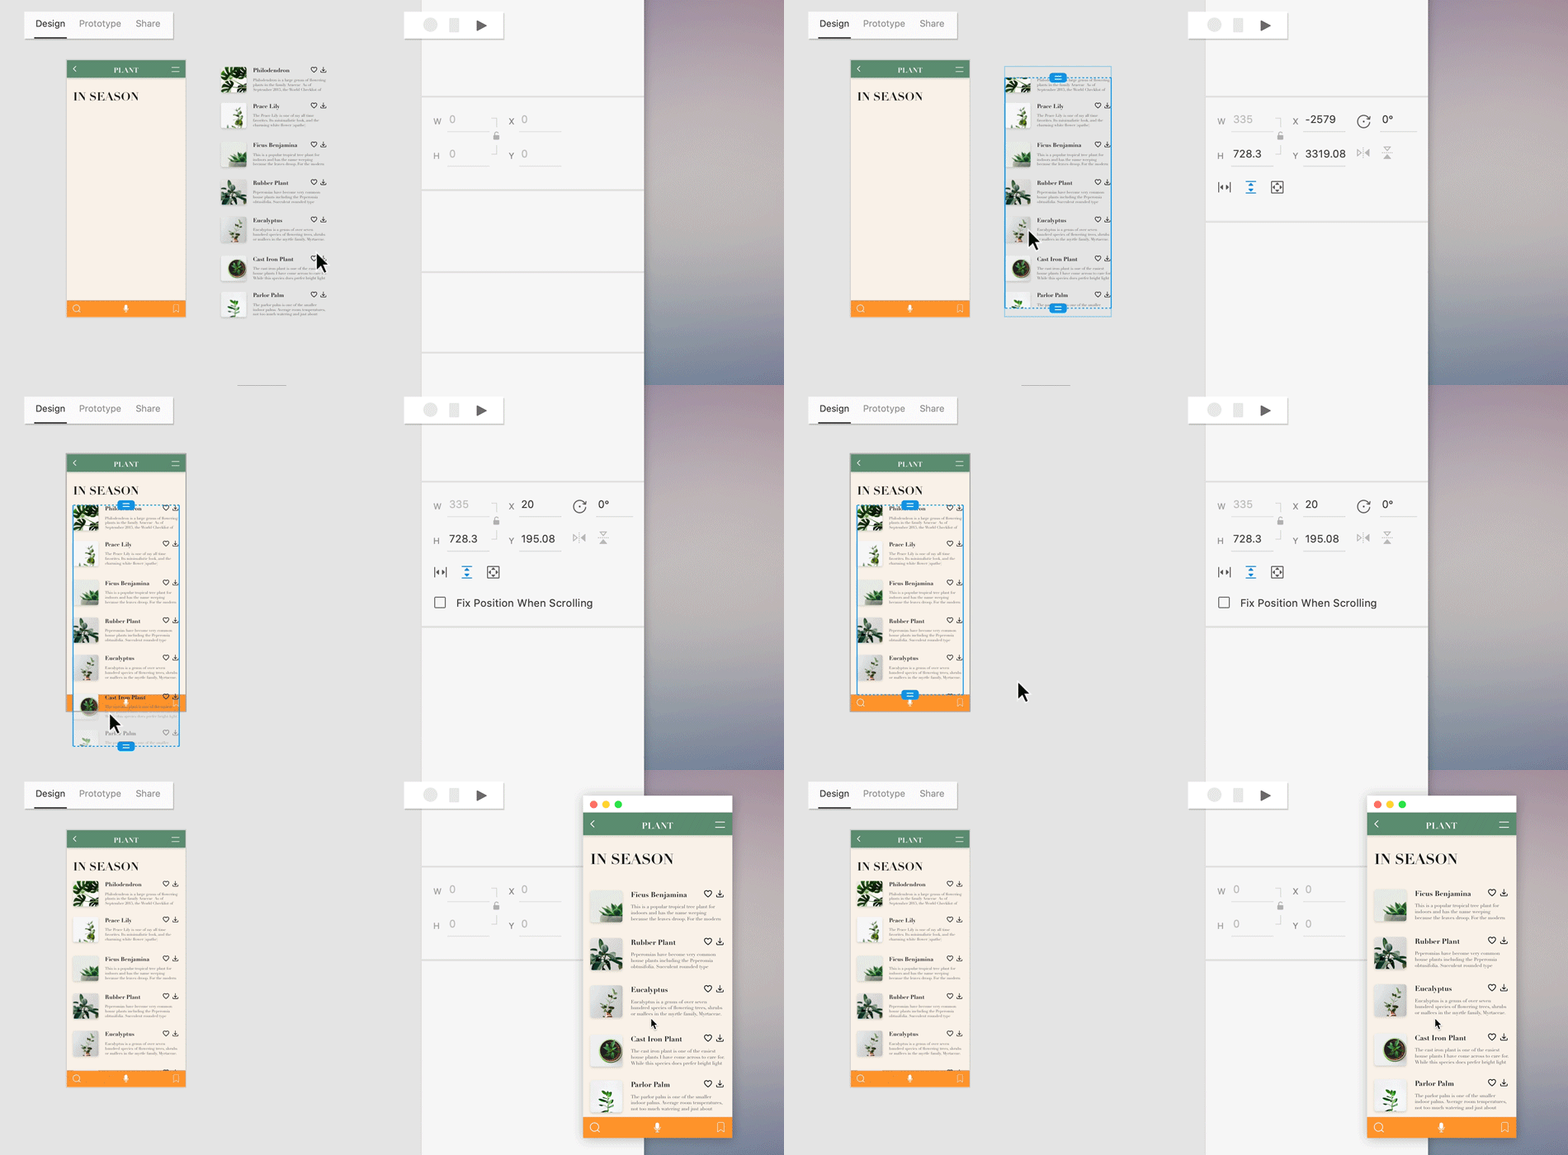
Want to prototype your carousel using vertical scroll? Watch this animated illustration and follow these steps to learn how to create a vertical scroll effect.


- In the Design mode, select the objects that you want to turn into a scrollable group.
- Click the
 icon in the Property Inspector to scroll up and down. The viewport automatically adjusts its dimensions to provide an instant preview experience. You can also use ⇧⌘V in macOS and Shift + Ctrl +V in Windows to create a vertical scroll effect.
- To preview the entire vertical scroll effect, click
 .
.
Create a horizontal and a vertical scroll effect
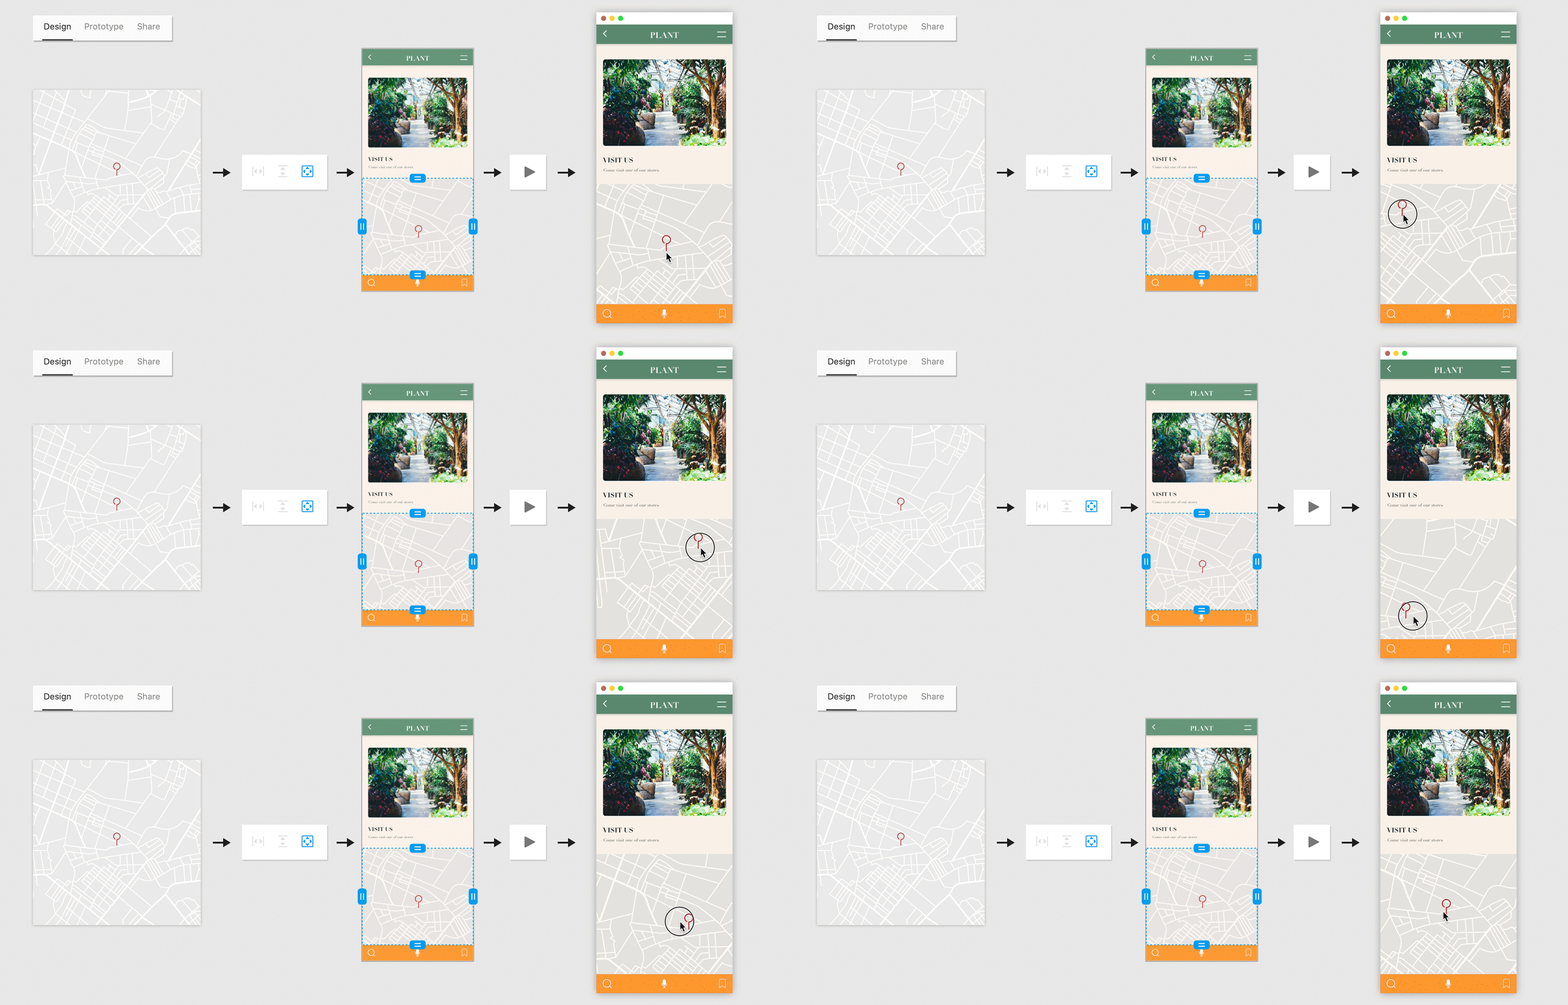
A combination of horizontal scroll and vertical effects is useful when creating objects that allow you to scroll in all directions such as interactive maps. Watch this animated illustration and follow these steps.


- In the Design mode, select the objects that you want to turn into a scrollable group.
- Click the
 icon in the Property Inspector. The Viewport automatically adjusts its dimensions to provide an instant preview experience. You can also use ⇧⌘D in macOS and Shift + Ctrl +D in Windows to create a combination of both horizontal and vertical scroll effects.
- To preview the entire horizontal and vertical scroll effect, click
 .
.
Learn more
To learn more about horizontal and vertical scroll groups in XD, watch this video.
Viewing time: 6 minutes
Tips and tricks
Now that know how to create horizontal and vertical scroll effects in XD, here are some handy tips and tricks:
- When previewing your prototype on windows and web, use the trackpad, mouse wheel, and click and drag to check both horizontal and vertical scroll effects.
- On macOS preview, use the trackpad, mouse wheel, and click and drag to check both horizontal and vertical scroll effects.
- Combine scroll groups with component states and action types such as Overlay, Auto-Animate, and Scroll To.
- Use padding to add better offset controls for your scroll groups.
- Use nested scroll groups when creating multiple levels of scrolling in your designs.
What's next?
We've got you started on how to create horizontal and vertical scroll effects. Take a step forward and learn how to create interactive prototypes and share them with designers or stakeholders for feedback.
Have a question or an idea?