
Import media through the Add Media panel if you are in the Quick view sceneline or the Advanced view.
Last updated on
Oct 1, 2024
- Get to know Premiere Elements
- Adobe Premiere Elements User Guide
- Download and Install Premiere Elements
- Introduction to Adobe Premiere Elements
- Workspace and workflow
- Working with projects
- 360° and VR Video Editing
- Importing and adding media
- Arranging clips
- Editing clips
- Reduce noise
- Select object
- Candid Moments
- Color Match
- Color Fonts and Emojis
- Smart Trim
- Freehand Crop
- Delete All Gaps
- Change clip speed and duration
- Split clips
- Freeze and hold frames
- Adjusting Brightness, Contrast, and Color - Guided Edit
- Stabilize video footage with Shake Stabilizer
- Replace footage
- Working with source clips
- Trimming Unwanted Frames - Guided Edit
- Trim clips
- Editing frames with Auto Smart Tone
- Artistic effects
- Color Correction and Grading
- Applying transitions
- Special effects basics
- Effects reference
- Applying and removing effects
- Create a black and white video with a color pop - Guided Edit
- Time remapping - Guided edit
- Effects basics
- Working with effect presets
- Finding and organizing effects
- Editing frames with Auto Smart Tone
- Fill Frame - Guided edit
- Create a time-lapse - Guided edit
- Best practices to create a time-lapse video
- Applying special effects
- Use pan and zoom to create video-like effect
- Transparency and superimposing
- Reposition, scale, or rotate clips with the Motion effect
- Apply an Effects Mask to your video
- Adjust temperature and tint
- Create a Glass Pane effect - Guided Edit
- Create a picture-in-picture overlay
- Applying effects using Adjustment layers
- Adding Title to your movie
- Removing haze
- Creating a Picture in Picture - Guided Edit
- Create a Vignetting effect
- Add a Split Tone Effect
- Add FilmLooks effects
- Add an HSL Tuner effect
- Fill Frame - Guided edit
- Create a time-lapse - Guided edit
- Animated Sky - Guided edit
- Select object
- Animated Mattes - Guided Edit
- Double exposure- Guided Edit
- Special audio effects
- Movie titles
- Create Titles and MOGRTs
- Creating titles
- Adding shapes and images to titles
- Adding color and shadows to titles
- Apply Gradients
- Add responsive design
- Editing and formatting text
- Text Styles and Style Browser
- Align and transform objects
- Motion Titles
- Appearance of text and shapes
- Exporting and importing titles
- Arranging objects in titles
- Designing titles for TV
- Applying styles to text and graphics
- Adding a video in the title
- Disc menus
- Sharing and exporting your movies
Learn to automatically find and select the best scenes based on the style of your video in Premiere Elements.
Trimming a video is the primary task in editing, and it can be difficult and time-consuming. Smart Trim auto-extracts the best scenes based on attributes such as people (single or multiple), action, and quality.
Smart Trim
Smart Trim in Premiere Elements is a powerful tool that lets you quickly and easily edit your clips by automatically identifying and trimming unwanted parts. It detects low-quality segments, such as shaky footage, poor lighting, or irrelevant footages. It suggests cuts to keep your clips engaging and focused on the best moments.
To apply Smart Trim to your selected clips in the timeline, do one of the following:
- Click on the Tools button in the action bar on the right side and select Smart Trim.
- Select Tools from the menu bar > Smart Trim.

Auto-extract best scenes
If you want to modify the auto-extracted results, you can change the slider position to add more or fewer scenes. You can further adjust the results by manually adding, deleting, or changing the duration of individual scenes. Preview and export the trimmed clip to the sceneline when you are happy with the modification.
-
-
Select the video clip in the quick view sceneline or the Advanced view.
-
To launch the Smart Trim screen, select the video clip and select Tools > Smart Trim.
The Smart Trim screen opens with the selected video clip.
-
Use an available preset to automatically mark the best scenes. Select a preset based on the style of your video.

People This preset focuses on faces in the video clip along with other quality filters to find scenes with people. This preset is recommended for family-event videos (for example, wedding, birthday, Thanksgiving, and Christmas gatherings).
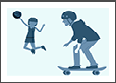
Action This preset focuses on activities in the video clip along with other quality filters to find scenes where there is medium-to-high activity or action happening. This preset is recommended for sports and dance videos (for example, action sports, school sports, school ballet dance, kids dancing, and kids playing).

Mix This preset focuses on the combination of faces, activities, and camera motion along with other quality filters to find scenes. This preset is recommended for travel and nature videos (for example, beaches, mountains, cruises, and vacations with the family.)
Once you select a preset, smart trim automatically analyzes the clip and marks relevant segments. Clips that are analyzed once are not analyzed again.
-
Check the extracted scenes highlighted in the sceneline. You can see the duration of the extracted video at the bottom of the timeline.
-
If you are not satisfied with the automatic extraction, do one of the following:
- Use the slider to manage the number of extracted scenes. Drag the slider to the left to extract fewer scenes or to the right to extract more scenes.
- Change the preset.
- Manually extract scenes.
- Remove unwanted extracted scenes.
- Use the slider to manage the number of extracted scenes. Drag the slider to the left to extract fewer scenes or to the right to extract more scenes.
-
Use one of the following smart trim options as required:
Smart trim options Smart trim options Reset
Click to remove all the extracted scenes. For information about removing a specific extracted scene, see Remove unwanted extracted scenes.
Mark Manually
Click to manually extract scenes from the clip. For more information, see Manually extract scenes.
Apply Transitions
Select to apply transitions while moving from one extracted scene to another.
Preview
Click to preview the generated output.
Export Merged
Click to export all the extracted scenes as a one clip to the sceneline.
Export Individual
Click to export all the extracted scenes as individual clips to the sceneline.


Manually extract scenes
If some of your favorite scenes are not in the set of automatically extracted scenes, you can extract those scenes manually.
-
Move the CTI in the timeline to the frame that you want to extract manually.
-
Do one of the following:
- Click Clip + button in the timeline.
- Select the Mark Manually option.
-
Drag
 to increase or decrease the duration of the extracted scene.


Remove unwanted extracted scenes
-
From the set of extracted scenes in the timeline, select any scene that you want to remove.
-
Hover the mouse cursor on the upper right corner of the selected scene. Now, click x to remove the selected scene.
