User Guide Cancel

Workflow Builder

Learn how to use the Workflow workspace to easily combine various tasks and stitch them together to create your own workflows for repeat use.

Workflow workspace

The Workflow workspace is accessible from the application bar on the top. You can also switch to the Workflow workspace by navigating to Windows > Workspace > Workflow.

Workflow workspace

The workspace consists of the following panels:

  • Task Diagram: This appears in the center of the workspace. Use this space to add tasks in the desired order to build your workflows.
  • Workflow Details: On the right side, the details of the Workflow and its tasks show up. Use this panel to name your workflow presets, specify the destination folder of your output, and customize your task settings.
  • Workflow Panel: On the left bottom, next to the Filters and Collection panel appears the Workflow Panel.  All your workflow presets will appear here. At the bottom of the Workflow panel, you have the Start workflow and View progress options.
  • Content Panel appears at the center-bottom and Folders and Favorite panel appears on the top left. 

Build your workflow

To start building your workflows, switch to the Workflow workspace. The Workflow workspace should appear on the Application bar along with the other workspaces like Essentials, Libraries, etc. You can also switch to the workspace by navigating to Windows Workspace Workflow.

Create a new workflow

  1. To create a new preset, do any of the following:

    • Click the + icon in the Workflow panel.
    • Click the Create New Workflow option in the Workflow panel.
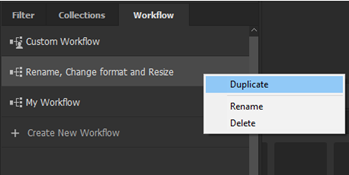
    • Ctrl-click (macOS), or right-click (Win) in the Workflow panel to bring up the context menu. Select Create New Preset.
    Create new workflow

    Create new preset

  2. A new workflow preset by the name My Workflow is created and appears in the Workflow panel.

Add tasks to your workflow

Once the blank workflow is created, start adding the desired tasks to start stitching your workflow.

  1. To add a task, do one of the following:

    • Click Add Task in the Task Diagram section.
    • Click the + icon at the bottom left corner of the Task Diagram section.
    Add a task

  2. Choose from the list of available tasks - Batch rename, Change format, Resize to, and Apply metadata and add them in the desired sequence to build your workflow. 

Specify the details of your workflow and tasks

In the Workflow Details section, you can specify the Workflow Preset name, Workflow Saving Options (Output Location), and Task Details based on the selected task.

Workflow Preset Name

  • Preset Name: Enter the name of the Workflow preset.
Workflow Preset Name

Note:

Save option would overwrite the existing preset. If you want to create a copy of a workflow, right-click on it to duplicate the workflow preset first and then edit and save it. 


Workflow Saving Options

  • Save To: Expand the drop-down option to choose a location — Original File Location and Specific Folder
  • If you select the Specific Folder option, you can further use the Browse field to set a location for your exported files. 
  • Enable the Save to subfolder named checkbox and type in a name to specify a subfolder location. 
  • You can also Manage Conflicts by selecting any of the options from the drop-down — Create unique file name, Overwrite existing file, or Skip file.
Workflow Saving Options

Task Details

Change Format

Use this option to change the format using the Workflow panel. Bridge supports JPEG, DNG, TIFF, and PNG for conversion.

Change Format

Apply Metadata:

  • Include Original Metadata: Select this checkbox and use the drop-down menu to choose from the metadata associated with the files that you wish to keep.
  • Select the Remove Location Info checkbox to remove location-specific metadata from the saved files.
  • Apply Metadata Template: Select this checkbox and choose from the following field:
    • Name: Choose any of the available metadata from the Name drop-down. 
    • Method: Select a method — Append Metadata, or Replace Metadata.
    • Additional Keywords (Separated by semicolon): Use this field to add additional keywords to the files you wish to export.

To learn more about applying metadata templates, see Work with metadata templates.

Apply Metadata

Resize to

This option is applicable only for JPEG, PNG, and TIFF.

  • Scale Image: Select this option to set a scale percentage.
  • Resize to: Select this option to resize your assets to fit or fill a target rectangle area and set the dimensions. You can resize images based on Long Edge, Short Edge, or Width/Height
    • On selecting Fit, you can fit your image to resize on the basis of Long edge, Short edge, or Width Height.
      1. Long Edge: You can manually change the Dimension and Resolution before you resize your images.
      2. Short Edge: You can manually change the Dimension and Resolution before you resize your images.
      3. Width Height: You can manually change the Width, Height, and Resolution before you resize your images. When you select Width/Height as your Fit option, your image is resized as per a target rectangle.
    • On selecting Fill, you can resize on the basis of Width Height. You can also view image thumbnails having the original and new sizes of the images mentioned below each thumbnail.
    • You can specify the Resolution of your image in Pixels/inch or Pixels/cm and Dimension metrics in pixels/inches/cm.
  • Don't Enlarge: Select this option to make sure your image doesn't get enlarged on resizing.
  • Resample Method: Choose any of the available Resample Method — Bilinear, Bicubic (best for smooth gradients), or Bicubic Sharper (best for reduction).
Resize To

Batch Rename

  • Preset Name: Select a preset from the Presets menu to renaming with frequently used naming schemes. Important: Batch rename presets are used as a reference in Workflow builder. Any changes done to the rename settings need to be saved first to be picked in the Workflow.

    Note:
    • If you change a Batch rename preset outside of the Workflow builder and if that preset is referred to in a Workflow, the changes done in the Batch rename preset will be honored
    • If you delete a Batch rename preset outside of the Workflow builder, that preset reference will be lost in the Workflow.
  • New File Name: Choose elements from the menus and enter the text as appropriate to create new filenames. Click the Plus icon (+) or Delete icon ( ) to add or delete elements.
  • Options: Select Preserve Current Filename In XMP Metadata to retain the original filename in the metadata. For Compatibility, select the operating systems with which you want renamed files to be compatible. The current operating system is selected by default, and cannot be deselected.
Note:

After entering the Workflow details, Task details, and saving the workflow preset, it appears in the Workflow Panel, ready to be used.


Batch Rename

Run the workflow

After entering the workflow details, task details, and saving the workflow preset, it appears in the Workflow Panel.

  1. To start a workflow, do one of the following:

    • Drag and drop the selected assets from the Content panel onto a Preset in the Workflow Panel and click Start Workflow.
    • Select the assets in the Content panel and Ctrl-click (macOS) or right-click (Windows) to bring up the context menu. Select Workflow  and choose the desired preset
    • Go to File  > Workflow  and choose the desired preset
    Note:

    If a workflow preset is not saved after making changes to it, you will be prompted to either save those changes and proceed with them or discard the changes and proceed without them.


View workflow progress

You can view your entire Workflow job list that includes pending jobs, active jobs, and completed jobs. To check the progress of your workflows, do the following:

  1. Click View Progress  at the bottom of the Workflow  panel

    View progress

  2. In the Workflow Progress dialog that opens, you can see the progress status of your workflow jobs. 

    Workflow progress

  3. Click  Clear to remove the job list or Close to exit the progress window. 

Cancel a workflow

To cancel a workflow, do the following:

  1. Click View Progress at the bottom of the Workflow  panel

    View progress

  2. In the Workflow Progress dialog, click the cancel   icon next to a selected job status to stop the workflow process at any time.

    Cancel workflow

Set Workflow preferences

To set your workflow preferences, do the following:

  1. Navigate to Adobe Bridge > Preferences > Workflow (masOS) or Edit > Preferences > Workflow (Windows)

  2. In the Options panel, you can set your preferences for the information that appears in the Workflow Progress dialog.

    • Maximum number of Workflow jobs to keep in job list: Manually enter the desired value. The maximum number of job details in the job progress dialog defaults to a max value of 100. Bridge deletes the older history beyond 100 job details.
    • Maximum number of Workflow jobs in progress: Manually enter the desired value. You can queue 20 export jobs at a time.
    Workflow preferences

Supported Image Formats

The following image formats are supported for the Change Format task:

JPEG

Image Quality: Use the slider to set your image quality. The values can vary between 1 (minimum image quality) to 12 (maximum image quality).

Change Format JPG

PNG

  • Bit Depth: 16-bit or 8-bit version 
  • Color Space: For most color-managed workflows, it is best to use a preset color setting that has been tested by Adobe such as sRGB. Choose a color space option based on your requirement.
  • Save transparency: This allows you to preserve the transparency of your image.
Change Format PNG

TIFF

  • Compression: When saving images as TIFF, you can choose to compress and zip files.
  • Color Space: For most color-managed workflows, it is best to use a preset color setting that has been tested by Adobe such as sRGB. Choose one based on your requirement.
  • Bit depth: Users can choose to store color information in two schemes — 8 bits per component or 16 bits per component.
  • Save transparency: This allows you to preserve the transparency of your image.
Change Format TIFF

DNG

  • JPEG Preview: You can select a preview option — None, Medium, and Full.
  • Embed Original Raw File: Enable this to embed the original raw file.
  • Delete Original File: Enable this to delete the original file after the file format is successfully changed.
Change Format DNG

Use the sample workflow preset to see a workflow preset in action 

You can use the sample Workflow Preset with the name Rename, Change format and Resize available in Bridge by default. Click on this Workflow preset to view the details.

Sample workflow

You can also duplicate this preset and save it with a new name to tweak and explore the options.

Duplicate preset

 Adobe

Get help faster and easier

New user?

Adobe MAX 2024

Adobe MAX
The Creativity Conference

Oct 14–16 Miami Beach and online

Adobe MAX

The Creativity Conference

Oct 14–16 Miami Beach and online

Adobe MAX 2024

Adobe MAX
The Creativity Conference

Oct 14–16 Miami Beach and online

Adobe MAX

The Creativity Conference

Oct 14–16 Miami Beach and online