
- About Adobe Connect Events
- Setup Adobe Connect Events
- Create and manage Adobe Connect Events
- Attend Adobe Connect Events
- Event analytics for webinars
- Simulated Live webinars
Learn how to create and manage event templates in Adobe Connect to standardize layouts, branding, and components across your events.
Event templates in Adobe Connect are preconfigured sets of layouts, branding elements, and functional components that simplify event creation. They allow organizers to quickly build and replicate consistent, professional-looking events without starting from scratch every time. By standardizing event structure and design, templates enhance efficiency, reduce setup time, and ensure brand consistency across all hosted events.
Benefits of using Event templates
Event templates help streamline the event management process while maintaining visual and functional consistency. Key benefits include:
- Consistency: Maintain a uniform layout, style, and structure across all events to reinforce your brand identity.
- Efficiency: Eliminate repetitive setup tasks by reusing template structures for recurring or similar event formats.
- Customization: Customize templates to match different types of events such as webinars, training sessions, product launches, or department-specific needs.
- Brand Alignment: Seamlessly integrate your organization’s logo, color schemes, and messaging into all event materials.
The following topics are covered in this article:
- With Adobe Connect 12.4, templates are responsive, adapting to different screen sizes from phones to desktops.
- Templates use Adobe Experience Manager (AEM) 6.5 for enhanced design capabilities.
- Templates use various AEM components like banners, carousels, and information blocks to build event pages.
Create an event template
To streamline event setup and ensure consistency across all your Adobe Connect events, you can create custom event templates tailored to your organization’s needs. These templates serve as reusable blueprints, allowing you to define the layout, branding, and components once and apply them across multiple events.
Launch template creation interface
-
Select Events on Adobe Connect Central home.
-
Select Event Templates.
Event templates interface Event templates interface The template creation interface appears.
For this example, you’ll customize the default template.
Event templates showing the list of shared templates Event templates showing the list of shared templates


Parts of an event template
Adobe Connect uses AEM technology to design and layout Event templates and the Event Catalog. The designed templates can be shared, and access control governs their usage. Adobe Connect also offers AEM components customized for Adobe Connect users and administrators. These AEM components can be dragged onto the template area and configured to quickly design and layout templates.
The template contains the following:
| Feature | Description |
|---|---|
Layout container |
Provides a demarcated area in an event template to contain any components you put there. The container helps you customize its background and restrict its dimensions. |
Event banner large |
Showcase the large event banner, uploaded as Large Banner Image in event information, on the various event pages and in the email. You can customize various properties of the event banner, such as size, description, position, alt text, and link. The recommended size for the image for Event Banner Large is 1280x240 pixels. |
Event name |
Displays the name of the event, mentioned as "Event Name" in the event information. You can customize the font properties. The maximum length is 60 characters. |
Time zone |
Select the time zone of the event from the dropdown. |
Event information |
Displays brief information about an event, entered as Event Information, in event information. |
Speaker information |
Display the Speaker Overview, added in event information in Adobe Connect Central, in your event templates. |
Event registration form |
Provide the event registration workflow from where a user registers for a particular event.
|
Customize the event template
After creating or selecting an event template, you can modify its components to match your event’s branding and informational needs.
To begin customization:
- Open the template you want to modify.
- Select Edit to enter the customization interface.
From here, you can adjust various elements such as banners, event information, speaker details, and registration forms. Each component can be configured individually, allowing you to define visual styles such as font and image properties, add links, and control layout behavior. This ensures that every template reflects your organization's visual identity and effectively communicates event details.

Once you're in the editing interface, you can configure various elements of the template to align with your branding and event goals. Below are the key components you can customize:
Event banner
-
Select the banner and then select Configure.
Configure the event banner Configure the event banner -
Set the following properties:
- Image Size: Select from the following options:
- Use responsive size: The image will automatically scale based on the screen size or container it is placed in.
- Use original size: Displays the image at its original resolution and dimensions.
- Maintain aspect ratio: Ensures that the image retains its original width-to-height ratio when resized.
- Set custom size: Allows you to manually define the image’s width and height.
- Image Position: Select from Center, Right, or Left to align the image in the container.
- Alt Text: Add the image’s alternative text for accessibility.
- Link: Add a redirection URL when a user clicks on the image.
- Open link in new tab: If selected, the link opens in a new tab.
Configure the image properties Configure the image properties - Image Size: Select from the following options:


Event time
-
Select the event time component and then select Configure.
Configure the event time Configure the event time -
Set the following properties:
- Font Properties: Select the template font family, font color, size, weight, or alignment.
Configure the font properties Configure the font properties - Date Time Format: Select the time and date formats from the dropdowns.
Date Time Format interface Date Time Format interface


Event name
-
Select the event name component and then select Configure.
-
Set the Font Properties that comprise font family, font color, size, weight, or alignment.
Font properties interface Font properties interface

Time zone
-
Select the time zone and then select Configure.
Configure the time zone Configure the time zone -
Set the time zone alignment on the template.
Time zone alignment options Time zone alignment options


Account logo

Set the following properties:
- Image Size: Select from the following options:
- Use responsive size: The image will automatically scale based on the screen size or container it is placed in.
- Use original size: Displays the image at its original resolution and dimensions.
- Maintain aspect ratio: Ensures that the image retains its original width-to-height ratio when resized.
- Set custom size: Allows you to manually define the image’s width and height.
- Image Position: Select from Center, Right, or Left to align the image in the container.
- Alt Text: Add the image’s alternative text for accessibility.
- Link: Add a redirection URL when a user clicks on the image.
- Open link in new tab: If selected, the link opens in a new tab.


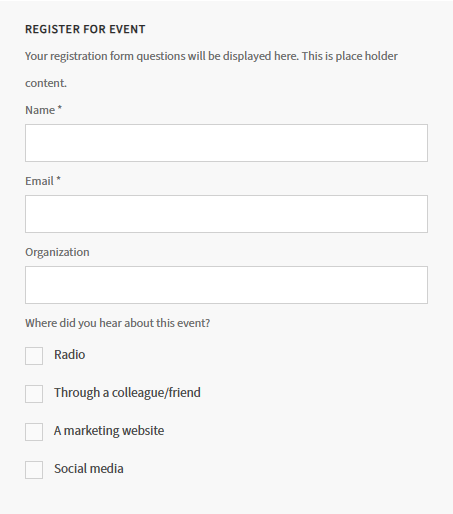
The form contains the following:
Form fields
- Name *: Required field where users enter their full name.
- Email *: Required field to capture the user’s email address. Used to send event confirmations, reminders, and follow-ups.
- Organization: Optional field where users can enter the name of their company or organization.
Survey question
This is a multi-select question to help organizers understand the most effective promotion channels. Options include:
- Radio
- Through a colleague/friend
- A marketing website
- Social media
Register Now
Submit the registration form and sign up for the event.
Customize the event form
Customize the event registration-related labels and messages in Adobe Connect Events. These options are part of the Event Template when setting up or editing an event.
On Registration Confirmation
Customize the confirmation message that attendees see after successfully registering for the event. The message could include a thank-you note, event details, or next steps.

Contact Support Label & Descriptive Text
The field allows you to define the label, link to support, and a message for participants if they need assistance.

Forgot Password Label & Descriptive Text
Customize the label and text that helps users reset their password or explains the process.

Registration Limit Label
Allows you to define a label or message that informs users if the event has reached its registration limit.

Event Calendar Invite
Configure the calendar invite that attendees receive upon registering.

-
Select Toggle side panel on the event template.
Event template showing the Toggle side panel Event template showing the Toggle side panel -
Drag and drop any component to the event template.
Account logo option in the event template Account logo option in the event template -
After adding the component, customize it accordingly.


-
Select Event Templates from the Events tab.
-
Select the template you just customized. Select the template options to create, edit, or reset the template.
Template menu showing the copy and reset options Template menu showing the copy and reset options
