- Photoshop User Guide
- Introduction to Photoshop
- Photoshop and other Adobe products and services
- Photoshop on mobile (not available in mainland China)
- Photoshop on the iPad (not available in mainland China)
- Photoshop on the iPad | Common questions
- Get to know the workspace
- System requirements | Photoshop on the iPad
- Create, open, and export documents
- Add photos
- Work with layers
- Draw and paint with brushes
- Make selections and add masks
- Retouch your composites
- Work with adjustment layers
- Adjust the tonality of your composite with Curves
- Apply transform operations
- Crop and rotate your composites
- Rotate, pan, zoom, and reset the canvas
- Work with Type layers
- Work with Photoshop and Lightroom
- Get missing fonts in Photoshop on the iPad
- Japanese Text in Photoshop on the iPad
- Manage app settings
- Touch shortcuts and gestures
- Keyboard shortcuts
- Edit your image size
- Livestream as you create in Photoshop on the iPad
- Correct imperfections with the Healing Brush
- Create brushes in Capture and use them in Photoshop on the iPad
- Work with Camera Raw files
- Create and work with Smart Objects
- Adjust exposure in your images with Dodge and Burn
- Auto adjustment commands in Photoshop on the iPad
- Smudge areas in your images with Photoshop on the iPad
- Saturate or desaturate your images using Sponge tool
- Content aware fill for iPad
- Photoshop on the web (not available in mainland China)
- Photoshop (beta) (not available in mainland China)
- Generative AI (not available in mainland China)
- Common questions on generative AI in Photoshop
- Generative Fill in Photoshop on the desktop
- Generate Image with descriptive text prompts
- Generative Expand in Photoshop on the desktop
- Replace background with Generate background
- Get new variations with Generate Similar
- Select an AI model for generative control
- Generative Fill in Photoshop on the iPad
- Generative Expand in Photoshop on the iPad
- Generative AI features in Photoshop on the web
- Content authenticity (not available in mainland China)
- Cloud documents (not available in mainland China)
- Photoshop cloud documents | Common questions
- Photoshop cloud documents | Workflow questions
- Manage and work with cloud documents in Photoshop
- Upgrade cloud storage for Photoshop
- Unable to create or save a cloud document
- Solve Photoshop cloud document errors
- Collect cloud document sync logs
- Invite others to edit your cloud documents
- Share documents for review
- Workspace
- Workspace basics
- Preferences
- Learn faster with the Photoshop Discover Panel
- Create documents
- Place files
- Default keyboard shortcuts
- Customize keyboard shortcuts
- Tool galleries
- Performance preferences
- Contextual Task Bar
- Use tools
- Presets
- Grid and guides
- Touch gestures
- Use the Touch Bar with Photoshop
- Touch capabilities and customizable workspaces
- Technology previews
- Metadata and notes
- Place Photoshop images in other applications
- Rulers
- Show or hide non-printing Extras
- Specify columns for an image
- Undo and history
- Panels and menus
- Position elements with snapping
- Position with the Ruler tool
- Organize, share, and collaborate with Projects
- Refine Adobe Firefly generations
- Image and color basics
- How to resize images
- Work with raster and vector images
- Image size and resolution
- Acquire images from cameras and scanners
- Create, open, and import images
- View images
- Invalid JPEG Marker error | Opening images
- Viewing multiple images
- Customize color pickers and swatches
- High dynamic range images
- Match colors in your image
- Convert between color modes
- Color modes
- Erase parts of an image
- Blending modes
- Choose colors
- Customize indexed color tables
- Image information
- Distort filters are unavailable
- About color
- Color and monochrome adjustments using channels
- Choose colors in the Color and Swatches panels
- Sample
- Color mode or Image mode
- Color cast
- Add a conditional mode change to an action
- Add swatches from HTML CSS and SVG
- Bit depth and preferences
- Layers
- Layer basics
- Nondestructive editing
- Create and manage layers and groups
- Select, group, and link layers
- Place images into frames
- Layer opacity and blending
- Mask layers
- Apply Smart Filters
- Layer comps
- Move, stack, and lock layers
- Mask layers with vector masks
- Manage layers and groups
- Layer effects and styles
- Edit layer masks
- Extract assets
- Reveal layers with clipping masks
- Generate image assets from layers
- Work with Smart Objects
- Blending modes
- Combine multiple images into a group portrait
- Combine images with Auto-Blend Layers
- Align and distribute layers
- Copy CSS from layers
- Load selections from a layer or layer mask's boundaries
- Knockout to reveal content from other layers
- Selections
- Get started with selections
- Make selections in your composite
- Select and Mask workspace
- Select with the marquee tools
- Select with the lasso tools
- Adjust pixel selections
- Move, copy, and delete selected pixels
- Create a temporary quick mask
- Select a color range in an image
- Convert between paths and selection borders
- Channel basics
- Save selections and alpha channel masks
- Select the image areas in focus
- Duplicate, split, and merge channels
- Channel calculations
- Get started with selections
- Image adjustments
- Replace object colors
- Perspective warp
- Reduce camera shake blurring
- Healing brush examples
- Export color lookup tables
- Adjust image sharpness and blur
- Understand color adjustments
- Apply a Brightness/Contrast adjustment
- Adjust shadow and highlight detail
- Levels adjustment
- Adjust hue and saturation
- Adjust vibrance
- Adjust color saturation in image areas
- Make quick tonal adjustments
- Apply special color effects to images
- Enhance your image with color balance adjustments
- High dynamic range images
- View histograms and pixel values
- Match colors in your image
- Crop and straighten photos
- Convert a color image to black and white
- Adjustment and fill layers
- Curves adjustment
- Blending modes
- Target images for press
- Adjust color and tone with Levels and Curves eyedroppers
- Adjust HDR exposure and toning
- Dodge or burn image areas
- Make selective color adjustments
- Image repair and restoration
- Image enhancement and transformation
- Drawing and painting
- Paint symmetrical patterns
- Draw rectangles and modify stroke options
- About drawing
- Draw and edit shapes
- Create star or any other pointed shape
- Painting tools
- Create and modify brushes
- Blending modes
- Add color to paths
- Edit paths
- Paint with the Mixer Brush
- Brush presets
- Gradients
- Gradient interpolation
- Fill and stroke selections, layers, and paths
- Draw with the Pen tools
- Create patterns
- Generate a pattern using the Pattern Maker
- Manage paths
- Manage pattern libraries and presets
- Draw or paint with a graphics tablet
- Create textured brushes
- Add dynamic elements to brushes
- Gradient
- Paint stylized strokes with the Art History Brush
- Paint with a pattern
- Sync presets on multiple devices
- Migrate presets, actions, and settings
- Text
- Filters and effects
- Saving and exporting
- Color Management
- Web, screen, and app design
- Video and animation
- Printing
- Automation
- Troubleshooting
Path segments, components, and points
A path consists of one or more straight or curved segments. Anchor points mark the end points of the path segments. On curved segments, each selected anchor point displays one or two direction lines, ending in direction points. The positions of direction lines and points determine the size and shape of a curved segment. Moving these elements reshapes the curves in a path.
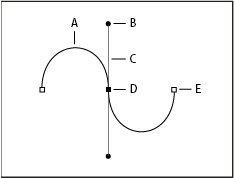
A. Curved line segment B. Direction point C. Direction line D. Selected anchor point E. Unselected anchor point

A path can be closed, with no beginning or end (for example, a circle), or open, with distinct end points (for example, a wavy line).
Smooth curves are connected by anchor points called smooth points. Sharply curved paths are connected by corner points.
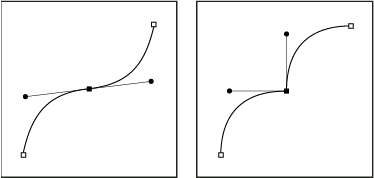

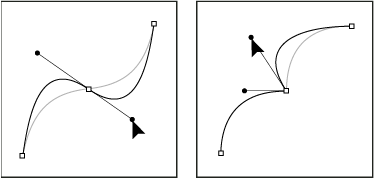
When you move a direction line on a smooth point, the curved segments on both sides of the point are adjusted simultaneously. By comparison, when you move a direction line on a corner point, only the curve on the same side of the point as the direction line is adjusted.

A path does not have to be one connected series of segments. It can contain more than one distinct and separate path component. Each shape in a shape layer is a path component, as described by the layer’s clipping path.

Select a path
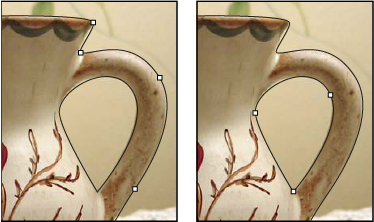
Selecting a path component or path segment displays all of the anchor points on the selected portion, including any direction lines and direction points if the selected segment is curved. Direction handles appear as filled circles, selected anchor points as filled squares, and unselected anchor points as hollow squares.
-
Do one of the following:
To select a path component (including a shape in a shape layer), select the Path Selection tool
 , and click anywhere inside the path component. If a path consists of several path components, only the path component under the pointer is selected.
To select a path segment, select the Direct Selection tool
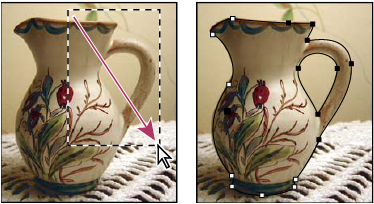
 , and click one of the segment’s anchor points, or drag a marquee over part of the segment.

Drag a marquee to select segments. 
Drag a marquee to select segments. -
To select additional path components or segments, select the Path Selection tool or the Direct Selection tool, and then hold down Shift while selecting additional paths or segments.Note
When the Direct Selection tool is selected, you can select the entire path or path component by Alt-clicking (Windows) or Option-clicking (Mac OS) inside the path. To activate the Direct Selection tool when most other tools are selected, position the pointer over an anchor point, and press Ctrl (Windows) or Command (Mac OS).
Select multiple paths | Photoshop
You can select multiple paths on the same layer or across different layers.
-
In the Paths panel, do any of the following to make the paths visible:
- Shift-click to select contiguous paths.
- Ctrl-click (Windows) or Command-click (Mac OS) to select non-contiguous paths.
-
Select the Path Selection tool or the Direct Selection tool and do any of the following:
- Drag over the segments.
- Shift-click the paths.
-
To select additional path components or segments, select the Path Selection tool or the Direct Selection tool, and then hold down the Shift key while selecting additional paths or segments.
NoteYou can choose to work with paths in the isolation mode. To isolate only the layer containing a path, with the path active, double-click using a selection tool. You can also isolate single or multiple layers by using the Select/Isolate Layers menu item or by setting Layer Filtering to Selected.
You can exit the isolation mode in several ways, such as:
- Turning off Layer Filtering
- Switching Layer Filtering to something other than Selected
- Double-clicking away from a path using the path selection tools
Reorder paths
You can reorder saved paths that are not Shape, Type, or Vector Mask paths in the Paths panel.
-
In the Paths panel, drag the path to the position you want. In Photoshop, you can select and drag more than one path simultaneously.
Duplicate paths
-
In the Paths panel, select the path you want to duplicate. In Photoshop, you can select more than one path.
-
Do any of the following:
- Alt-drag (Windows) or Option-drag the paths.
- Choose Duplicate Path from the panel menu.
Specify path options
You can define the color and thickness of path lines to suit your taste and for easier visibility. While creating a path—using the Pen tool, for example—click the gear icon (![]() ) in the Options bar. Now specify the color and thickness of path lines. Also, specify whether you want to preview path segments as you move the pointer between clicks (Rubber Band effect).
) in the Options bar. Now specify the color and thickness of path lines. Also, specify whether you want to preview path segments as you move the pointer between clicks (Rubber Band effect).


Adjust path segments
You can edit a path segment at any time, but editing existing segments is slightly different from drawing them. Keep the following tips in mind when editing segments:
If an anchor point connects two segments, moving that anchor point always changes both segments.
When drawing with the Pen tool, you can temporarily activate the Direct Selection tool so that you can adjust segments you’ve already drawn; press Ctrl (Windows) or Command (Mac OS) while drawing.
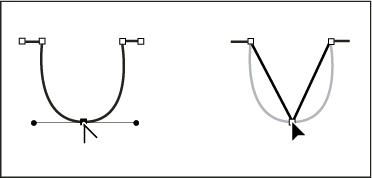
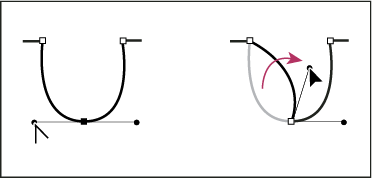
When you initially draw a smooth point with the Pen tool, dragging the direction point changes the length of the direction line on both sides of the point. However, when you edit an existing smooth point with the Direct Selection tool, you change the length of the direction line only on the side you’re dragging.
Move straight segments
-
With the Direct Selection tool
 , select
the segment you want to adjust.
-
Drag the segment to its new position.
Adjust the length or angle of straight segments
-
With the Direct Selection tool
 select an anchor point on the segment you want to adjust.
 -
Drag the anchor point to the desired position. Shift-drag to constrain the adjustment to multiples of 45°.
Adjust the position or shape of curved segments
-
With the Direct Selection tool
 ,, select
a curved segment, or an anchor point on either end of the curved
segment. Direction lines appear, if any are present. (Some curved
segments use just one direction line.)
-
Do any of the following:
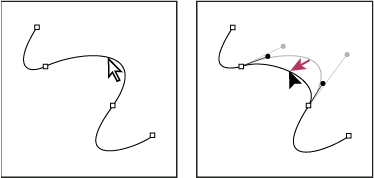
To adjust the position of the segment, drag the segment. Shift-drag to constrain the adjustment to multiples of 45°.

Click to select the curve segment. Then drag to adjust. 
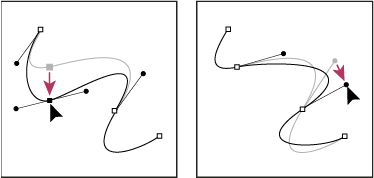
Click to select the curve segment. Then drag to adjust. To adjust the shape of the segment on either side of a selected anchor point, drag the anchor point or the direction point. Shift-drag to constrain movement to multiples of 45°.

Drag the anchor point, or drag the direction point. 
Drag the anchor point, or drag the direction point. NoteAdjusting a path segment also adjusts the related segments, letting you intuitively transform path shapes. To only edit segments between the selected anchor points, similar to earlier Photoshop versions, select Constrain Path Dragging in the options bar.
NoteYou can also apply a transformation, such as scaling or rotating, to a segment or anchor point.
Delete a segment
-
(Optional) If you’re creating an opening in a closed path, select the Add Anchor Point tool
 , and
add two points where you want the cut to occur.
-
Select the Direct Selection tool
 , and
select the segment you want to delete.
-
Press Backspace (Windows) or Delete (Mac OS) to delete the selected segment. Pressing Backspace or Delete again erases the rest of the path.
Delete the direction line of an anchor point
- Using the Convert Anchor Point tool, click the anchor point of the direction line.
The smooth point becomes a corner point. For more information, see Convert between smooth points and corner points.
Extend an open path
-
Using the Pen tool, position the pointer over the endpoint of the open path you want to extend. The pointer changes when it’s precisely positioned over the endpoint.
-
Click the endpoint.
-
Do one of the following:
To create a corner point, position the Pen tool where you want to end the new segment, and click. If you are extending a path that ends at a smooth point, the new segment will be curved by the existing direction line.
To create a smooth point, position the Pen tool where you want to end the new curved segment, and drag.
Connect two open paths
-
Using the Pen tool, position the pointer over the endpoint of the open path that you want to connect to another path. The pointer changes when it’s precisely positioned over the endpoint.
-
Click the endpoint.
-
Do one of the following:
To connect the path to another open path, click an endpoint on the other path. When you precisely position the Pen tool over the other path’s endpoint, a small merge symbol
 appears
next to the pointer.
appears
next to the pointer.To connect a new path to an existing path, draw the new path near the existing path, and then move the Pen tool to the existing path’s (unselected) endpoint. Click that endpoint when you see the small merge symbol that appears next to the pointer.
Move or nudge anchor points or segments using the keyboard
-
Select the anchor point or path segment.
-
Click or hold down any of the arrow keys on the keyboard to move 1 pixel at a time in the direction of the arrow.
Hold down the Shift key in addition to the arrow key to move 10 pixels at a time.
Add or delete anchor points
Adding anchor points can give you more control over a path or it can extend an open path. However try not to add more points than necessary. A path with fewer points is easier to edit, display, and print. You can reduce the complexity of a path by deleting unnecessary points.
The toolbox contains three tools for adding or deleting points: the Pen tool ![]() , the Add Anchor Point tool
, the Add Anchor Point tool ![]() , and the Delete Anchor Point tool
, and the Delete Anchor Point tool ![]() .
.
By default, the Pen tool changes to the Add Anchor Point tool as you position it over a selected path, or to the Delete Anchor Point tool as you position it over an anchor point. You must select Auto Add/Delete in the options bar to enable the Pen tool to automatically change to the Add Anchor Point or Delete Anchor Point tool.
You can select and edit multiple paths simultaneously. You can also reshape a path while adding anchor points by clicking and dragging as you add.
Don’t use the Delete or Backspace keys or the Edit > Cut or Edit > Clear commands to delete anchor points. These keys and commands delete the point and line segments that connect to that point.
Add or delete anchor points
-
Select the path you want to modify.
-
Select the Pen tool, the Add Anchor Point tool, or the Delete Anchor Point tool.
-
To add an anchor point, position the pointer over a path segment and click. To delete an anchor point, position the pointer over an anchor point and click.
Disable or temporarily override automatic Pen tool switching
You can override automatic switching of the Pen tool to the Add Anchor Point tool or the Delete Anchor Point tool. This is useful when you want to start a new path on top of an existing path.
- In Photoshop, deselect Auto Add/Delete in the options bar.
Convert between smooth points and corner points
-
Select the path you want to modify.
-
Select the Convert Point tool, or use the Pen tool and hold down Alt (Windows) or Option (Mac OS).Note
To activate the Convert Point tool while the Direct Selection tool is selected, position the pointer over an anchor point, and press Ctrl+Alt (Windows) or Command+Option (Mac OS).
-
Position the Convert Point tool over the anchor point you want to convert, and do one of the following:
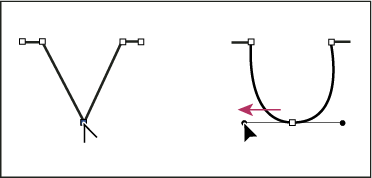
To convert a corner point to a smooth point, drag away from the corner point to make direction lines appear.

Dragging a direction point out of a corner point to create a smooth point 
Dragging a direction point out of a corner point to create a smooth point To convert a smooth point to a corner point without direction lines, click the smooth point.

Clicking a smooth point to create a corner point 
Clicking a smooth point to create a corner point To convert a corner point without direction lines to a corner point with independent direction lines, first drag a direction point out of a corner point (making it a smooth point with direction lines). Release the mouse button only (don’t release any keys you may have pressed to activate the Convert Anchor Point tool), and then drag either direction point.
To convert a smooth point to a corner point with independent direction lines, drag either direction point.

Converting a smooth point to a corner point 
Converting a smooth point to a corner point
Adjust path components
You can reposition a path component (including a shape in a shape layer) anywhere within an image. You can copy components within an image or between two Photoshop images. Using the Path Selection tool, you can merge overlapping components into a single component. All vector objects, whether they are described by a saved path, work path, or vector mask, can be moved, reshaped, copied, or deleted.
You can also use the Copy and Paste commands to duplicate vector objects between a Photoshop image and an image in another application, such as Adobe Illustrator.
Change the overlap mode for the selected path component
-
Using the Path Selection tool
 , drag
a marquee to select existing path areas.
-
Combine Shapes
Adds the path area to overlapping path areas.
Subtract From Shape Area
Removes the path area from overlapping path areas.
Intersect Shape Areas
Restricts the area to the intersection of the selected path area and overlapping path areas.
Exclude Overlapping Shape Areas
Excludes the overlap area.
Show or hide the selected path component
Do one of the following:
- Choose View > Show > Target Path.
- Choose View > Extras. This command also shows or hides a grid, guides, selection edges, annotations, and slices.
Move a path or path component
-
Select the path name in the Paths panel, and use the Path Selection tool
 to select
the path in the image. To select multiple path components, Shift-click each
additional path component to add it to the selection.
-
Drag the path to its new location. If you move any part of a path beyond the canvas boundaries, the hidden part of the path is still available.
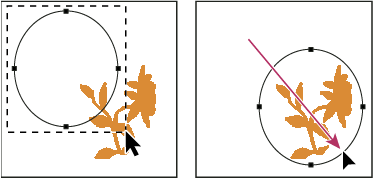
Dragging a path to a new location 
Dragging a path to a new location NoteIf you drag a path so that the move pointer is over another open image, the path is copied to that image.
Reshape a path component
-
Select the path name in the Paths panel, and use the Direct Selection tool
 to
select an anchor point in the path.
-
Drag the point or its handles to a new location.
Merge overlapping path components
-
Select the path name in the Paths panel, and select the Path Selection tool
 .
.
-
To create a single component from all overlapping components, choose Merge Shape Components from the Path Operations drop-down menu in the options bar.
Copy a path component or path
Do any of the following:
- To copy a path component as you move
it, select the path name in the Paths panel, and click a path component
with the Path Selection tool
 . Then
Alt-drag (Windows) or Option-drag (Mac OS) the selected
path.
 - To copy a path without renaming it, drag the path name
in the Paths panel to the New Path button
 at
the bottom of the panel.
 - To copy and rename a path, Alt-drag (Windows) or Option-drag (Mac OS) the path in the Paths panel to the New Path button at the bottom of the panel. Or select the path to copy, and choose Duplicate Path from the Paths panel menu. Enter a new name for the path in the Duplicate Path dialog box, and click OK.
- To copy a path or path component into another path, select the path or path component you want to copy, and choose Edit > Copy. Then select the destination path, and choose Edit > Paste.
Copy path components between two Photoshop files
-
Open both images.
-
In the source image, use the Path Selection tool
 to
select the entire path or the path components that you want to copy.
-
To copy the path component, do any of the following:
Drag the path component from the source image to the destination image. The path component is copied to the active path in the Paths panel.
In the source image, select the path name in the Paths panel and choose Edit > Copy to copy the path. In the destination image, choose Edit > Paste. You can also use this method to combine paths in the same image.
To paste the path component into the destination image, select the path component in the source image, and choose Edit > Copy. In the destination image, choose Edit > Paste.
Delete a path component
-
Select the path name in the Paths panel, and click a path component with the Path Selection tool
 .
.
-
Press Backspace (Windows) or Delete (Mac OS) to delete the selected path component.
Align and distribute path components
You can align and distribute path components that are described in a single path. For example, you can align the left edges of several shapes contained in a single layer or distribute several components in a work path along their horizontal centers.
To align shapes that are on separate layers, use the Move tool.
- To align components, use the Path Selection tool
 to select the components you want to align. Then choose an option from the Path Alignment drop-down menu in the options bar.


- To distribute components, select at least three components you want to distribute. Then choose an option from the Path Arrangement drop-down menu in the options bar.


