- Lightroom Classic User Guide
- Introduction to Lightroom Classic
- What's new in Lightroom Classic
- Lightroom Classic Release Notes
- Lightroom Classic technical requirements
- Keyboard shortcuts
- Lightroom Classic FAQ
- Lightroom Classic Key Concepts
- Lightroom Classic tutorials
- Set Preferences for working in Lightroom Classic
- Reset Preferences for working in Lightroom Classic
- Supported image formats
- Workspace
- Import photos
- Specify import options
- Set import preferences
- Import photos from a camera or card reader
- Import photos from a folder on a hard drive
- Import photos automatically
- Import photos from Photoshop Elements
- Import photos from a tethered camera
- Select best photos while importing with Assisted Culling
- The Filename Template Editor and Text Template Editor
- Set up tethered camera support for Fujifilm cameras
- Organize photos in Lightroom Classic
- Face recognition
- Work with photo collections
- Group photos into stacks
- Flag, label, and rate photos
- Use keywords
- Metadata basics and actions
- Save metadata to external sidecar files
- Find photos in the catalog
- Work with video in Lightroom Classic
- Advanced metadata actions
- Use the Quick Develop panel
- Select best photos with Assisted Culling
- Group your photos into a stack
- Process and develop photos
- Develop module basics
- Apply Presets
- Create panoramas and HDR panoramas
- Flat-Field Correction
- Correct distorted perspective in photos using Upright
- Improve image quality using Enhance
- Work with image tone and color
- Edit your images with Color Mixer tool
- Masking
- Apply local adjustments
- HDR photo merge
- Develop module options
- Retouch photos
- Cure red eye and pet eye effects
- Use the Radial Filter tool
- Adjustments with Lens Blur
- Edit and Export in HDR
- Remove Tool
- Remove distracting people
- Remove reflections
- Remove sensor dust in a photo
- Viewing photos
- Export photos
- Work with external editors
- Manage catalogs and files
- Maps
- Photo books
- Slideshows
- Print photos
- Web galleries
- Content Authenticity
- Lightroom and Adobe services
- Troubleshooting
- Technical Support
- Performance Guidelines
- Technical issues
- GPU Issues
- Startup Issues
- Rendering Issues
- Stability Issues
- Miscellaneous Issues
- Workflow Issues
- Catalog Issues
- Sync Issues
The color conundrum
No device in the digital photographic workflow can reproduce the full range of colors viewable to the human eye. Each device operates within a specific color space, which simply describes a range, or gamut, of colors that the device can record, store, edit, or output. Some color spaces are bigger than others. For example, the CIE Lab space is large; the sRGB space, used by many web browsers, is relatively small.
In addition, each device describes color either additively, using the RGB color model, or subtractively, using the CMYK color model. Cameras and monitors use RGB; printers use CMYK.
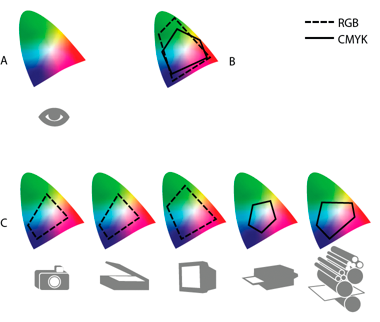
A. Lab color space B. An image's color spaces C. Device color spaces

Because of these varying color spaces, colors often look different depending on where you view them. Color management systems use profiles to reconcile color differences among devices so that you can confidently predict the color that you'll see when you share or print photos.
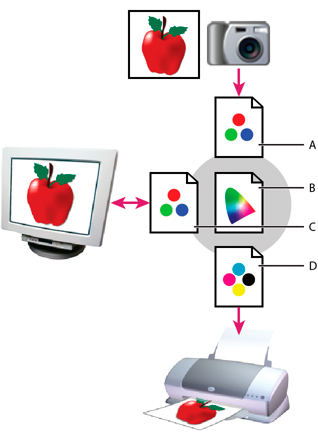
A. Profiles describe the color spaces of the camera and the image. B. Using the profiles, the color management system identifies the image's actual colors. C. The monitor's profile tells the color management system how to translate the image's colors to the monitor's color space. D. Using the printer profile, the color management system translates the image's colors to the printer's color space, so the colors appear correctly in print.

Lightroom Classic simplifies color management by displaying colors using device-independent color spaces. This means that all you need to do before working in Lightroom Classic is to calibrate your monitor. Then, when you’re in Lightroom Classic, choose color settings or color profiles when you’re ready to output your photos.
How Lightroom Classic manages color
Lightroom Classic primarily uses the Adobe RGB color space to display colors. The Adobe RGB gamut includes most of the colors that digital cameras can capture as well as some printable colors (cyans and blues, in particular) that can’t be defined using the smaller, web-friendly sRGB color space.
Lightroom Classic uses Adobe RGB:
- for previews in the Library, Map, Book, Slideshow, Print, and Web modules
- when printing in Draft mode
- in exported PDF slideshows and uploaded web galleries
- when you send a book to Blurb.com (If you export books as PDF or JPEG from the Book module, however, you can choose sRGB or a different color profile.)
- for photos uploaded to Facebook and other photo-sharing sites using the Publish Services panel
In the Develop module, by default Lightroom Classic CC displays previews using the ProPhoto RGB color space. ProPhoto RGB contains all of the colors that digital cameras can capture, making it an excellent choice for editing images. In the Develop module, you can also use the Soft Proofing panel to preview how color looks under various color-managed printing conditions.
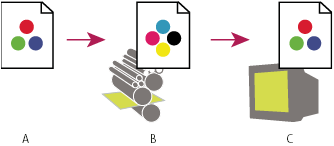
A. Image is edited in the Develop module. B. Image's color values are translated to the color space of chosen print conditions C. Lightroom Classic displays proof profile's interpretation of the image's color values.

When you export or print photos from Lightroom Classic, you can choose a profile or a color space to determine how the colors you see in Lightroom Classic will appear on the device you’re sending the photo to. For example, you can export using sRGB if you’re going to share photos online. If you’re printing (other than Draft mode), you can choose a custom color profile for your device.
Calibrate your monitor
To help Lightroom Classic display colors reliably and consistently, calibrate your monitor. When you calibrate your monitor, you are adjusting it so that it conforms to a known specification. After your monitor is calibrated, you can optionally save the settings as a color profile for your monitor.
-
If you are calibrating a CRT monitor, make sure it has been turned on for at least a half hour. This gives it sufficient time to warm up and produce more consistent output.
-
Set the ambient lighting in your room to be consistent with the brightness and color of the lighting conditions that you usually work under.
-
Make sure your monitor is displaying thousands of colors or more. Ideally, make sure it is displaying millions of colors or 24-bit or higher.
-
Remove colorful background patterns on your monitor desktop, and set your desktop to display neutral grays. Busy patterns or bright colors surrounding a document interfere with accurate color perception.
-
For best results, calibrate and profile your monitor using third-party software and measuring devices. In general, using a measuring device such as a colorimeter along with software can create more accurate profiles because an instrument can measure the colors displayed on a monitor far more accurately than the human eye.
Otherwise, use the monitor calibration tools that come with Windows or Mac OS. To calibrate your monitor using the utility in your operating system see one of the following:
- OS X Mavericks: Calibrate your display (Apple Support)
- OS X Mountain Lion: Calibrate your display (Apple Support)
- Calibrate your display in Windows 7 (Microsoft Support)
- Get the best display on your monitor (Microsoft Support)
NoteMonitor performance changes and declines over time; recalibrate and profile your monitor every month or so. If you find it difficult or impossible to calibrate your monitor to a standard, it may be too old and faded.
Most profiling software automatically assigns the new profile as the default monitor profile. For instructions on how to manually assign the monitor profile, see your operating system’s Help.
Install a color profile
Color profiles are often installed when a device is added to your system. The accuracy of these profiles (often called generic profiles or canned profiles) varies from manufacturer to manufacturer. You can also obtain profiles from a custom profile service, download profiles from the web, or create custom profiles using professional profiling equipment.
1. To install a color profile, copy it to one of the following locations:
- Windows 7, 8: \Windows\system32\spool\drivers\color
- Mac OS: /Library/ColorSync/Profiles or /Users/[user name]/Library/ColorSync/Profiles
Tip: By default on Mac OS 10.7 (Lion), the user Library folder is hidden. If you don’t see it in the Finder, press Option and click the Go menu. Then, choose Library. See Access hidden user library files | Mac OS 10.7 and later.
2. Restart Lightroom Classic.