Choose Enhance > Auto Sharpen.
- Get to know Photoshop Elements
- Photoshop Elements User Guide
- Introduction to Photoshop Elements
- Workspace and environment
- Get to know the Home screen
- Workspace basics
- Preferences
- Tools
- Contextual task bar
- Panels and bins
- Open files
- Rulers, grids, and guides
- Enhanced Quick Mode
- File information
- Presets and libraries
- Multitouch support
- Scratch disks, plug-ins, and application updates
- Undo, redo, and cancel actions
- Viewing images
- Importing Files
- Fixing and enhancing photos
- Resize images
- Cropping
- Process camera raw image files
- Add blur, replace colors, and clone image areas
- Adjust shadows and light
- Retouch and correct photos
- Restore Photos
- Combine Photos
- Sharpen photos
- Transforming
- Auto Smart Tone
- Recomposing
- Using actions to process photos
- Photomerge Compose
- Create a panorama
- Moving Overlays
- Moving Elements
- Moving Photos
- Adding shapes and text
- Quick Actions
- Generative AI
- Guided edits, effects, and filters
- Guided mode
- Filters
- Guided mode Photomerge edits
- Guided mode Basic edits
- Adjustment filters
- Effects
- Guided mode Fun edits
- Guided mode Special edits
- Artistic filters
- Guided mode Color edits
- Guided mode Black & White edits
- Blur filters
- Brush Stroke filters
- Distort filters
- Other filters
- Noise filters
- Render filters
- Sketch filters
- Stylize filters
- Texture filters
- Pixelate filters
- Working with colors
- Working with selections
- Working with layers
- Creating photo projects
- Saving, printing, and sharing photos
- Keyboard shortcuts
- Keys for selecting tools
- Keys for selecting and moving objects
- Keys for the Layers panel
- Keys for showing or hiding panels (expert mode)
- Keys for painting and brushes
- Keys for using text
- Keys for the Liquify filter
- Keys for transforming selections
- Keys for the Color Swatches panel
- Keys for the Camera Raw dialog box
- Keys for the Filter Gallery
- Keys for using blending modes
- Keys for viewing images (expertmode)
Sharpening overview
Sharpening enhances the definition of edges in an image. Whether your images come from a digital camera or a scanner, most images can benefit from sharpening. When sharpening images, keep the following in mind:
Sharpening cannot correct a severely blurred image.
Sharpen your image on a separate layer so that you can resharpen it later if you need to change the adjustment. Set the layer’s blending mode to Luminosity to avoid color shifts along edges. If you find that highlights or shadows are lessened after you sharpen, use the layer blending controls to prevent sharpening in highlights and shadows.
If you need to reduce image noise, do so before sharpening so that you don’t intensify the noise.
Sharpen your image multiple times in small amounts. Sharpen the first time to correct blur captured by a scanner or digital camera. After you’ve color corrected and resized your image, sharpen it again.
If possible, judge your sharpening by outputting your image. The amount of sharpening needed varies depending on whether the image is printed or displayed on a web page.
Sharpen an image
The Auto Sharpen command increases clarity or focus without the risk of oversharpening an image.
The Sharpen tool focuses soft edges in a photo to increase clarity or focus. Oversharpening a photo gives it a grainy look. You can avoid oversharpening by setting a lower Strength value in the options bar. It’s best to make the sharpening subtle and increase it as necessary by dragging over the area several times, building up the sharpness each time.
The Adjust Sharpness dialog box has sharpening controls not available with the Sharpen tool or with Auto Sharpen. You can set the sharpening algorithm or control the amount of sharpening that occurs in shadow and highlight areas.
Automatically sharpen an image
Sharpen areas of an image


-
Select the Sharpen tool
 .
.
-
Set options in the options bar:
Mode
Determines how the paint that you apply blends with the existing pixels in the image.
Brush
Sets the brush tip. Click the arrow next to the brush sample, choose a brush category from the Brushes menu, and then select a brush thumbnail.
Size
Sets the size of the brush, in pixels. Drag the Size pop‑up slider or enter a size in the text box.
Strength
Specifies the amount of sharpening that occurs with each stroke.
Sample All Layers
Sharpens all visible layers. If this is deselected, the tool sharpens only the active layer.
Protect Detail
Select Protect Detail to enhance details and minimize pixelated artifacts. Deselect this option if you want to produce more exaggerated sharpening effects
-
Drag over the part of the image you want to sharpen.
Precisely sharpen an image
-
Choose Enhance > Adjust Sharpness.
-
Select Preview check box.
-
Set any of the following options to sharpen your image, and then click OK.
Amount
Sets the amount of sharpening. Type a number in the box or drag the slider to increase or decrease the contrast between edge pixels, giving the appearance of greater sharpness.
Radius
Determines the number of pixels surrounding the edge pixels affected by the sharpening. Type a number in the box or drag the slider to change the radius value. As you increase the radius, sharpening becomes more obvious.
Remove
Sets the sharpening algorithm used to sharpen the image. Gaussian Blur is the method used by the Unsharp Mask filter. Lens Blur detects the edges and detail in an image, and provides finer sharpening of detail and reduced sharpening halos. Motion Blur attempts to reduce the effects of blur due to camera or subject movement. Select a blur option from the pop‑up menu.
Angle
Sets the direction of motion for the Motion Blur option of the Remove control. Type a number in the box or drag the angle dial to change the angle percentage to the left (counterclockwise) or right (clockwise).
More Refined
Processes the file more slowly for more accurate blur removal.
Use the Unsharp Mask filter
The Unsharp Mask filter reproduces a traditional film technique used to sharpen edges in an image. The Unsharp Mask filter corrects blur introduced during photographing, scanning, resampling, or printing. It is useful for images intended for both print and online viewing.
Unsharp Mask locates pixels that differ from surrounding pixels by the threshold you specify and increases the pixels’ contrast by the amount you specify. For neighboring pixels within the specified radius, the lighter pixels get lighter, and the darker pixels get darker.
The effects of the Unsharp Mask filter are far more pronounced on‑screen than in high-resolution printed output. If your final destination is printed output, experiment to determine what settings work best for your image.


-
In the Edit workspace, select an image, layer, or area.
-
Choose Enhance > Unsharp Mask.
-
Select the Preview option.
-
Set any of these options and click OK:
Amount
Determines how much to increase the contrast of pixels. For high-resolution printed images, an amount between 150% and 200% is usually best.
Radius
Specifies the number of pixels to sharpen around edges. For high-resolution images, a radius between 1 and 2 is usually recommended. A lower value sharpens only the edge pixels, whereas a higher value sharpens a wider band of pixels. This effect is much less noticeable in print than on‑screen, because a 2‑pixel radius represents a smaller area in a high-resolution printed image.
Threshold
Determines how far different pixels must be from the surrounding area before they are considered edge pixels and sharpened. To avoid introducing noise (in images with flesh tones, for example), experiment with Threshold values between 2 and 20. The default Threshold value (0) sharpens all pixels in the image.
Shake Reduction
Introduced in Photoshop Elements 14
When a camera or the photographer shakes while taking a picture, blurriness caused by the camera shake is introduced in the picture. It is not always possible to maintain high-shutter speeds to avoid camera shake. Taking pictures in low-light conditions may require the shutter to be open for long - resulting in shake-induced blur. Also, if the picture is taken from a moving vehicle, the image may turn out blurred due to shake caused by an uneven road.
You can reduce shake-induced blur in a photo using two methods: automatic and manual.
Automatic Shake Reduction
-
Open a photograph from the Photo Bin.
-
Choose Enhance > Auto Shake Reduction.
-
(Optional) If you are not satisfied with the result, click Enhanced > Automatic Shake Reduction, to run the process again.
-
In case you are unable to achieve shake reduction with the automatic mode, try reducing shake with the manual option.
Manual Shake Reduction
-
Open a photograph from the Photo Bin.
-
Click Enhance > Shake Reduction.
-
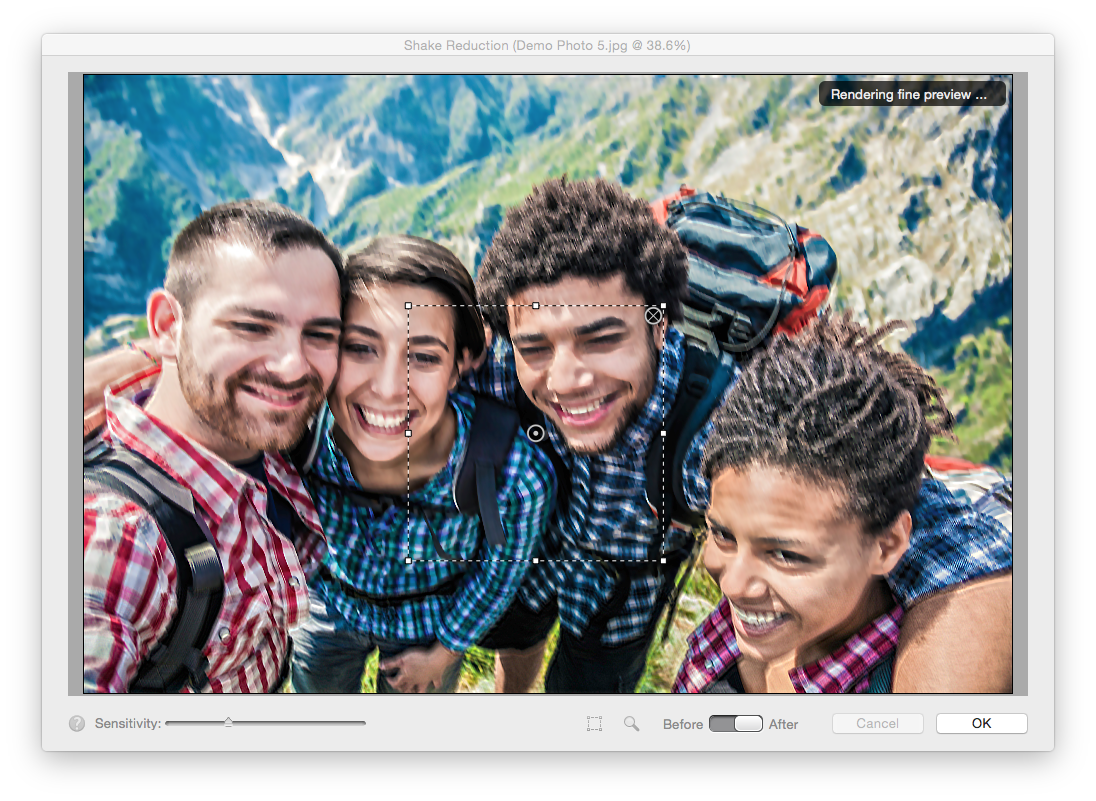
When the Shake reduction dialog starts, Photoshop Elements places a Shake Region on the image and starts to analyze the portion of the image for shake. When analysis is done, shake correction are applied across the photo.

The Shake Reduction dialog 
The Shake Reduction dialog -
Use the Sensitivity Slider to vary the shake threshold. Increasing the sensitivity may improve the resultant image.
-
Use the pin (
 ) at the center of a Shake Region to move it around. When you move a Shake Region, the area under the region is re-analyzed for shake corrections, and the image is optimized again.
-
To further analyze the photograph and reduce blurriness, add more Shake Regions.
- Do one of the following:
- Use the mouse to draw a rectangular shape on any part of the photo.
- Click the Shake Region icon (
 ) in the Shake Reduction dialog.
- Use the Sensitivity Slider to vary the shake threshold.
The new Shake Region is analyzed and corrections are applied.
NoteDraw Shake Reduction regions over areas of the image that have visible and prominent levels of blurring.

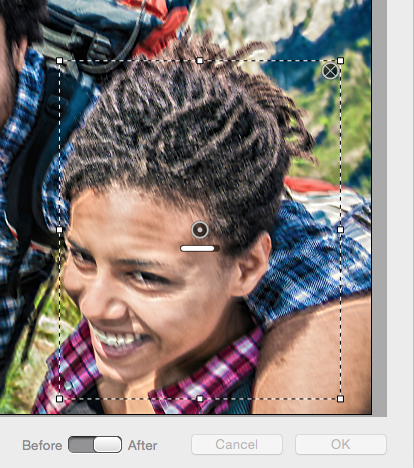
The Shake Reduction dialog. The Shake Region at the lower-right corner is currently being processed, and the progress bar is visible. 
The Shake Reduction dialog. The Shake Region at the lower-right corner is currently being processed, and the progress bar is visible. NoteIf the Shake Region created does not have enough area or information to sample the amount of shake, a warning (
 ) appears within the Shake Region. Use the handles of the Shake Region to increase the size of the Shake Region.
- Do one of the following:
-
(Optional) If you do not want to use a Shake Region:
- To temporarily exclude the Shake Region from being used to analyze the photo, click the pin to indicate it is excluded (
 ).
).
- To remove a Shake Region, select the pin of the region and click the delete icon (
 ) at the upper-right corner of the Shake Region.
- To temporarily exclude the Shake Region from being used to analyze the photo, click the pin to indicate it is excluded (
-
Use the Before/After toggle button to quickly view the original image and the current shake-corrected image.
-
Click OK to continue.