- Dreamweaver User Guide
- Introduction
- Dreamweaver and Creative Cloud
- Dreamweaver workspaces and views
- Set up sites
- About Dreamweaver sites
- Set up a local version of your site
- Connect to a publishing server
- Set up a testing server
- Import and export Dreamweaver site settings
- Bring existing websites from a remote server to your local site root
- Accessibility features in Dreamweaver
- Advanced settings
- Set site preferences for transferring files
- Specify proxy server settings in Dreamweaver
- Synchronize Dreamweaver settings with Creative Cloud
- Using Git in Dreamweaver
- Manage files
- Create and open files
- Manage files and folders
- Getting and putting files to and from your server
- Check in and check out files
- Synchronize files
- Compare files for differences
- Cloak files and folders in your Dreamweaver site
- Enable Design Notes for Dreamweaver sites
- Preventing potential Gatekeeper exploit
- Layout and design
- CSS
- Understand Cascading Style Sheets
- Laying out pages using CSS Designer
- Using CSS preprocessors in Dreamweaver
- How to set CSS Style preferences in Dreamweaver
- Move CSS rules in Dreamweaver
- Convert inline CSS to a CSS rule in Dreamweaver
- Work with div tags
- Apply gradients to background
- Create and edit CSS3 transition effects in Dreamweaver
- Format code
- Page content and assets
- Set page properties
- Set CSS heading properties and CSS link properties
- Work with text
- Find and replace text, tags, and attributes
- DOM panel
- Edit in Live View
- Encoding documents in Dreamweaver
- Select and view elements in the Document window
- Set text properties in the Property inspector
- Spell check a web page
- Using horizontal rules in Dreamweaver
- Add and modify font combinations in Dreamweaver
- Work with assets
- Insert and update dates in Dreamweaver
- Create and manage favorite assets in Dreamweaver
- Insert and edit images in Dreamweaver
- Add media objects
- Adding videos in Dreamweaver
- Insert HTML5 video
- Insert SWF files
- Add audio effects
- Insert HTML5 audio in Dreamweaver
- Work with library items
- Using Arabic and Hebrew text in Dreamweaver
- Linking and navigation
- jQuery widgets and effects
- Coding websites
- About coding in Dreamweaver
- Coding environment in Dreamweaver
- Set coding preferences
- Customize code coloring
- Write and edit code
- Code hinting and code completion
- Collapse and expand code
- Reuse code with snippets
- Lint code
- Optimize code
- Edit code in Design view
- Work with head content for pages
- Insert server-side includes in Dreamweaver
- Using tag libraries in Dreamweaver
- Importing custom tags into Dreamweaver
- Use JavaScript behaviors (general instructions)
- Apply built-in JavaScript behaviors
- About XML and XSLT
- Perform server-side XSL transformations in Dreamweaver
- Performing client-side XSL transformations in Dreamweaver
- Add character entities for XSLT in Dreamweaver
- Format code
- Cross-product workflows
- Installing and using extensions to Dreamweaver
- In-App updates in Dreamweaver
- Insert Microsoft Office documents in Dreamweaver (Windows only)
- Working with Fireworks and Dreamweaver
- Edit content in Dreamweaver sites using Contribute
- Dreamweaver-Business Catalyst integration
- Create personalized email campaigns
- Templates
- About Dreamweaver templates
- Recognizing templates and template-based documents
- Create a Dreamweaver template
- Create editable regions in templates
- Create repeating regions and tables in Dreamweaver
- Use optional regions in templates
- Define editable tag attributes in Dreamweaver
- How to create nested templates in Dreamweaver
- Edit, update, and delete templates
- Export and import xml content in Dreamweaver
- Apply or remove a template from an existing document
- Edit content in Dreamweaver templates
- Syntax rules for template tags in Dreamweaver
- Set highlighting preferences for template regions
- Benefits of using templates in Dreamweaver
- Mobile and multiscreen
- Dynamic sites, pages and web forms
- Understand web applications
- Set up your computer for application development
- Troubleshoot database connections
- Removing connection scripts in Dreamweaver
- Design dynamic pages
- Dynamic content sources overview
- Define sources of dynamic content
- Add dynamic content to pages
- Changing dynamic content in Dreamweaver
- Display database records
- Provide and troubleshoot live data in Dreamweaver
- Add custom server behaviors in Dreamweaver
- Building forms using Dreamweaver
- Use forms to collect information from users
- Create and enable ColdFusion forms in Dreamweaver
- Create web forms
- Enhanced HTML5 support for form elements
- Develop a form using Dreamweaver
- Building applications visually
- Build master and detail pages in Dreamweaver
- Build search and results pages
- Build a record insert page
- Build an update record page in Dreamweaver
- Building record delete pages in Dreamweaver
- Use ASP commands to modify database in Dreamweaver
- Build a registration page
- Build a login page
- Build a page that only authorized users can access
- Securing folders in Coldfusion using Dreamweaver
- Using ColdFusion components in Dreamweaver
- Test, preview, and publish websites
- Troubleshooting
Learn how to use the Files panel to manage, transfer, and synchronize files and folders between local and remotes sites in Dreamweaver. Also learn how the auto-recovery feature works in Dreamweaver.
The Files panel in Dreamweaver allows you to access and manage files associated with your site. You can toggle between the FTP View and the Git View in Files panel, to manage the files using an FTP server or Git repositories.
To open the Files panel, click Window > Files, or press F8 (on Windows) or Shift-⌘-F (on Mac).
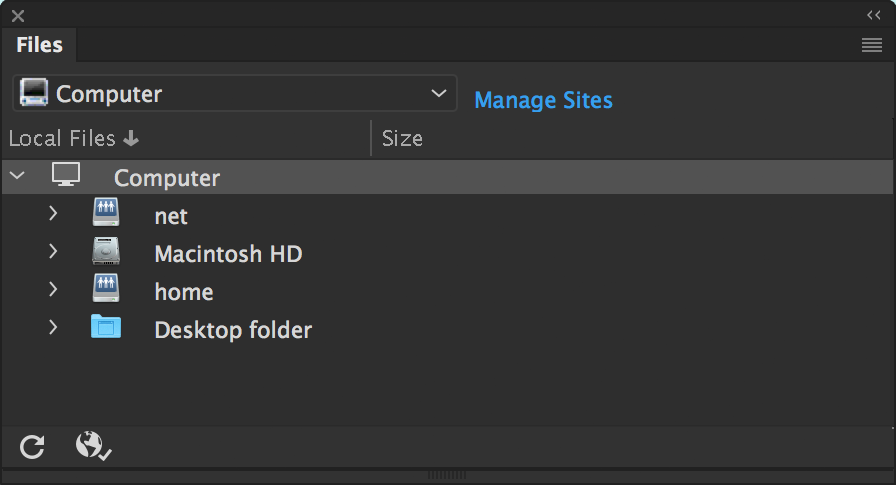
If you don't set up a site, the Files panel works simply lists all the drives or folders in your system. You can only use it to view files. You cannot transfer files back and forth from a remote system to your local system.
To learn more about the benefits of setting up a site, and for instructions on how to create a site, see About Dreamweaver sites.
Read on to know how to use the Files panel in each of these views.
Working with the Files panel in the FTP View
You can use the FTP view to view files and folders, check whether they are associated with a Dreamweaver site or not, and perform standard file maintenance operations, such as opening and moving files. The Files panel also helps you manage and transfer files to and from a remote server.
After you set up a site in Dreamweaver, you can use the Files panel in the following ways:
- Access sites, a server, and local drives
- View files and folders
- Manage files and folders in the Files panel
- Synchronize files and folders between local and remote servers
Read on to learn how to use the Files panel in the FTP View.
Options in the Files panel
At its simplest, the Files panel displays a list of only the local files in your computer. As you work more with the Files panel - setting up a site, setting up connections to remote servers, enabling check in and check out, more options appear in the Files panel.
Here's what the Files panel looks like:
- When no site is defined in Dreamweaver
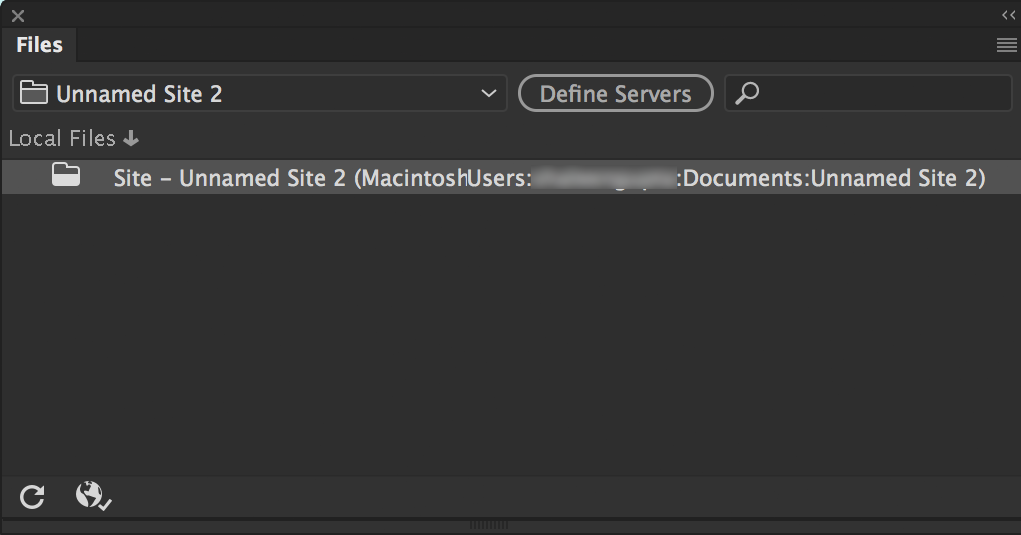
- When a site is defined but a server is not defined
- When a site is defined, server connections are defined, and check-in and check-out of files is enabled
For information on defining a site and server, see About Dreamweaver sites.
When no site is defined in Dreamweaver

When a site is defined but a server is not defined
When you define a Dreamweaver site, the files within your site are displayed. The Files panel also includes a button - Define servers, which is a prompt to start defining connections to remote and testing servers.

When a site is defined and servers are defined and check-in and check-out is enabled
All options on the Files panel are available for you to use after you define a site, and server. If you enable check-in and check-out, these options are also available to use.
Read on to find out more about what you can do with the Files panel.
For information on enabling check-in and check-out, see Check in and check out files.
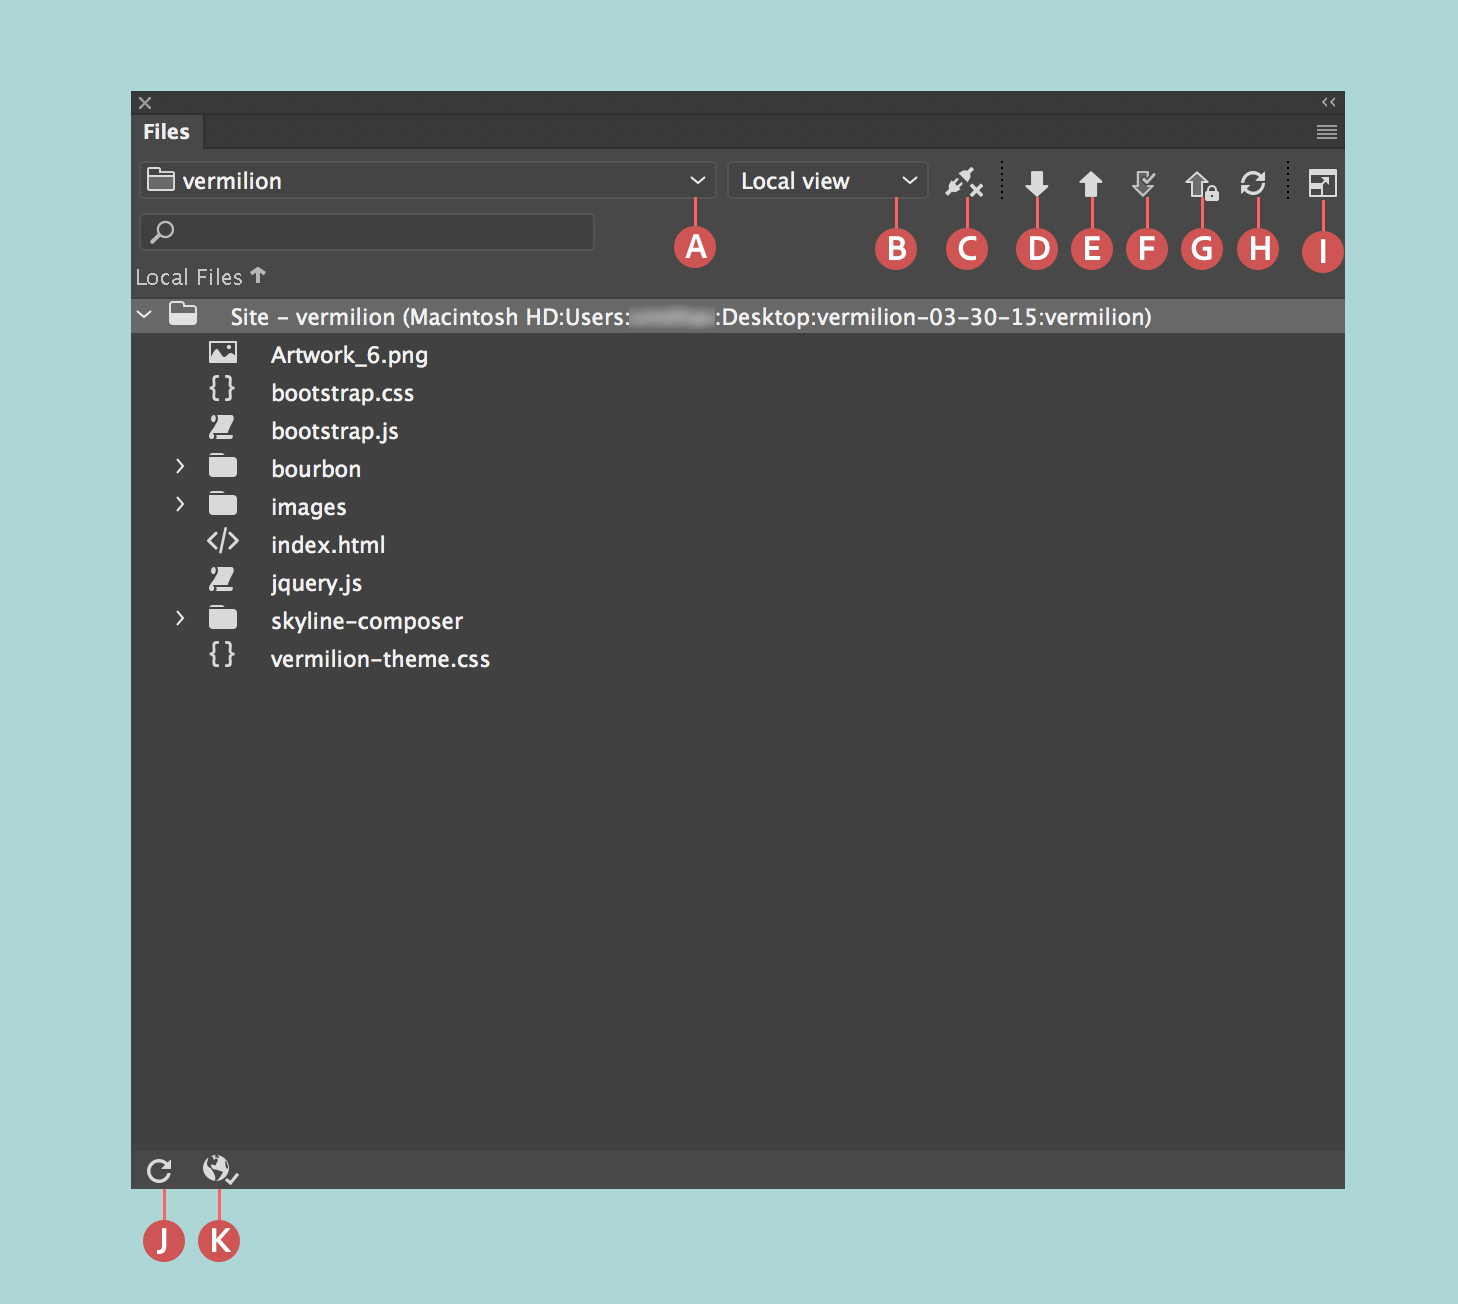
A. Site pop-up menu B. File view C. Connect to remote server D. Get files from remote server E. Put files to remote server F. Check out files G. Check in files H. Synchronize with remote server I. Expand/collapse J. Refresh K. File Activity

You can move the Files panel as necessary and set preferences for the panel.
The Site Files view, Testing Server view, and Synchronize buttons appear only in the expanded Files panel.
Site pop‑up menu
Lets you select a Dreamweaver site and display that site’s files. You can also use the Site menu to access all the files on your local disk, much like Windows Explorer (Windows) or the Finder (Mac).
File view
Lets you view files present in your local site root, remote server, or testing server. Select an option from the pop-up menu to see files in the respective view.
Connect to remote server
(FTP, RDS, and WebDAV protocol) Connects to or disconnects from the remote site. By default, Dreamweaver disconnects from the remote site if it has been idle for more than 30 minutes (FTP only). To change the time limit, select Edit > Preferences (Windows) or Dreamweaver > Preferences (Macintosh), then select Site from the category list on the left.
Get files from remote server
Copies the selected files from the remote site to your local site (overwriting the existing local copy of the file, if any). If Enable File Check In And Check Out is enabled, the local copies are read-only; the files remain available on the remote site for other team members to check out. If Enable File Check In and Check Out is disabled, the file copies have both read and write privileges.
Put files to remote server
Copies the selected files from the local site to the remote site.
Check out files
Transfers a copy of the file from the remote server to your local site (overwriting the existing local copy of the file, if any) and marks the file as checked out on the server. This option is not available if Enable File Check In and Check Out is disabled for the current site.
Check in files
Transfers a copy of the local file to the remote server and makes the file available for editing by others. The local file becomes read-only. This option is not available if Enable File Check In and Check Out is disabled for the current site.
Synchronize with remote server
Synchronizes the files between the local and remote folders.
Expand/Collapse
Expands or collapses the Files panel to display one or two panes. In the Expanded view, an additional option - View site FTP log is also available. When the Files panel is collapsed it displays the contents of the local site, the remote site, or the testing server as a list of files. When expanded, it displays the local site and either the remote site or testing server.
Refresh
Refreshes the local and remote directory lists. Use this button to manually refresh the directory lists if you deselected either Refresh Local File List Automatically or Refresh Remote File List Automatically in the Site Definition dialog box.
File Activity
Displays the background file activity.
The View Site FTP log is available if you expand the Files panel by clicking the Expand/collapse icon.
View Site FTP log
Displays the file structure of the remote and local sites in the panes of the Files panel. (A preference setting determines which site appears in the left pane and which appears in the right pane.) Site Files view is the default view for the Files panel.
The files Dreamweaver copies are the files you select in the active pane of the Files panel. If the Remote pane is active, the selected remote or testing server files are copied to the local site; if the Local pane is active, Dreamweaver copies the remote or testing server version of the selected local files to the local site.
The files Dreamweaver copies are the files you select in the active pane of the Files panel. If the Local pane is active, the selected local files are copied to the remote site or testing server; if the Remote pane is active, Dreamweaver copies the local versions of the selected remote server files to the remote site.
If you are putting a file that doesn’t already exist on the remote site, and Enable File Check In and Out is enabled, the file is added to the remote site as “checked out.” Click the Check In Files button if you want to add a file without the checked out status.
View files and folders
You can view files and folders in the Files panel, whether they are associated with a Dreamweaver site or not. When you view sites, files, or folders in the Files panel, you can change the size of the viewing area, and, for Dreamweaver sites, you can expand or collapse the Files panel.
For Dreamweaver sites, you can also customize the Files panel by changing the view—either your local or remote site—that appears by default in the collapsed panel. Or, you can switch the content views in the expanded Files panel using the Always Show option.
Search files in the files panel (Mac OS, Creative Cloud users only)
Use Live Search to locate files based on filename or text present in files. The site selected in the Files panel is used for search. If there is no site selected in the panel, the search option does not appear. For more information, see Search files based on filenames or content.
Change the size of the view area in the expanded Files panel
In the Files panel (Window > Files), with the panel expanded, drag the bar that separates the two views to increase or decrease the view area of the right or left pane.
Change the site view in Files panel (Dreamweaver sites only)
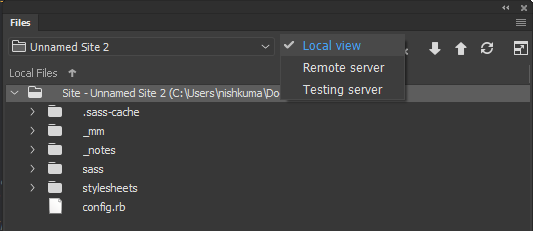
You can use the Files panel to view files present in your local site root, remote server, or testing server.
In the collapsed Files panel (Window > Files), select Local View, Remote Server, or Testing Server from the Site View pop‑up menu.
By default, Local View appears in the Site View menu.

View files outside of a Dreamweaver site
Navigate your computer using the Site pop‑up menu, much as you would if you were using Windows Explorer(Windows) or the Finder (Macintosh).
Work with files in the FTP View
You can open or rename files; add, move, or delete files; or refresh the Files panel after you make changes.
For Dreamweaver sites, you can also determine which files (on either the local or remote site) have been updated since the last time they were transferred.
Open a file
-
In the Files panel (Window > Files), select a site, server, or drive from the pop‑up menu (where the current site, server, or drive appears).
-
Navigate to the file you want to open.
-
Do one of the following:
Double-click the file’s icon.
Right-click (Windows) or Control‑click (Macintosh) the file’s icon, then select Open.
Dreamweaver opens the file in the Document window.
Create a file or folder
-
In the Files panel (Window > Files), select a file or folder.
Dreamweaver creates the new file or folder inside the currently selected folder, or in the same folder as the currently selected file.
-
Right-click (Windows) or Control‑click (Macintosh), then select New File or New Folder.
-
Enter a name for the new file or folder.
-
Press Enter (Windows) or Return (Macintosh).
Delete a file or folder
-
In the Files panel (Window > Files), select the file or folder you want to delete.
-
Right-click (Windows) or Control‑click (Macintosh), then select Edit > Delete.
Rename a file or folder
-
In the Files panel (Window > Files), select the file or folder you want to rename.
-
Do one of the following to activate the name of the file or folder:
Click in the filename, pause, then click again.
Right-click (Windows) or Control‑click (Macintosh) the file’s icon, then select Edit > Rename.
-
Type the new name over the existing name.
-
Press Enter (Windows) or Return (Macintosh).
Move a file or folder
-
In the Files panel (Window > Files), select the file or folder you want to move.
-
Do one of the following:
Copy the file or folder, then paste it in a new location.
Drag the file or folder to a new location.
-
Refresh the Files panel to see the file or folder in its new location.
Refresh the Files panel
To refresh the view in the Files panel, do one of the following:
- Right-click (Windows) or Control‑click (Macintosh) any file or folder, then select Refresh.
- (Dreamweaver sites only) Click the Refresh button in the Files panel toolbar (this option refreshes both panes).
Dreamweaver refreshes the Files panel when you make changes in another application, then return to Dreamweaver.
Find files in your Dreamweaver site
Dreamweaver makes it easy to find selected, open, checked out, or recently modified files in your site. You can also find files that are newer in your local or remote site.
Find an open file in your site
-
Open the file in the Document window.
-
Select Site > Locate in Site.
Dreamweaver selects the file in the Files panel.
NoteIf the open file in the Document window is not part of the current site in the Files panel, Dreamweaver attempts to determine which of your Dreamweaver sites the file belongs to; if the current file belongs to only one local site, Dreamweaver opens that site in the Files panel, then highlights the file.
Locate and select checked out files in a Dreamweaver site
Dreamweaver selects the files in the Files panel.
Find a selected file in your local or remote site
-
Select the file in the Local or Remote view of the Files panel (Window > Files).
-
Right-click (Windows) or Control‑click (Macintosh), then select Locate in Local Site or Locate in Remote Server (depending on where you selected the file).
Dreamweaver selects the file in the Files panel.
Locate and select files that are newer in the local site than in the remote site
Dreamweaver selects the files in the Files panel.
Locate and select files that are newer in the remote site than in the local site
Dreamweaver selects the files in the Files panel.
Find recently modified files in your site
-
In the collapsed Files panel (Window > Files), click the Options menu in the upper-right corner of the Files panel, and then select Edit > Select Recently Modified.
-
Do one of the following to indicate search dates for the report:
To report on all files modified in the last several days, select Files Created or Modified in the Last and enter a number in the box.
To report on all files modified within a specific time frame, click the Files Created or Modified Between radio button, then specify a date range.
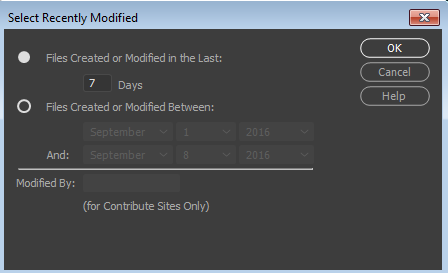
Finding recently modified files 
Finding recently modified files -
(Optional) Enter a user name in the Modified By box to limit your search to files modified by a specific user between the dates you indicated.Note
This option is only available for reports on Contribute sites.
-
Select a radio button to indicate where you want to view files listed in the report, if necessary:
Local Machine
if the site contains static pages.
Testing Server
if the site contains dynamic pages.
Other Location
if you want to enter a path in the text box.
NoteThis option assumes you defined a Testing Server in the Site Definition dialog box. If you have not defined a Testing Server and entered a URL prefix for that server, or if you are running the report for more than one site, this option is not available.
-
Click OK to save your settings.
Dreamweaver highlights the files that were modified within the selected time frame in the Files panel.
Identify and delete unused files
You can identify and delete files that are no longer used by other files in your site.
-
Select Site > Site Options > Check Links Sitewide.
Dreamweaver checks all the links in your site and displays the broken ones in the Results panel.
-
Select Orphaned Files from the menu on the Link Checker panel.
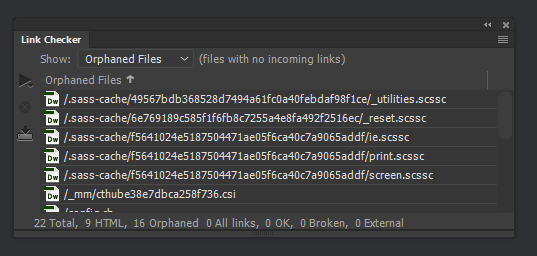
Viewing orphaned files - files with no incoming links 
Viewing orphaned files - files with no incoming links Dreamweaver displays all the files with no incoming links. This means that no files in your site link to these files.
-
Select the files you want to delete and press Delete.Note
Although no other file in the site links to these files, some of the listed files may link to other files. Use caution when deleting the files.
Access sites, a server, and localdrives
You can access, modify, and save files and folders in your Dreamweaver sites, as well as files and folders that are not part of a Dreamweaver site. In addition to Dreamweaver sites, you can access a server, a local drive, or your desktop.
Before you can access a remote server, you must set up Dreamweaver to work with that server.
The best way to manage your files is to create a Dreamweaver site. For information on the benefits of creating a site, and information on how to create a site see About Dreamweaver sites.
Open an existing Dreamweaver site
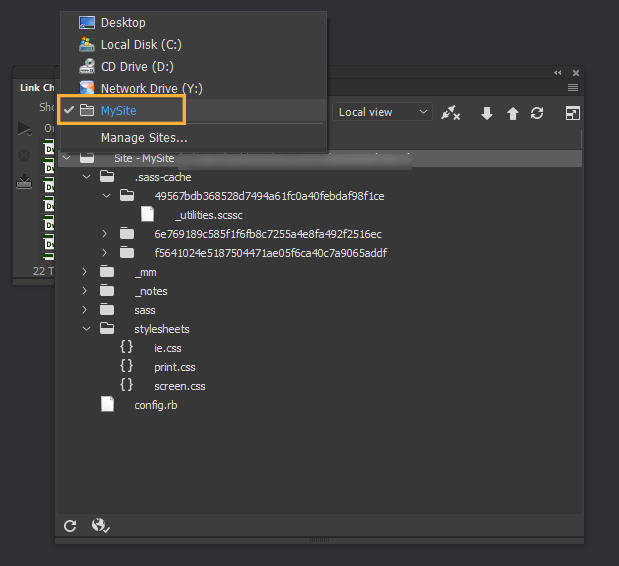

Open a folder on a remote FTP or RDS server
-
In the Files panel (Window > Files), select a server name from the menu (where the current site, server, or drive appears).Note
Server names appear for servers you’ve configured Dreamweaver to work with.
-
Navigate to and edit files as you normally do.
Access a local drive or your desktop
-
In the Files panel (Window > Files), select Desktop, Local Disk, or CD Drive from the menu (where the current site, server, or drive appears).
-
Navigate to a file, then do any of the following:
- Open files in Dreamweaver or another application
- Rename files
- Copy files
- Delete files
- Drag files
- If you drag a file from one Dreamweaver site to another or to a folder that is not part of a Dreamweaver site, Dreamweaver copies the file to the location where you drop it.
- If you drag a file within the same Dreamweaver site, Dreamweaver moves the file to the location where you drop it.
- If you drag a file that is not part of a Dreamweaver site to a folder that is not part of a Dreamweaver site, Dreamweaver moves the file to the location where you drop it.
NoteTo move a file that Dreamweaver copies by default, hold down the Shift key (Windows) or the Command key (Macintosh) while you drag. To copy a file that Dreamweaver moves by default, hold the Control key (Windows) or the Option key (Macintosh) while you drag.
Customize the file and folder details displayed in the Files panel
When you view a Dreamweaver site in the Files panel, by default only the files and folder structure is displayed. However, you can customize the appearance of the Files panel to show the following details:
- Notes
- Size
- Type
- Date a file was last modified
- Check out details
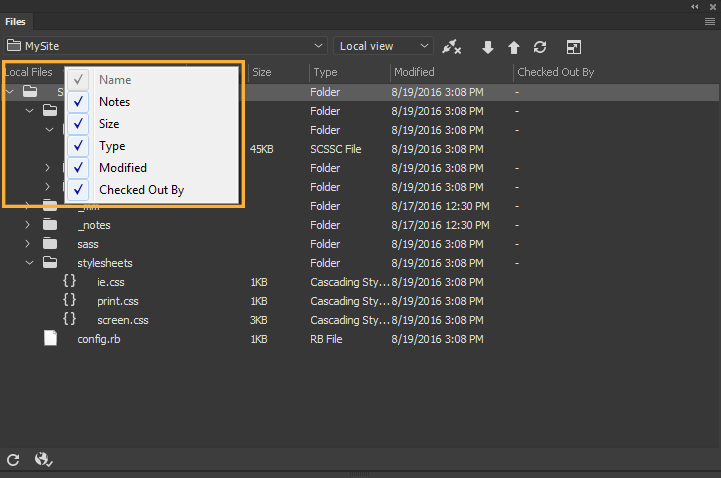

You can do some additional column customization using the Manage Sites > Advanced Settings > File View Columns dialog:
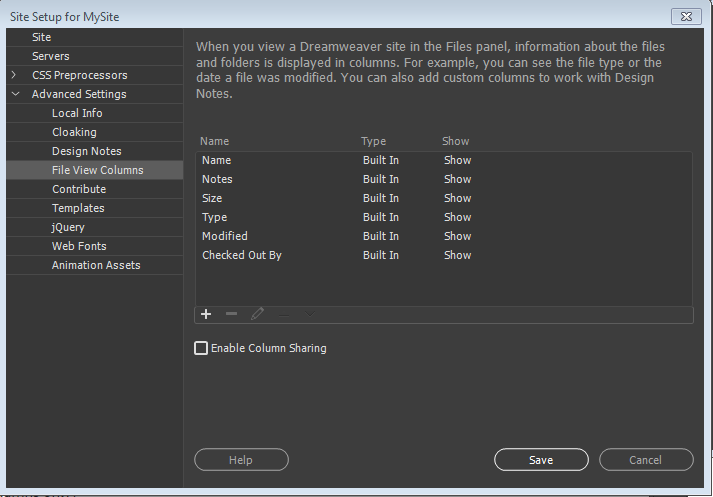

Change the order of columns
In the Manage Sites > Advanced Settings > File View Columns panel, select a column name, and then click the up or down arrow button to change the position of the selected column.
You can change the order of any column except Name, which is always the first column.
Add, delete, or change column details
-
Select Site > Manage Sites.
-
Select a site, then click Edit.
-
Expand Advanced Settings and select the File View Columns category.
-
Select a column and click the Plus (+) button to add a column.
-
In the Column Name box, enter a name for your column.
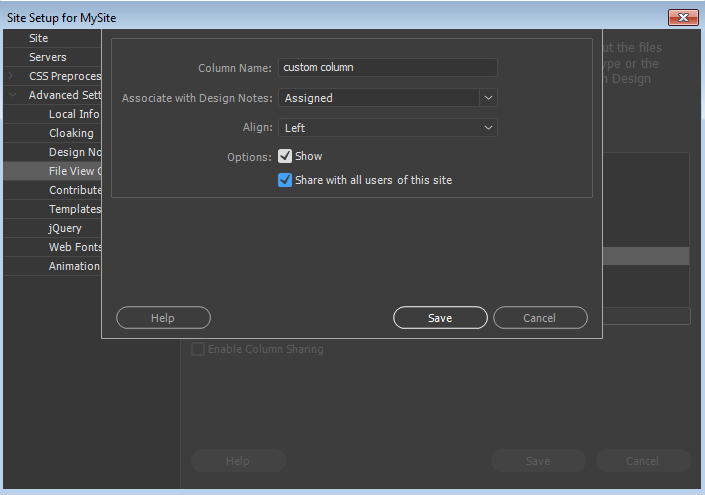
Adding custom columns 
Adding custom columns -
Select a value from the Associate with Design Notes menu, or type in your own.Note
You must associate a new column with a Design Note, so that there is data to display in the Files panel.
-
Select an alignment to determine how text is aligned within the column.
-
Select or deselect Show to reveal or hide the column.
-
Select Share with All Users of This Site to share the column with all users connected to the remote site.
To delete a column, select it and click the Minus (-) button.
The column is deleted immediately and without confirmation, so make certain that you want to delete the column before clicking the Minus (–) button.
Sort columns in the Files panel
In the Files panel, click the heading for the column you want to sort.
Click the heading again to reverse the order (ascending or descending) by which Dreamweaver sorts the column.
Auto-recovery of files
If Dreamweaver shuts down unexpectedly because of system errors, power outages, or other problems, then you can recover any unsaved changes made to files you were working on.
The auto-recovery feature automatically backs up any unsaved files in Dreamweaver. If a crash occurs, the following dialog box is displayed during subsequent launches of Dreamweaver.
You must have saved your file at least once for Dreamweaver to be able to recover it.
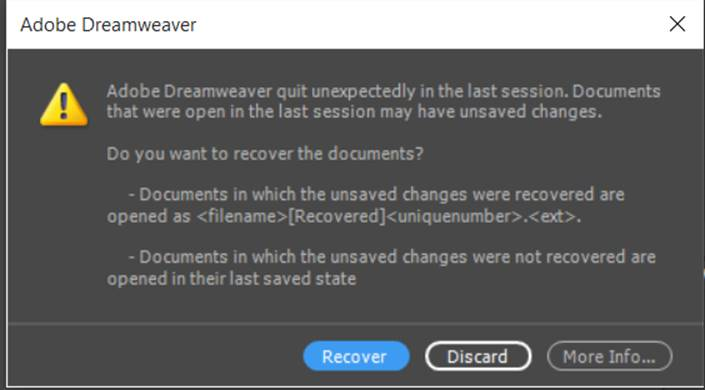

When you open a crashed Dreamweaver, you recover or discard last changes to a file:
- Recover - Select this option to open the auto-saved version of your file
- Discard - Select this option to open the last saved version of your file
In Dreamweaver, auto-save happens approximately every five seconds (depending on the operating system).
Working with the Files panel in Git View
The Git view in Files panel allows you to connect with Git repositories, and manage files using Git. The Files panel works as an interface for you to perform various operations like commit, stage, unstage, add to gitignore and so on.
You can use the Git View to perform the following actions:
- View the files associated with a site, in Git repositories
- Synchronize files and folders between your local repository and Git
- View the untracked, staged, and committed files
- Access the Git terminal
You can also initialize a Git repository from this panel, if it has already not been done. When you create a site in Dreamweaver, you can associate a Git repository with your site. If you have not done this during site creation, you can Initialize a Git repository using the Files panel.
To initialize a repository, click Initialize Git from the Files panel. The files associated with your site are immediately visible in the Git view, along with their status.
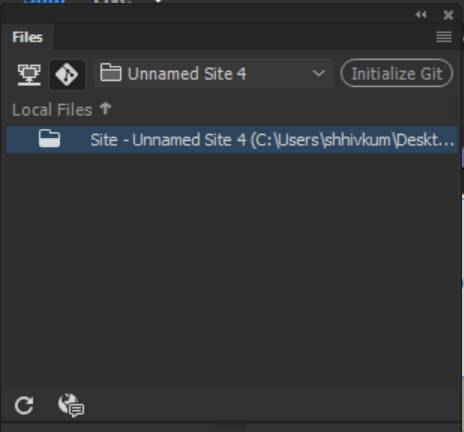

View the status of files
You can view the status of the files associated with a Git repository, from the Files panel. When you initialize a Git repository, the files are displayed in green. This means that the files are untracked and do not exist in Git yet.
When you commit a file, the file appears in white in the Files panel. This means that the file has been committed in the Git repository that you have chosen.
Now, when you edit and save a file after commit, the color of the file changes to yellow in the Files panel. This indicates that the files in your local repository and in the Git repository are not in sync.
To learn about the version control workflow in Git, see Using Git for version control.
Create and manage branches
You can create and manage branches locally, using the Files panel. To create a branch, select the drop-down list at the top of the panel. Click Manage Branches, and click the + sign from the Manage Branches dialog box.
You can choose your origin branch and create a new branch. You can also remove a branch and merge one branch with another.
To know more about managing local branches using the Files panel, see Create and manage branches.
Perform basic Git actions
Apart from initializing and managing branches, you can also perform various Git actions from the Files panel. From the files panel, select a file, right-click, and do one of the following:
- Click Add to .gitignore to add the selected file or files to the gitignore folder. These files will not be touched by Git, and no actions can be performed on these files.
- Click Remove from .gitignore to remove a file from the gitignore folder.
- Click Stage to stage the selected file. Staging is one step behind committing a file in Git.
- Click Unstage to remove a file from staging.
- Click Stage All to stage all the files in the repository.
- Click Unstage All to remove all the files in the repository from staging.
- Click Diff to view the changes in the file between the previous commit and the current version.
- Click File History to view the change and commit history of the selected file.
- Click Revert File to discard all the changes done to the file, and restore the previous committed version.
- Click Commit All Staged to commit the files that you have staged, from this repository.
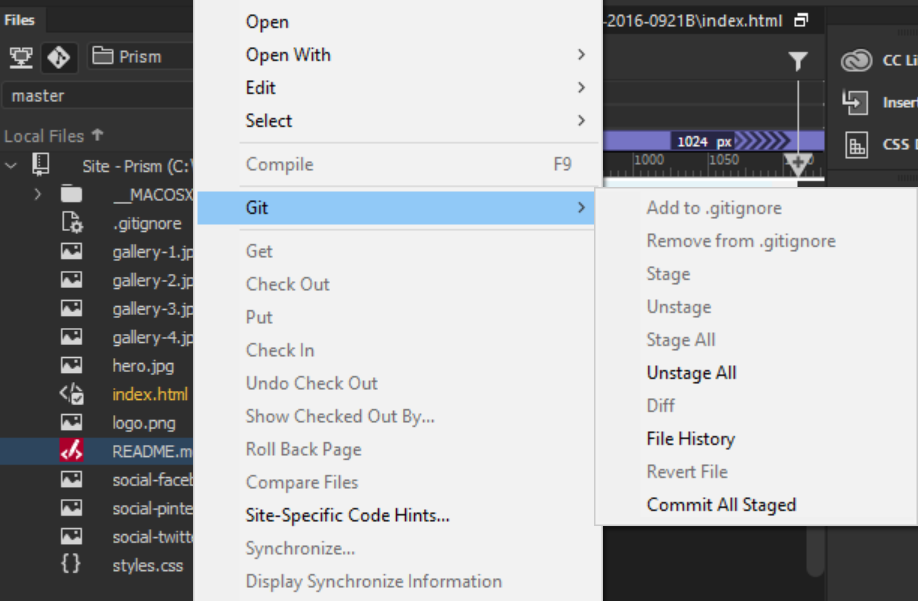

To know more about each of these actions, and about Git in Dreamweaver, read Using Git in Dreamweaver.