You can now create a file node, load your bitmap texture and plug it as an input to your Bitmap2Material node by either dragging and dropping your input image to the "Bitmap Diffuse" input in the Attribute Editor,
Last updated on
May 24, 2023
- Substance 3D home
- Home
- Get Started
- Main features
- Bitmap2Material StandAlone
- B2M inside Substance Compatible tools
- Reduce Game Size
- Parameters
- Solve problems
- About
In Autodesk Maya
Alert
- B2M3 is dedicated to PBR materials, if you use a "classic" pipeline, B2M2 version is recommended.
- For PBR renders in Maya use Bitmap2Material_3-X.sbsar with the last Substance plugin version.
If you use the "native" integration (no plugin), use the "Legacy" version (Bitmap2Material_3.sbsar) or exported bitmaps as this one use an older Substance Engine.
Workflow
You will find the Substance node under the 2D Textures tab in Hypershade.

Since Maya 2012 SAP (Subscription Advantage Pack), you can create a Substance node within the new Node Editor by simply pressing the "Tab" key and typing in the word "Substance", choosing the texture mode will create an empty Substance node with a place2d wired to it.


Select the Substance node, click on the load icon within Attribute Editor and browse to your Bitmap2Material.sbsar file.

-
Or in the Node Editor, you will need to left click on your Input image node's output and wire the connection to the "Main Input" of your B2M substance node.
Some inputs are optional, you don't need them to generate all the maps but they can help you to obtain a better result:
Grunge (optional): Import a grunge map
Metallic (optional): Import a metallic map
Height (optional): Import a height map
Normal (optional): Import a normal map
-
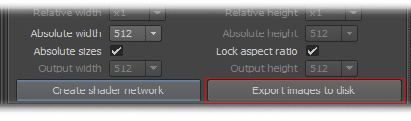
You can now create your shader network by either choosing the desired outputs in the TreeView,
or by hitting the "Create shader network" button in the Attribute Editor to quickly create a basic material with Diffuse, Specular and Normal maps.
-
The Substance parameters allow you to fine tune the results. Report to page 15 for a description of each parameter.
Be sure the outputs you need are enabled (in the "Outputs" group) in order to generate them
-
Once you are satisfied with the results, you can either bake your outputs to bitmap files by clicking on the "Export images to disk" button, or by embedding the Substance with your mesh in a .FBX file if your engine supports it.


Note
You can also check the "Create shader network" function, when defining a directory path the plug-in will automatically bake all the outputs and recreate the same shader network within Node Editor or Hypershade.

-
You can load in Maya Substance Presets that were created in the Substance Player. By default the Bitmap2Material filter ships with six presets files that you can copy to Maya's "attrPresets" directory:
- on Windows(x86): "\Documents\maya\2012\presets\attrPresets\substance"
- on Windows(x64): "\Documents\maya\2012\presets\attrPresets\substance"
- on MAC OS X: "/USERNAME/Library/Preferences/Autodesk/maya/2012-x64/presets/attrPresets/substance "
- on Linux: "/home/USERNAME/maya/2012-x64/presets/attrPresets/substance"
NoteIf the "substance" folder is not present, it means that you have still not created a Substance preset in Maya. You will need to create this folder manually. -
2. In order to load your preset file, select the Substance node and click on "Presets" within Attribute Editor. The preset files should now be displayed as follow:
Like any other shading node in Maya, you can apply the preset values to your current Substance node by clicking on "Replace" or "Blend" this values with the desired percentage.

Notes
Autodesk Maya is a registered trademark of Autodesk Media & Entertainment, a division of Autodesk Inc.