- Adobe Premiere Pro User Guide
- Beta releases
- Getting started
- Hardware and operating system requirements
- Creating projects
- Workspaces and workflows
- Frame.io
- Import media
- Importing
- Importing from Avid or Final Cut
- Searching for imported media
- File formats
- Working with timecode
- Editing
- Edit video
- Sequences
- Create and change sequences
- Set In and Out points in the Source Monitor
- Add clips to sequences
- Rearrange and move clips
- Find, select, and group clips in a sequence
- Remove clips from a sequence
- Change sequence settings
- Edit from sequences loaded into the Source Monitor
- Simplify sequences
- Rendering and previewing sequences
- Working with markers
- Add markers to clips
- Create markers in Effect Controls panel
- Set default marker colors
- Find, move, and delete markers
- Show or hide markers by color
- View marker comments
- Copy and paste sequence markers
- Sharing markers with After Effects
- Source patching and track targeting
- Scene edit detection
- Generative Extend
- Cut and trim clips
- Video
- Audio
- Overview of audio in Premiere Pro
- Edit audio clips in the Source Monitor
- Audio Track Mixer
- Adjusting volume levels
- Edit, repair, and improve audio using Essential Sound panel
- Enhance Speech
- Enhance Speech FAQs
- Audio Category Tagging
- Automatically duck audio
- Remix audio
- Monitor clip volume and pan using Audio Clip Mixer
- Audio balancing and panning
- Advanced Audio - Submixes, downmixing, and routing
- Audio effects and transitions
- Working with audio transitions
- Apply effects to audio
- Measure audio using the Loudness Radar effect
- Recording audio mixes
- Editing audio in the timeline
- Audio channel mapping in Premiere Pro
- Use Adobe Stock audio in Premiere Pro
- Overview of audio in Premiere Pro
- Text-Based Editing
- Advanced editing
- Best Practices
- Video Effects and Transitions
- Overview of video effects and transitions
- Effects
- Types of effects in Premiere Pro
- Modern transitions, effects, and animations in Premiere Pro
- Apply and remove effects
- Use FX badges
- Effect presets
- Metadata effect in Premiere Pro
- Automatically reframe video for different social media channels
- Color correction effects
- Effects Manager
- Change duration and speed of clips
- Adjustment Layers
- Stabilize footage
- Transitions
- Titles, Graphics, and Captions
- Properties panel
- About Properties panel
- Edit text
- Edit shapes
- Change the appearance of text and shapes
- Apply gradients
- Linked and Track Styles
- Working with style browser
- Draw with the Pen tool
- Align objects
- Add Responsive Design features to your graphics
- Edit audio
- Edit video
- Mask with shape
- Create reveal animations using masking techniques
- Create, apply, and redefine text styles
- Add Responsive Design features to your graphics
- Captions
- Motion Graphics Templates
- Best Practices: Faster graphics workflows
- Retiring the Legacy Titler FAQs
- Upgrade Legacy titles to Source Graphics
- Properties panel
- Fonts and emojis
- Animation and Keyframing
- Compositing
- Color Correction and Grading
- Overview: Color workflows in Premiere Pro
- Color Settings
- Auto Color
- Get creative with color using Lumetri looks
- Adjust color using RGB and Hue Saturation Curves
- Correct and match colors between shots
- Using HSL Secondary controls in the Lumetri Color panel
- Create vignettes
- Looks and LUTs
- Lumetri scopes
- Timeline tone mapping
- HDR for broadcasters
- Enable DirectX HDR support
- Color management
- About color management
- How color management works
- Auto Detection of Log Camera Formats and Raw Media
- Disable color management
- Manage source media colors in the Program Monitor
- Configure clips for color management using Clip Modify
- Configure sequence color management
- Customize color presets for new or existing sequences
- Configure a sequence’s output color space
- Color management options
- Color management and Lumetri Color
- Premiere Pro and After Effects color management compatibility
- Working with color managed iPhone media
- Frequently asked questions
- Color management and new version compatibility FAQ
- Exporting media
- Export video
- Export Preset Manager
- Workflow and overview for exporting
- Quick export
- Exporting for the Web and mobile devices
- Export a still image
- Content Credentials in Premiere Pro and Adobe Media Encoder
- Exporting projects for other applications
- Exporting OMF files for Pro Tools
- Export to Panasonic P2 format
- Create and export HDR videos for YouTube on Macintosh
- Export settings
- Best Practices: Export faster
- Collaborative editing
- Collaboration in Premiere Pro
- Get started with collaborative video editing
- Create Team Projects
- Add and manage media in Team Projects
- Invite and manage collaborators
- Share and manage changes with collaborators
- View auto saves and versions of Team Projects
- Manage Team Projects
- Linked Team Projects
- Frequently asked questions
- Long form and Episodic workflows
- Working with other Adobe applications
- Organizing and Managing Assets
- Improving Performance and Troubleshooting
- Set preferences
- Reset and restore preferences
- Recovery Mode
- Working with Proxies
- Check if your system is compatible with Premiere Pro
- Premiere Pro for Apple silicon
- Eliminate flicker
- Interlacing and field order
- Smart rendering
- Control surface support
- Best Practices: Working with native formats
- Removal of software rendering options
- Knowledge Base
- Known issues
- Fixed issues
- Fix Premiere Pro crash issues
- Why do my Premiere Pro exports look washed out?
- Unable to migrate settings after updating Premiere Pro
- Green and pink video in Premiere Pro or Premiere Rush
- How do I manage the Media Cache in Premiere Pro?
- Fix errors when rendering or exporting
- Troubleshoot issues related to playback and performance in Premiere Pro
- Set preferences
- Extensions and plugins
- Video and audio streaming
- Monitoring Assets and Offline Media
A control surface is a hardware device with controls like faders, knobs, and buttons to give you tactile control when working with audio.
Premiere Pro provides a hardware control interface that lets you connect your control surface device with the application.
Premiere Pro supports two kinds of control surfaces:
- Mackie Control protocol (Mackie)
- Avid and Euphonix control surfaces (EUCON)
Check the hardware documentation that comes with the device to set it up correctly. Once you've done that, go to Premiere Pro's Preferences dialog to set up the configuration.
After configuring your device with Premiere Pro, you can control the Audio Track Mixer and Audio Clip Mixer using the buttons, knobs, and faders on the device.
Setting Control Surface preferences
Use the Control Surface preferences dialog to configure your hardware control device.
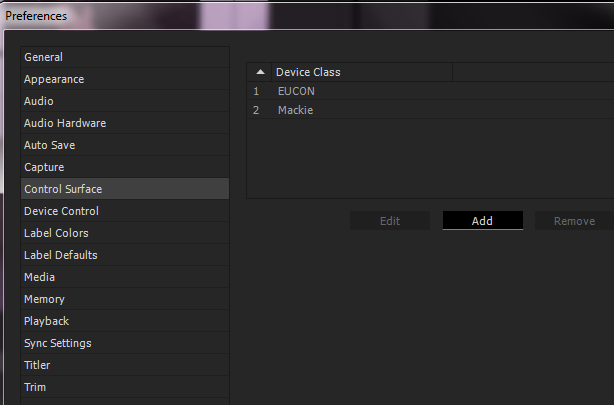
To access the Control Surface preferences dialog, select Edit > Preferences > Control Surface.
The Edit, Add, and Remove buttons let you add, edit, or remove control surfaces in your configuration.
Under Device Class, click Add to select the device. You can add either EUCON or Mackie. Or you can add both.
Click Edit to specify configure settings like MIDI Input Device and MIDI Output Device for the selected control surface.


Work with Audio Track Mixer using control surface controls
After you select the connected control surface device in the Preferences dialog, the hardware transport controls are synchronized with the following Audio Track Mixer controls in real time.
Faders: Adjust faders in the Audio Track Mixer using the control surface faders.
For best results, ensure that the fader placement on the control surface accurately matches the placement of the fader in the Audio Track Mixer. Any movement of the fader control in the Audio Track Mixer affects the fader of the control surface.
Bank and Nudge buttons: Control surfaces usually have a limited number of faders. Sometimes, the number of tracks in your sequence exceed the number of corresponding control surface faders. In this case, use the bank and nudge buttons on the control surface to navigate additional tracks . The bank buttons navigate to the next set of tracks in the project.
Meters: Some control surfaces display track meters. EUCON from Avid's Artist Series displays track meters for mono, stereo, 5.1 tracks.
Track Name: Control surfaces also display track names. However, depending on the device, there can be a limit to the number of characters in the track name that the control surface can display.
Automation Mode: Mackie devices let you toggle between Off, Read, Latch, Touch, and Write states for each track in your sequence.
Pan/Balance control: Use the Pan and Balance knob to control pan and balance for each track in your sequence.
Mute: The Mute button on the control surface (On button on Avid devices) mutes the corresponding track in your sequence.
Record: The Rec/Ready button on Mackie devices or the Auto Rec button on EUCON enables recording for the corresponding track in your sequence.
Work with Audio Clip Mixer using control surface controls
After selecting the control device in the Preferences dialog, select Toggle Control Surface Clip Mixer Mode from the pop-up menu in the Audio Clip Mixer. You can also assign a keyboard shortcut to use the Toggle Control Surface Clip Mixer Mode command.
The control surface supports faders, pan/balance, mute, and solo controls.