Launch Bridge.
- Bridge User Guide
- Introduction
- Work with assets
- Creative Cloud Libraries in Bridge
- Create PDF contact sheet in the Output workspace
- View and manage files in Adobe Bridge
- Work with metadata in Adobe Bridge
- Work with the Adobe Bridge cache
- Use keywords in Adobe Bridge
- Start Adobe Bridge
- Adjust Adobe Bridge Content panel display
- Preview images and edit capture time
- HEIC and HEIF image files support in Adobe Bridge (Windows)
- Use collections in Adobe Bridge
- Stack files in Adobe Bridge
- Automate tasks in Adobe Bridge
- Workflow Builder
- Preview dynamic media files in Adobe Bridge
- Create web galleries and PDFs
- Work with Bridge shared cache
- Manage media cache
- Quick Actions
- Content Credentials
- Bridge and other Adobe apps
- Export and publish
- Keyboard shortcuts
- Adobe Camera Raw
- Troubleshooting
Learn how to use Content Credentials (Early Access) to promote content authenticity and transparency in the content creation process.
With the October 2024 release of Adobe Bridge (version 15.0), you can secure your content with Content Credentials (Early Access) when exporting your photo through export or workflow builder.
Learn more about the benefits of adding Content Credentials.
How to use Content Credentials (Early Access) in Adobe Bridge
-
-
Within the Export panel, create/edit a preset.
-
Within the Content Credentials dropdown in the preset dialog box, select Apply Content Credentials.
Easily add Content Credentials to your files in Bridge. Easily add Content Credentials to your files in Bridge. -
Select Information to include:
- Producer: Enable this option to display the name listed on your Adobe account.
- Connected Accounts: Enable this option to manage your social accounts. Select Manage to link your social media accounts with Content Credentials.
- Edits & Activity: Enable this option to display the editing and processing actions taken to produce the final image.
-
From the Storage Method dropdown, choose the required option:
- Attach to files: This method increases file sizes but keeps your Content Credentials more private. However, the attached Content Credentials are less resilient and may be stripped from your content when published or shared online.
- Publish to Content Credentials cloud: This method reduces file sizes and improves resiliency. If the credentials are ever stripped from your content, they can be recovered with Adobe Inspect. In Adobe Inspect, your published Content Credentials may appear as possible matches for content that is visually similar to yours.
- Attach and publish to cloud: This method provides the benefits of both approaches, offering a balance between privacy and resiliency.
- Attach to files: This method increases file sizes but keeps your Content Credentials more private. However, the attached Content Credentials are less resilient and may be stripped from your content when published or shared online.
-
Select Preview to view the Content Credentials settings.
View the Content Credentials settings. View the Content Credentials settings. -
Select Save.
How to view Content Credentials status
-
Launch Bridge.
-
Select Edit > Preferences.
-
Within the Content preferences settings, select Display Content Credentials information in Content and Filter panel. Then, select OK.
Set Content Credentials preferences in Bridge. Set Content Credentials preferences in Bridge.
How to filter your files based on the Content Credentials status
-
Open Filter panel.
-
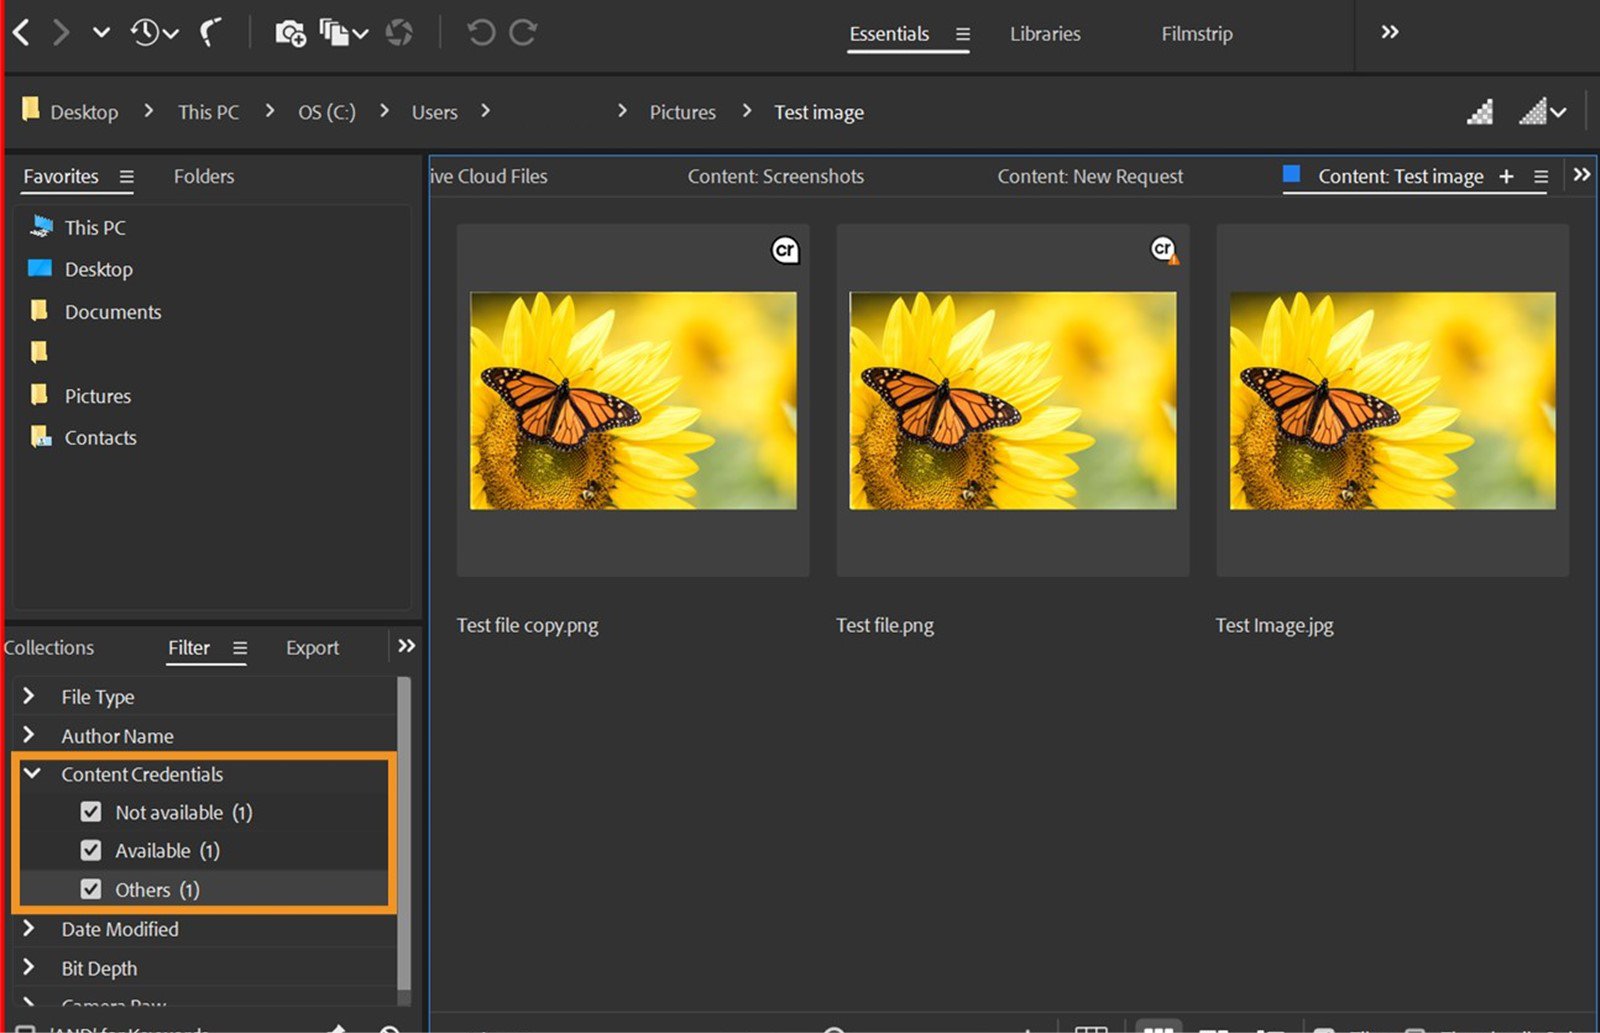
Within the Content Credentials dropdown, you can further filter your files based on the following Content Credentials status:
- Not available
- Available
- Others
Content Credentials status is displayed in the Content panel with a cr badge on the files. Content Credentials status is displayed in the Content panel with a cr badge on the files.
How to view the Content Credentials status in the Metadata panel
-
Select the desired file.
-
Within the Metadata panel, you can easily check the Content Credentials status of the selected file.
View the Content Credentials status in the Metadata panel. View the Content Credentials status in the Metadata panel.


