
- Photoshop Elements User Guide
- Introduction to Photoshop Elements
- Workspace and environment
- Fixing and enhancing photos
- Resize images
- Cropping
- Process camera raw image files
- Add blur, replace colors, and clone image areas
- Adjust shadows and light
- Retouch and correct photos
- Combine Photos
- Sharpen photos
- Transforming
- Auto Smart Tone
- Recomposing
- Using actions to process photos
- Photomerge Compose
- Create a panorama
- Moving Overlays
- Moving Elements
- Adding shapes and text
- Quick Actions
- Guided edits, effects, and filters
- Guided mode
- Filters
- Guided mode Photomerge edits
- Guided mode Basic edits
- Adjustment filters
- Effects
- Guided mode Fun edits
- Guided mode Special edits
- Artistic filters
- Guided mode Color edits
- Guided mode Black & White edits
- Blur filters
- Brush Stroke filters
- Distort filters
- Other filters
- Noise filters
- Render filters
- Sketch filters
- Stylize filters
- Texture filters
- Pixelate filters
- Working with colors
- Working with selections
- Working with layers
- Creating photo projects
- Saving, printing, and sharing photos
- Keyboard shortcuts
- Keys for selecting tools
- Keys for selecting and moving objects
- Keys for the Layers panel
- Keys for showing or hiding panels (expert mode)
- Keys for painting and brushes
- Keys for using text
- Keys for the Liquify filter
- Keys for transforming selections
- Keys for the Color Swatches panel
- Keys for the Camera Raw dialog box
- Keys for the Filter Gallery
- Keys for using blending modes
- Keys for viewing images (expertmode)
Use Blur Effects to quickly create distinct photographic blur effects in Photoshop Elements.
Average
The Average filter finds the average color of an image or selection, and then fills the image or selection with the color to create a smooth look. For example, if you select an area of grass, the filter changes the area into a homogeneous patch of green.
Blur and Blur More
The Blur filters soften a selection or an image and are useful for retouching. They smooth transitions by averaging the color values of pixels next to the hard edges of defined lines and shaded areas.
Blur
Eliminates noise where significant color transitions occur in an image. Blur filters smooth transitions by averaging the color values of pixels next to the hard edges of defined lines and shaded areas.
Blur More
Produces an effect several times stronger than that of the Blur filter.
Before applying a Blur filter, deselect the Lock transparent pixels option in the Layers panel.

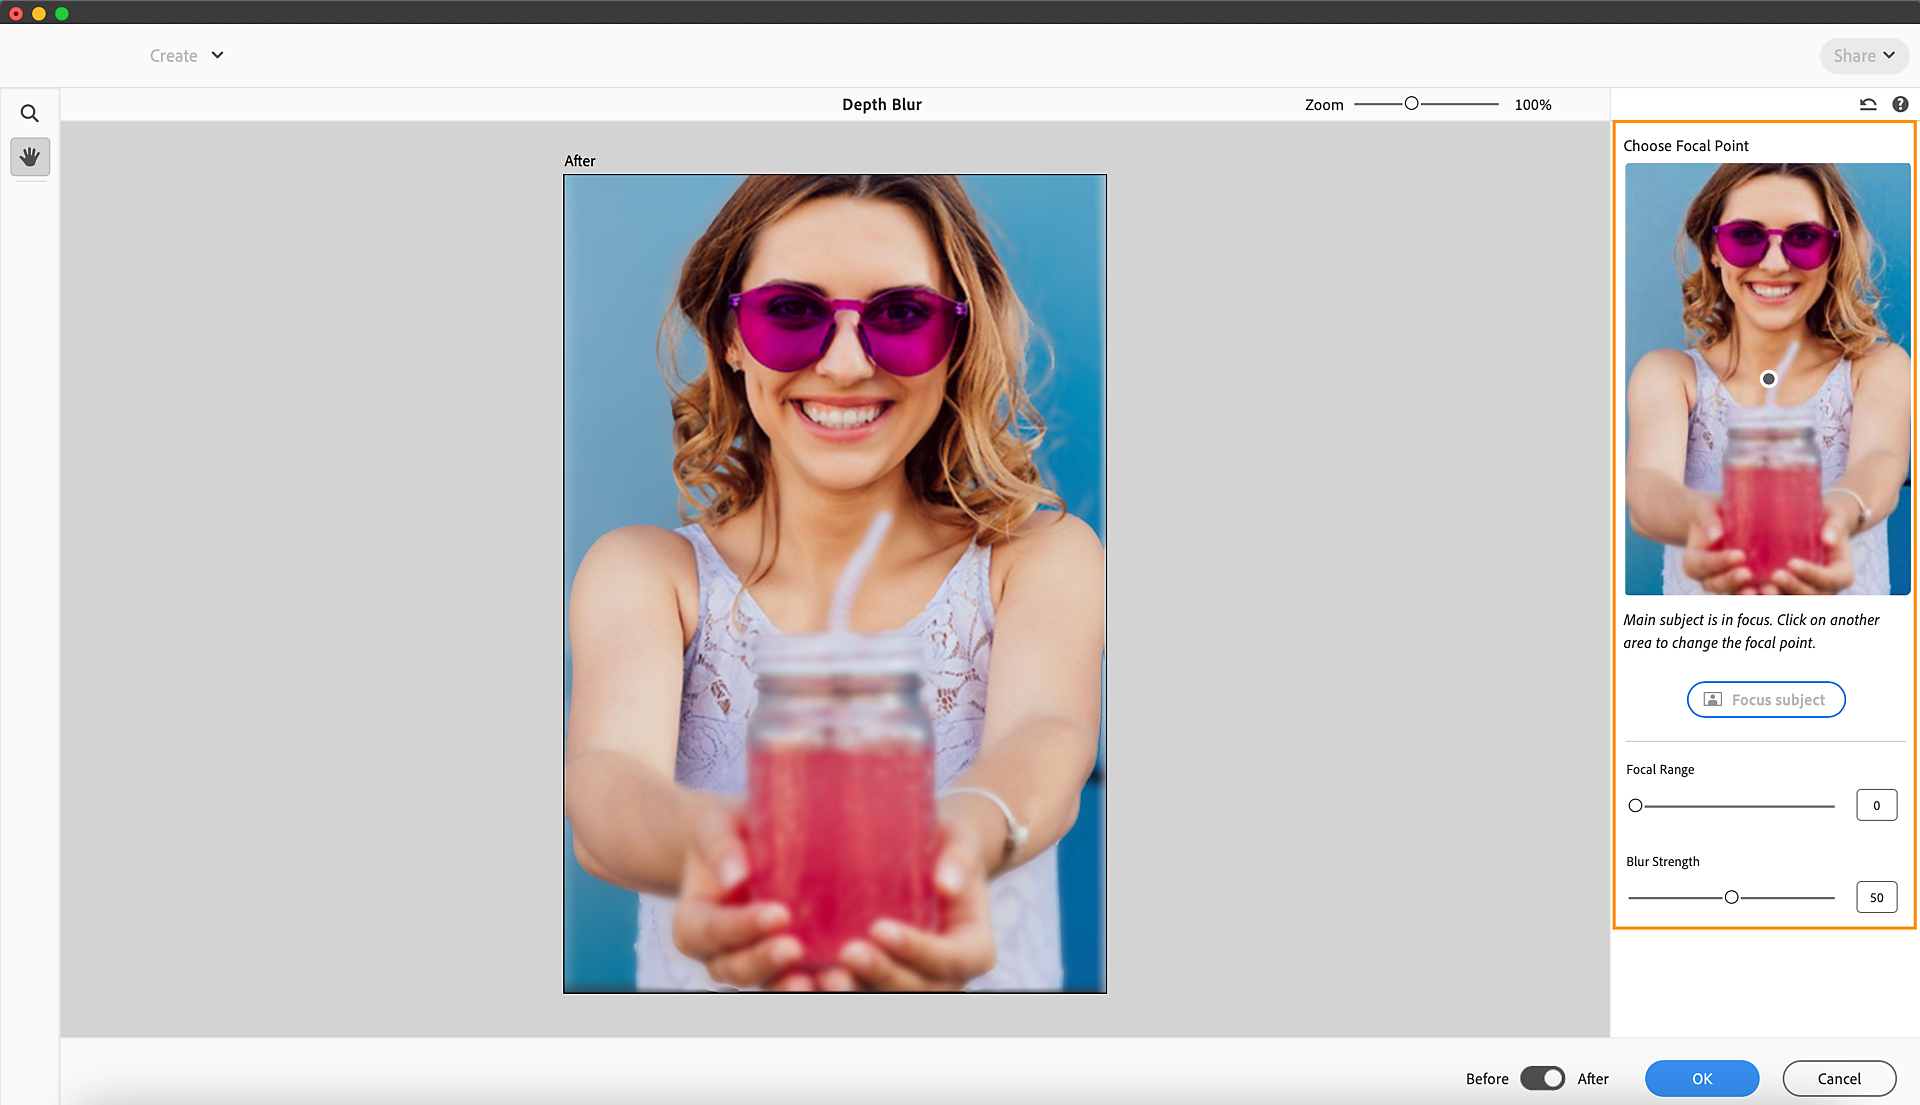
Depth Blur creates environmental depth in an image by creating the effect of shallow depth of field, where certain parts of an image appear out of focus while others remain sharp.
You can explore Depth Blur by selecting Filters > Blur > Depth Blur in Quick and Advanced view. You can also apply Depth Blur from Quick Actions in Quick view by selecting Quick Actions > AI Edits > Depth Blur.

Depth Blur allows you to adjust the Focal Range and Blur Strength around the subject in focus. Click on the Focus Subject button or on the photo preview in the right panel to change the focal point.
The Focal Range in depth blur refers to the range of distances within which objects appear acceptably sharp in an image while the rest appears blurred.
Blur Strength in depth blur refers to the intensity or degree of blurriness applied to areas of an image that are outside the focal range. This parameter controls how blurred or out-of-focus these areas appear, helping to create a more pronounced separation between the subject in focus and the background or foreground.
Gaussian Blur
The Gaussian Blur filter quickly blurs a selection by an adjustable amount. Gaussian refers to the bell-shaped curve that Photoshop Elements generates when it applies a weighted average to the pixels. The Gaussian Blur filter adds low-frequency detail and can produce a hazy effect. You can set the blur radius in the filter options to determine how far the filter searches for dissimilar pixels to blur.
Lens Blur
Lens Blur can be used to give the effect of narrower depth of field so that some objects in the image stay in the focus and others are blurred. The portions of the image that are blurred and those that remain in focus depend on the layer mask, saved selection, or transparency settings applied. The way the blur appears depends on the iris shape you choose. Iris shapes are determined by the number of blades they contain. You can change blades of an iris by curving them (making them more circular) or rotating them. Use the preview options to see how changing the settings in the Lens Blur dialog affect your photograph.
Motion Blur
The Motion Blur filter blurs in a particular direction (from ‑360º to +360º) and at a specific distance (from 1 to 999). The filter’s effect is analogous to taking a picture of a moving object with a fixed exposure time. You can set the blur angle and distance.
Radial Blur
The Radial Blur filter simulates the blur of a zooming or rotating camera to produce a soft blur. The Amount option controls the blur amount. Spin blurs along concentric circular lines and lets you specify a degree of rotation. Zoom blurs along radial lines, as if zooming in on or out of the image and lets you specify an amount from 1 to 100. Blur quality ranges from Draft for fast but grainy, results to Good and Best for smoother results, which are indistinguishable except on a large selection. You can specify the origin of the blur by dragging the pattern in the Blur Center box.
Smart Blur
The Smart Blur filter precisely blurs an image. You can specify a radius to determine how far the filter searches for dissimilar pixels to blur, a threshold to determine how different the pixels’ values must be before they are eliminated, and a blur quality. You can also set a mode for the entire selection (Normal) or for the edges of color transitions (Edge Only and Overlay Edge). Where significant contrast occurs, Edge Only applies black-and-white edges and Overlay Edge applies white.
Surface Blur
The Surface Blur filter blurs an image while preserving edges. This filter is useful for creating special effects and for removing noise and graininess. The Radius option specifies the size of the area sampled for the blur. The Threshold option controls how much the tonal values of neighboring pixels must diverge from the center pixel value before becoming a part of the blur. Pixels with tonal value differences less than the Threshold value are excluded from the blur.
Depth Blur creates a sense of depth by blurring the background and foreground while keeping the subject in sharp focus. This feature automatically generates a Depth Map and uses it to apply a realistic Depth Blur on the Photo. You can also adjust the Focal Range and Blur Strength.
Depth Blur filters are available in both Quick and Advanced views. In Advanced view, you can explore Depth Blur via Filters > Blur > Depth Blur. Select Quick Actions > AI Edits > Depth Based Blur in Quick view.
Depth Blur automatically identifies the subject by default and blurs out the remaining areas. However, you can select the area to focus on using the given Focal Point Selector by clicking the image preview on the right-side panel. Once the selection is made, a blue dot will help locate your focus area.