In any view, tap the camera icon at the lower-right corner to turn on the in-app camera.
- Adobe Lightroom User Guide
- Introduction
- In-app learning
- Add, import, and capture photos
- Organize photos
- Edit photos
- Edit photos
- Edit photos in Lightroom for mobile (iOS)
- Edit photos in Lightroom for mobile (Android)
- Edit photos with Quick Actions in Lightroom on mobile (iOS)
- Edit photos with Quick Actions in Lightroom on mobile (Android)
- Presets in Lightroom
- Presets in Lightroom for mobile (iOS)
- Presets in Lightroom for mobile (Android)
- Crop, Rotate, & Geometry tool in Lightroom
- Crop an image in Lightroom on mobile (Android)
- Remove tool in Lightroom
- Remove unwanted people
- Remove window reflection
- Remove tool in Lightroom for mobile (iOS)
- Remove tool in Lightroom for mobile (Android)
- Edit panel in Lightroom
- Masking in Lightroom
- Lens Blur in Lightroom
- Merge photos to create HDRs, panoramas, and HDR panoramas
- Edit HDR photos
- Edit HDR photos in Lightroom for mobile (iOS)
- Edit HDR photos in Lightroom for mobile (Android)
- Easily enhance image quality in Lightroom
- Edit photos in other apps
- Learn about Content Credentials
- Add Content Credentials in Lightroom on mobile (iOS)
- Add Content Credentials in Lightroom on mobile (Android)
- Manage edits made with AI-powered tools(iOS)
- Manage edits made with AI-powered tools(Android)
- Edit photos
- Edit videos
- Save, share, and export
- Lightroom for mobile, TV and the web
- Get started with Lightroom for mobile (iOS)
- Get started with Lightroom for mobile (Android)
- Adobe Photoshop Lightroom on the web
- Set up Lightroom for Apple TV app
- Use keyboard shortcuts in Lightroom for mobile (iOS and Android)
- Adobe Photoshop Lightroom for mobile and Apple TV | FAQ
- View Lightroom photos and videos on your TV
- How to Add Presets/Sync Presets with mobile
- Migrate photos
- Troubleshooting
Use Lightroom's in-app camera to capture DNG and HDR photos on supported devices and adjust settings like shutter speed, focus, and flash in the Pro mode.
Capture module is not available on Android-based tablet devices.
Quickly access the in-app camera
You can launch your in-app camera using one of the following ways:
App shortcuts
- Beginning with version 3.2 of Lightroom for mobile (Android), the app shortcuts feature has been added for devices running Android versions 7.1.1 or later. However, the support for this feature on your Android device is enabled/set solely by the mobile device manufacturer.
- To access the app shortcuts, you need to launch the Lightroom app at least once.


On your device's home screen, long press on the Lightroom app icon to access the following shortcuts:
- Selfie. Launches the in-app camera module with your device's front camera.
- Lightroom Camera. Launches the in-app camera module with your device's back camera.
- Add Photos. Launches the import interface where you can select and add images from device's photo gallery.
Camera widget
You can add the Lightroom Camera widget ![]() on your phone's home screen. Tapping the Lightroom Camera widget takes you directly to Lightroom's in-app camera.
on your phone's home screen. Tapping the Lightroom Camera widget takes you directly to Lightroom's in-app camera.
Capture settings
Tap (![]() ) icon to display the Settings.
) icon to display the Settings.
Volume keys function
Assigns a function to your device's volume keys that you can use when accessing the in-app camera. Tap to choose None, Exposure Compensation, Capture, or Zoom.
Max screen brightness
Turn ON to set the brightness of your device's screen to maximum while in the Capture mode.
Geotag photos
Turn ON to allow tagging of the location information within the EXIF metadata of your captured photo.
Tooltips
Turn ON to enable tooltips while in the Capture mode. You can tap the (![]() ) icon, wherever displayed in the Capture interface, to view a tooltip.
) icon, wherever displayed in the Capture interface, to view a tooltip.
Save unprocessed HDR
This setting is available in the HDR mode only. Turn ON to also save the unprocessed original photo along with the processed raw HDR photo.
Save original to device
Saves a copy of the original captured image on your device.
Capture photos in the Auto mode
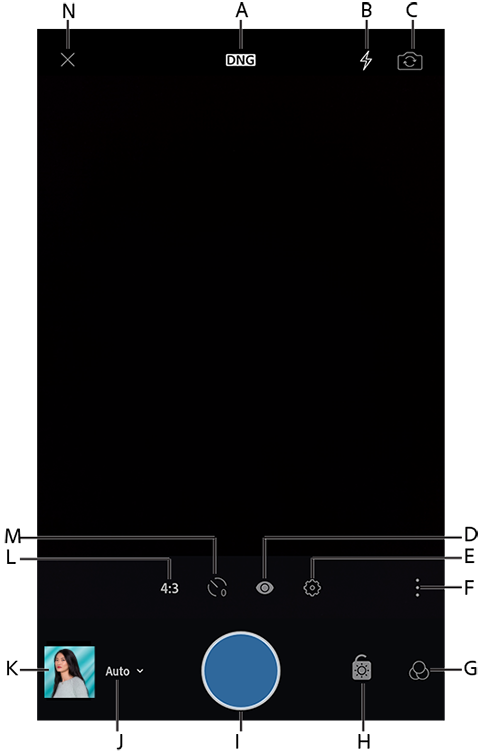
A. Raw/JPEG capture option B. On-camera flash options C. Switch to front camera D. Viewfinder overlay options E. Additional capture settings F. Toggle capture options G. Presets H. Exposure compensation lock I. Capture button J. Capture mode (Auto) K. Preview last shot photo L. Crop ratio options M. Trigger timer options N. Close capture interface

Set on-camera flash options
Tap ( ) icon to toggle flash options bar.
Auto (default)
Automatically turn the device's flash ON or OFF based on the external lighting conditions. This is the default flash option and good for general-purpose setting.
On (forced flash)
Turn ON the device's flash for every capture.
Off (disable flash)
Turn OFF the device's flash for every capture.
Pinch to zoom
You can use a pinch gesture on the viewfinder screen to initiate the camera zoom.
- To zoom in, use the outward spread gesture.
- To zoom out, use the pinch gesture.
The zoom applied on your capture is non-destructive in nature, so you can always revert to the original capture (non-zoomed) while editing the photo.
Tap to focus
While capturing photos using Lightroom's in-app camera, your camera lens auto-focuses on the live scene by default. However, in scenarios where you want a sharper focus on a particular area of interest like a subject in the background instead of the foreground, you can manually refocus the lens on that area.
To do so:
- Tap on the viewfinder screen to get a sharper image of that region.
- When you tap, a box overlay appears showing where the lens is refocusing.
Capture raw photos
Beginning with version 2.0, Adobe Photoshop Lightroom for mobile supports DNG raw image capture on devices running Android versions 5.0 (Lollipop) and later. However, this capability is available only on those devices that support capturing DNG raw images. Support for DNG capture is enabled/set solely by the device manufacturers.
Raw capture In the camera module, tap the capture file format badge (DNG, by default) at the top of the viewfinder and then choose DNG. You can now capture the photos in Digital Negative (DNG) raw format.
To check if your device supports DNG capture:
- First ensure that the latest version of the Lightroom app is installed on your mobile device.
- In the Albums view, tap (
 ) icon at the upper-left corner of the screen to bring up the sidebar menu.
- In the menu, tap Device Info & Storage > Device Info.
- Check whether DNG Capture Supported displays Yes or No. If it displays Yes, you can capture raw images using the in-app camera.
Compose shots using viewfinder overlays
Overlays help you to compose the shots.
Tap (![]() ) icon to toggle overlays options.
) icon to toggle overlays options.
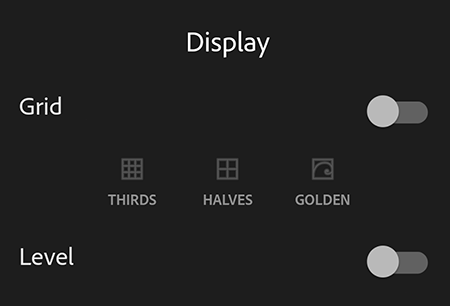

By default, the overlays are turned off.
Thirds
Align areas of the subject being captured along or at the junction of the thirds.
Halves
Align areas of the subject being captured along or at the junction of the halves.
Golden
Align areas of the subject being captured along or at the junction of the Phi grid overlay that is based on the golden ratio.
Level overlay
Uses device's sensors to align the camera with the ground for leveled horizon shots and to avoid geometric distortion.
Shoot through Presets
Tap (![]() ) icon on the lower-right corner to display the Presets. The following Presets are available:
) icon on the lower-right corner to display the Presets. The following Presets are available:
- High contrast
- Flat
- Warm shadows
- High contrast black and white
- Flat black and white
Choose any of the presets to apply it on your live capture. This allows you to preview your photo before you capture it. When you launch the Adobe in-app camera again, it auto-defaults to the last preset that you used.
Shoot-through presets is available only on those Android devices that support Open GL ES 3.0 and later. To check the Open GL version supported by your device, tap (![]() ) icon at the upper-left of the Albums view to display the Sidebar menu and then tap Device Info & Storage> Device Information.
) icon at the upper-left of the Albums view to display the Sidebar menu and then tap Device Info & Storage> Device Information.
Set exposure compensation


When you swipe across the viewfinder screen, the Exposure Compensation slider appears. Drag the slider in either direction to set the desired exposure level.
Lock exposure compensation at its current value Tap (![]() ) icon at the lower right corner to lock the exposure compensation at its current value. The icon turns yellow indicating the locked state and also displays the value at which the exposure is locked.
) icon at the lower right corner to lock the exposure compensation at its current value. The icon turns yellow indicating the locked state and also displays the value at which the exposure is locked.
You can lock the exposure compensation in Auto capture mode only.
Double-tap the Exposure Compensation slider to reset the exposure value to zero.
Preview last captured photo
In the camera module, tap on the lower-left (last shot) thumbnail to preview the last photos that you captured.
Tap thumbnail of the last shot photo to preview it. Tap on the preview to return to the camera view.
Shoot in different Crop ratios
Tap (![]() ) icon to display the crop ratios. The following crop ratios are available:
) icon to display the crop ratios. The following crop ratios are available:
- 16:9
- 3:2
- 4:3
- 1:1
Tap to choose any ratio to display it as an overlay in the viewfinder. This allows you to preview your photo at the desired crop ratio even before you capture it.
This crop is non-destructive in nature. You can change the crop ratio later when you edit the photo.
Trigger a delayed capture
Tap ( ) icon to toggle timer options toolbar. You can introduce a few seconds of delay before a shot is captured. There is an option to introduce a delay of 2, 5, or 10 seconds in your capture. By default, the timer is OFF.
When a delay is set, it will persist until you turn it OFF.
Capture photos in the Professional mode
Manually control the shutter speed, ISO, and focus distance in the Pro mode

A. Raw/JPEG capture option B. On-camera flash options C. Switch to front camera D. Viewfinder overlay options E. Additional capture settings F. Toggle capture options G. Presets H. Exposure compensation lock I. Capture button J. Capture mode (Auto) K. Preview last shot photo L. Crop ratio options M. Trigger timer options N. Close capture interface

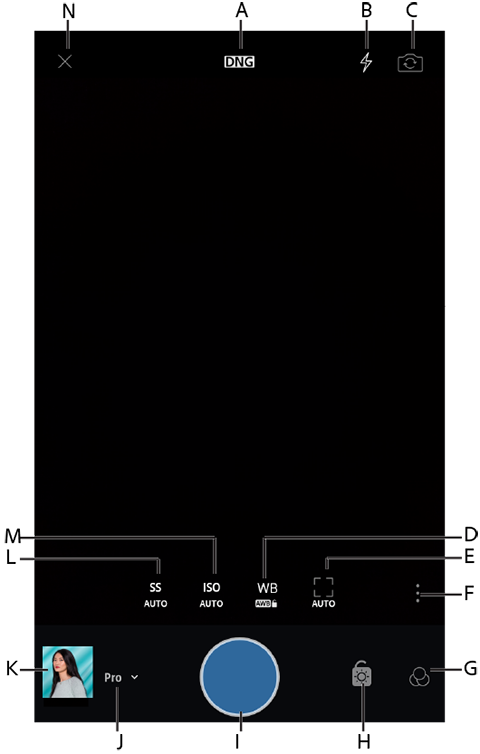
A. Raw/JPEG capture option B. On-camera flash options C. Switch to front camera D. White Balance options E. Manual focus distance F. Toggle capture options G. Presets H. Exposure compensation lock I. Capture button J. Capture mode (Pro) K. Preview last captured shot L. Set Shutter Speed M. Set ISO N. Close capture interface

Beginning with version 2.1, Adobe Photoshop Lightroom for mobile supports manually controlling the shutter speed, ISO, and focus distance on devices running Android versions 5.0 (Lollipop) and later. However, these capabilities are available on your device only if the support has been enabled/set by the device manufacturer.
Adjust the shutter speed
Shutter speed controls the duration for which your camera is exposed to light. You can adjust this duration to achieve the desired creative effect in your photos.
For example, you can set a slow shutter speed to create motion blur or light trail effect while capturing a fast-moving subject. To freeze the movement of the same subject in your photo, you can set a fast shutter speed.
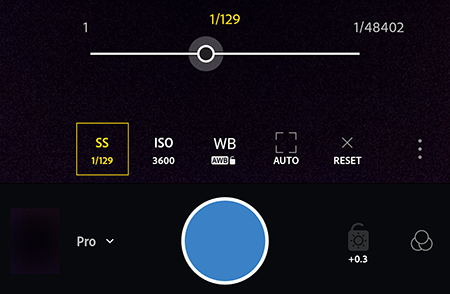

Tap (![]() ) icon to adjust the shutter speed slider. Move the slider to the left for a slow shutter speed; move it to the right for a fast shutter speed.
) icon to adjust the shutter speed slider. Move the slider to the left for a slow shutter speed; move it to the right for a fast shutter speed.
When you adjust the shutter speed, the ISO value adjusts automatically to compensate it and vice versa. This is to ensure that your photo is not overexposed or underexposed during the capture.
Double-tap the ISO icon to reset the ISO value to Auto.
Adjust the ISO value
ISO controls the sensitivity of your device's camera to light.
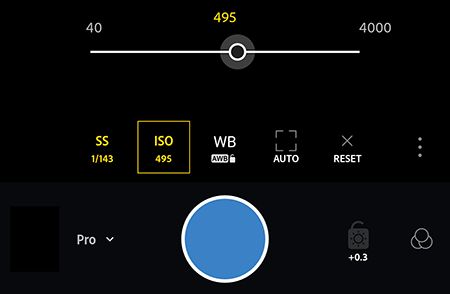

Tap (![]() ) icon to adjust the ISO slider. Move the slider to the left for low ISO values; move it to the right for high ISO values.
) icon to adjust the ISO slider. Move the slider to the left for low ISO values; move it to the right for high ISO values.
High ISO values introduce noise in the captured photos. Therefore, high ISO values should be used only when you want to achieve very fast shutter speeds.
Double-tap the ISO icon to reset the ISO value to Auto.
Adjust the focus distance of your camera
You can use this setting to increase or decrease the focus distance of your device's camera.
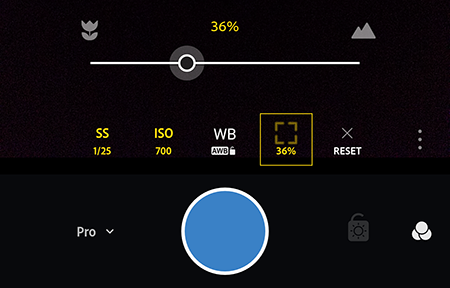

Tap (![]() ) icon to adjust the focus distance slider. Move the slider to the left to decrease the focus distance; move it to the right to increase the focus distance.
) icon to adjust the focus distance slider. Move the slider to the left to decrease the focus distance; move it to the right to increase the focus distance.
In the Professional capture mode, tap the Reset icon to reset the shutter speed, ISO, white balance, and manual focus distance to Auto.
Double-tap the [ ] icon to reset the manual focus distance to Auto.
Set white balance options
In the Professional mode, tap ( ) icon to display the white balance options bar.
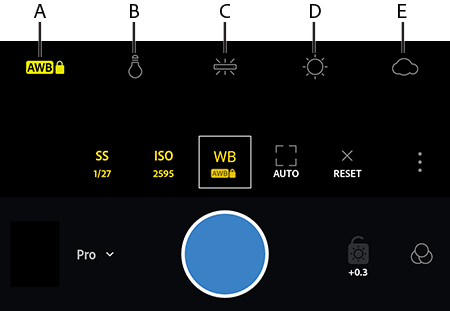
A. Automatic white balance in locked state B. Incandescent C. Fluorescent D. Daylight E. Cloudy

You can choose a preset white balance option from the options bar according to the lighting conditions — Automatic, Incandescent, Fluorescent, Daylight, Cloudy, or Custom.
Automatic White balance This is the default option.
Auto White Balance lock (Android) Aim the camera at a neutral colored surface to sample and lock the white balance.
Double-tap the WB icon to reset the white balance to Auto.
Capture high-contrast scenes in the HDR mode
Currently, with the latest update, the HDR mode is available only for Samsung S8, Samsung S8+, Samsung S7, Samsung S7 Edge, Samsung Note 8, Google Pixel, Google Pixel 2, Google Pixel XL, Google Pixel 2 XL, Google Pixel 3, Google Pixel 3 XL, and One Plus 5 mobile devices.
HDR as Technology Previews feature: On other compatible Android mobile devices that meet the specifications listed below, the HDR mode is available as a Technology Previews feature that you can enable from the sidebar menu.
- 3 GB RAM or more
- Android OS version 6.0 (Marshmallow) or later
- App version is 'Arm8'.
- DNG capture is supported
To check the specification for your device: In the sidebar menu, go to Device Info & Storage > Device Info.
Use the HDR mode to capture High Dynamic Range photos using the in-app camera in Lightroom for mobile (Android).
When you trigger the capture button in the HDR mode to capture a high-contrast scene, Adobe Photoshop Lightroom for mobile automatically does all the processing in the background to create a raw HDR image:
- Adobe Photoshop Lightroom for mobile analyzes your scene to determine the appropriate spread of exposure values to capture multiple exposure-bracketed images.
- Auto aligns the exposure bracketed images to compensate for any hand movements when capturing your HDR shot.
- De-ghosts the exposure bracketed images to compensate for any moving objects like cars, people, or foliage in the captured scene.
- Auto tones the image to give you an evenly-toned merged HDR image.
- Merges the multiple exposure images to create a 32-bit floating point DNG file — your processed raw HDR image.
This resulting raw HDR file is similar to the type of file you would get when using the HDR merge functionality within Lightroom on your desktop. For more details about HDR merge in Lightroom CC, see HDR photo merge.
The generated raw HDR files are large in size and require a lot of processing in the background as explained above. Therefore, it takes some time before your HDR images appear in the Lightroom photos view or the view grid after capturing a shot.
-
-
In the capture interface, choose HDR mode from the menu at the lower-left corner of the interface.
-
(Optional) Adjust the zoom level before capturing your HDR shot, if required. To know how to adjust the zoom level in the viewfinder, see Pinch to zoom.
NoteTo save the original unprocessed image along with the raw HDR image in Adobe Photoshop Lightroom for mobile(Android), tap the
 settings icon and enable Save Unprocessed Original option in the Settings menu. To know more about other settings, see Capture settings.
 -
Tap the Capture button while holding the mobile device steady in your hands. You can capture multiple HDR shots in a single capture session.
-
Tap the
 cross icon at the upper-left corner to exit the capture interface to return to your last view. When you exit, Adobe Photoshop Lightroom for mobile begins processing your HDR captures. Note
Processing your HDR capture to create a final raw HDR output is GPU-intensive and computationally complex. Therefore, it takes some time for your HDR images to appear in the Lightroom photos view or the view grid after capturing a shot. To check the processing status, tap the (
) cloud icon and see the progress under the heading Processing Captured Photos in the menu.
Once the HDR processing is complete, your images are now imported into Adobe Photoshop Lightroom for mobile.
In the Notification bar of your Android device, Adobe Photoshop Lightroom for mobile app displays import notifications about the progress and completion status.
-
The processed HDR images now appear in the Lightroom photos view or the grid view.
When you open any HDR image in the Loupe view for editing, you can observe that the name of the HDR image is suffixed as '-hdr'.
To learn how to capture photos with Lightroom on your iPad or iPhone, see Capture photos with Lightroom for mobile (iOS).