Click Guided > Getting started with Premiere Elements. This Guided Edit is a walkthrough on editing a video clip by guiding you through the basic editing tasks.
Click Back and Next to move forward or backward in the guided edits steps.
This Guided Edit is a quick tutorial on video-editing via Adobe Premiere Elements. You can quickly perform basic edits by following the sequence this guided edit walks you through.
You can perform the following tasks quickly by using this guided edit:
To enhance your video clips using this Guided edit, follow these steps:
Click Guided > Getting started with Premiere Elements. This Guided Edit is a walkthrough on editing a video clip by guiding you through the basic editing tasks.
Click Back and Next to move forward or backward in the guided edits steps.


You can play and pause your video using these controls.


The film strip below the video is the Timeline.
Move the CTI (Current Time Indicator) left or right to preview different parts of your video.
To view more frames in your video clip, move the slider to the right to expand it. To condense the video, move the slider to the left.
You can trim the clip to remove footage that is not required in the video clip from the beginning or the end. To trim the clip, follow these steps:
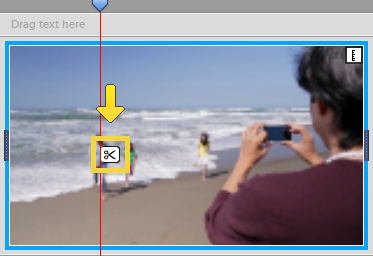
You can split a clip to make two separate clips. Place the CTI where you want to split the clip and click the scissors icon attached to the CTI.
The video splits in two separate video clips.


To make the changeover between two video clips less abrupt and gradual, you can add a transition. To add a transition, follow these steps:
You can adjust transition settings later as well. Double-click the transition icon on the timeline to change these settings.
Click Publish + Share to export or publish your movie clip and save it in your computer. Select Computer from the list. Choose the location and settings and click Save.
Easily edit and share stunning videos with Premiere Elements
Get creative with colour, effects, transitions, text, and music. Create reels, reframe, trim with AI powered tools.