Select Remove tool from the toolbar. If you can't find it, select and hold Clone tools to reveal other related tools, and then select Remove tool.
Last updated on
May 7, 2024
- Photoshop User Guide
- Introduction to Photoshop
- Photoshop and other Adobe products and services
- Photoshop on mobile (not available in mainland China)
- Photoshop on the iPad (not available in mainland China)
- Photoshop on the iPad | Common questions
- Get to know the workspace
- System requirements | Photoshop on the iPad
- Create, open, and export documents
- Add photos
- Work with layers
- Draw and paint with brushes
- Make selections and add masks
- Retouch your composites
- Work with adjustment layers
- Adjust the tonality of your composite with Curves
- Apply transform operations
- Crop and rotate your composites
- Rotate, pan, zoom, and reset the canvas
- Work with Type layers
- Work with Photoshop and Lightroom
- Get missing fonts in Photoshop on the iPad
- Japanese Text in Photoshop on the iPad
- Manage app settings
- Touch shortcuts and gestures
- Keyboard shortcuts
- Edit your image size
- Livestream as you create in Photoshop on the iPad
- Correct imperfections with the Healing Brush
- Create brushes in Capture and use them in Photoshop on the iPad
- Work with Camera Raw files
- Create and work with Smart Objects
- Adjust exposure in your images with Dodge and Burn
- Auto adjustment commands in Photoshop on the iPad
- Smudge areas in your images with Photoshop on the iPad
- Saturate or desaturate your images using Sponge tool
- Content aware fill for iPad
- Photoshop on the web (not available in mainland China)
- Photoshop (beta) (not available in mainland China)
- Generative AI (not available in mainland China)
- Common questions on generative AI in Photoshop
- Generative Fill in Photoshop on the desktop
- Generate Image with descriptive text prompts
- Generative Expand in Photoshop on the desktop
- Replace background with Generate background
- Get new variations with Generate Similar
- Select an AI model for generative control
- Generative Fill in Photoshop on the iPad
- Generative Expand in Photoshop on the iPad
- Generative AI features in Photoshop on the web
- Content authenticity (not available in mainland China)
- Cloud documents (not available in mainland China)
- Photoshop cloud documents | Common questions
- Photoshop cloud documents | Workflow questions
- Manage and work with cloud documents in Photoshop
- Upgrade cloud storage for Photoshop
- Unable to create or save a cloud document
- Solve Photoshop cloud document errors
- Collect cloud document sync logs
- Invite others to edit your cloud documents
- Share documents for review
- Workspace
- Workspace basics
- Preferences
- Learn faster with the Photoshop Discover Panel
- Create documents
- Place files
- Default keyboard shortcuts
- Customize keyboard shortcuts
- Tool galleries
- Performance preferences
- Contextual Task Bar
- Use tools
- Presets
- Grid and guides
- Touch gestures
- Use the Touch Bar with Photoshop
- Touch capabilities and customizable workspaces
- Technology previews
- Metadata and notes
- Place Photoshop images in other applications
- Rulers
- Show or hide non-printing Extras
- Specify columns for an image
- Undo and history
- Panels and menus
- Position elements with snapping
- Position with the Ruler tool
- Organize, share, and collaborate with Projects
- Refine Adobe Firefly generations
- Image and color basics
- How to resize images
- Work with raster and vector images
- Image size and resolution
- Acquire images from cameras and scanners
- Create, open, and import images
- View images
- Invalid JPEG Marker error | Opening images
- Viewing multiple images
- Customize color pickers and swatches
- High dynamic range images
- Match colors in your image
- Convert between color modes
- Color modes
- Erase parts of an image
- Blending modes
- Choose colors
- Customize indexed color tables
- Image information
- Distort filters are unavailable
- About color
- Color and monochrome adjustments using channels
- Choose colors in the Color and Swatches panels
- Sample
- Color mode or Image mode
- Color cast
- Add a conditional mode change to an action
- Add swatches from HTML CSS and SVG
- Bit depth and preferences
- Layers
- Layer basics
- Nondestructive editing
- Create and manage layers and groups
- Select, group, and link layers
- Place images into frames
- Layer opacity and blending
- Mask layers
- Apply Smart Filters
- Layer comps
- Move, stack, and lock layers
- Mask layers with vector masks
- Manage layers and groups
- Layer effects and styles
- Edit layer masks
- Extract assets
- Reveal layers with clipping masks
- Generate image assets from layers
- Work with Smart Objects
- Blending modes
- Combine multiple images into a group portrait
- Combine images with Auto-Blend Layers
- Align and distribute layers
- Copy CSS from layers
- Load selections from a layer or layer mask's boundaries
- Knockout to reveal content from other layers
- Selections
- Get started with selections
- Make selections in your composite
- Select and Mask workspace
- Select with the marquee tools
- Select with the lasso tools
- Adjust pixel selections
- Move, copy, and delete selected pixels
- Create a temporary quick mask
- Select a color range in an image
- Convert between paths and selection borders
- Channel basics
- Save selections and alpha channel masks
- Select the image areas in focus
- Duplicate, split, and merge channels
- Channel calculations
- Get started with selections
- Image adjustments
- Replace object colors
- Perspective warp
- Reduce camera shake blurring
- Healing brush examples
- Export color lookup tables
- Adjust image sharpness and blur
- Understand color adjustments
- Apply a Brightness/Contrast adjustment
- Adjust shadow and highlight detail
- Levels adjustment
- Adjust hue and saturation
- Adjust vibrance
- Adjust color saturation in image areas
- Make quick tonal adjustments
- Apply special color effects to images
- Enhance your image with color balance adjustments
- High dynamic range images
- View histograms and pixel values
- Match colors in your image
- Crop and straighten photos
- Convert a color image to black and white
- Adjustment and fill layers
- Curves adjustment
- Blending modes
- Target images for press
- Adjust color and tone with Levels and Curves eyedroppers
- Adjust HDR exposure and toning
- Dodge or burn image areas
- Make selective color adjustments
- Image repair and restoration
- Image enhancement and transformation
- Drawing and painting
- Paint symmetrical patterns
- Draw rectangles and modify stroke options
- About drawing
- Draw and edit shapes
- Create star or any other pointed shape
- Painting tools
- Create and modify brushes
- Blending modes
- Add color to paths
- Edit paths
- Paint with the Mixer Brush
- Brush presets
- Gradients
- Gradient interpolation
- Fill and stroke selections, layers, and paths
- Draw with the Pen tools
- Create patterns
- Generate a pattern using the Pattern Maker
- Manage paths
- Manage pattern libraries and presets
- Draw or paint with a graphics tablet
- Create textured brushes
- Add dynamic elements to brushes
- Gradient
- Paint stylized strokes with the Art History Brush
- Paint with a pattern
- Sync presets on multiple devices
- Migrate presets, actions, and settings
- Text
- Filters and effects
- Saving and exporting
- Color Management
- Web, screen, and app design
- Video and animation
- Printing
- Automation
- Troubleshooting
Touch up your photos and fix imperfections in them with the Remove tool, Spot healing brush, and Clone stamp tools in Photoshop on the iPad.
Topics in this article:

Try the mobile app
Try out the latest features and enhancements in the Photoshop app on the iPad for general availability.
With Photoshop now available on your iPad, you can select powerful tools such as Remove tool, Spot healing brush and Clone stamp tools to retouch and remove unwanted parts from your composites.
Introduced in Photoshop on the iPad 5.2 (October 2023 release)
Easily remove objects, people, or distractions from your image on the iPad by brushing over them using the Remove tool.
The Remove tool () is found within the Clone tools. Use the Size field to choose a brush size slightly larger than the area you want to fix to cover the entire area with one stroke.
Just underneath the canvas, you’ll find the Remove after each stroke toggle button. When left on, the tool switches to the single-stroke mode. Turn it off to brush your selections with multiple strokes to be committed at once at the end. Use this option for large, complicated, or disconnected areas that are difficult to brush in one stroke.
Follow these steps to replace objects, areas, or distractions in your image using Remove tool in Photoshop on the iPad.
-
-
In the Remove tool options bar, use the Size field to choose a brush size slightly larger than the area you want to fix so you can cover the entire area with one stroke.
-
(Optional) Turn on Sample All Layers in the options bar to sample data from all visible layers.
-
(Optional) Turn off Remove after each stroke to allow for multiple brush strokes before applying the fill. Use multiple strokes for large or complicated areas. Keep Remove after each stroke enabled to apply the fill as soon as you complete a single stroke.


Introduced in Photoshop on the iPad 5.5 (March 2024 release)
You can now use the Remove tool in Photoshop on the iPad as either a brush or a lasso.
With this release, use the Remove tool to draw a loop around unwanted elements in your image to remove them. What’s amazing is that you don’t even need to close the loop, as Photoshop will do it for you!
Now, you can easily remove large areas without the hassle of brushing over the entire area.
Follow these steps to use the Remove tool to draw a loop around the element you want to remove from your image:
-
Tap the Remove tool from the toolbar. Tap Clone tools to locate the Remove tool and other tools.
-
Choose your desired brush size from the Size field. Just ensure the brush size is slightly larger than the area you want to fix to cover the entire area with one stroke.
-
(Optional) Turn on the Sample All Layers and Remove after each stroke slider to sample data from all visible layers and apply the fill after completing each stroke.
-
Draw a loop around the object you want to remove and watch it get removed. Notice that the overlay area fills in automatically.
To correct accidental selections made while drawing a loop, change the brush stroke mode from + to -.
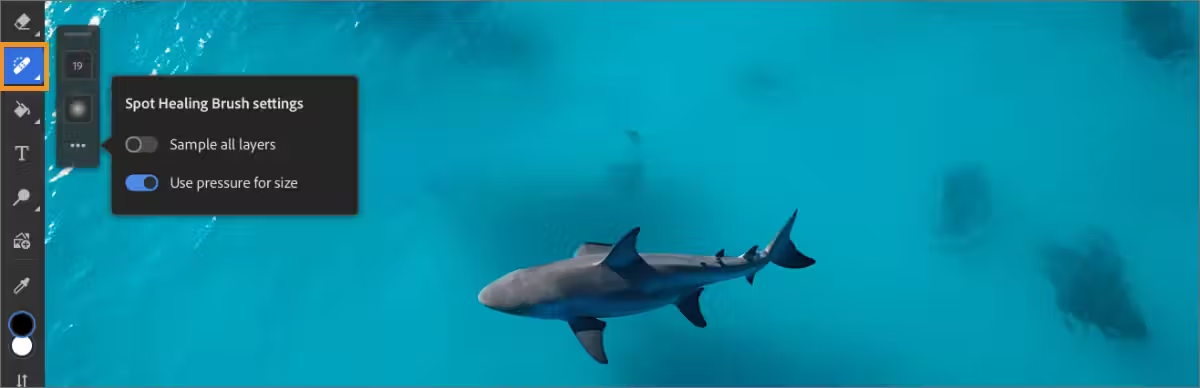
The Spot Healing Brush tool paints with a sampled part from your document and matches the texture, lighting, transparency, and shading of the sampled part to the part of the document being healed.
This tool does not require you to specify a sample spot and automatically picks samples from around the part of the document to be retouched.
To work with the Spot Healing Brush, do the following:
- Tap the Spot Healing Brush (
 ) icon from the toolbar.
 - From the tool options that open, you can set the brush size, and hardness.
- Tap (
 ) to access more settings.
 - In the Spot Healing Brush settings panel that opens, enable Sample all layers to use all visible layers in your document as a source to apply healing on the selected layer. Deselect Sample All Layers, to sample only from the active layer. Also, you can enable/disable Use pressure for size as required.
- Tap the area in your document you want to retouch, or tap and drag to smooth over imperfections in a larger area.
The Clone stamp (![]() ) tool paints one part of your document over another part of the same document. You can also paint one part of a layer over another layer.
) tool paints one part of your document over another part of the same document. You can also paint one part of a layer over another layer.
This tool is useful for duplicating objects or removing a defect in your composite.
To use the Clone stamp tool, you set a sampling source on the area you want to clone from and paint over another area. By default, your last sampling area is selected when you access this tool.
To work with the Clone stamp tool, do the following:
- Double-tap the Spot Healing Brush () icon from the toolbar to reveal the hidden Clone stamp tool.
- Tap
 to select the Clone stamp tool.
 - From the tool options that open, you can change the brush radius, hardness, opacity, and set source.
- Tap () to access more settings.
- In the Clone stamp settings panel that opens, you can select your Sample—Current layer, Current and below, and All layers. You can also enable/disable the Use pressure for size and Use pressure for opacity options.

6. Activate the primary touch shortcut to Set source and tap over an area you want to select as the cloning source.

7. Release the touch shortcut after setting the source and tap over an area on which you want to apply Clone stamp. This action paints the source area over your selected area.
