Make sure that your scanner is connected and switched on.
Learn how you can import photos from scanners in systems operating with Windows.
Elements Organizer connects to your scanner so that you can get scanned images of your photos, negatives, and slides. You can get images from scanners in two ways:
Use the scanner driver plug‑in module that came with your scanner. This software is either compatible with 32-bit Elements Organizer on Windows or uses the TWAIN® interface to scan and open images directly in Elements Organizer.
Note: The TWAIN manager is supported only on Windows.
Use the standalone scanning software that came with your scanner to scan and save your images. You can then bring the images into Elements Organizer in the following ways:
Before you try to scan and open your photos in Elements Organizer, make sure that you’ve installed all the software that came with your scanner. Carefully read any documentation that came with your scanner to make sure that it’s connected properly to your computer.
Make sure that your scanner is connected and switched on.
In Elements Organizer, do one of the following:
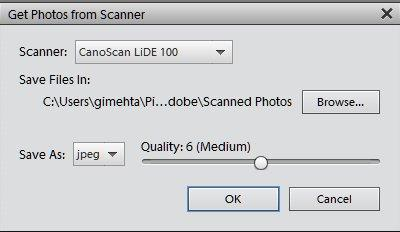
In the Get Photos From Scanner dialog box, choose the name of the scanner from the Scanner menu.
If you get a None Detected message in the Scanner list, make sure that the scanner is on and properly connected to your computer.
Choose a file format from the Save As menu. JPEG, the default format, is usually the best choice. If you choose JPEG, drag the Quality slider to to increase or decrease the quality of the scan. The higher the quality, the larger the file size.


Click OK. If you’re using a scanner with a TWAIN driver, Elements Organizer launches the driver that came with your scanner. Follow the instructions that came with the driver software to scan your photo. Typically, you can also select an area to scan or correct any color issues that you may see.
In Windows XP, Windows Vista, or Windows 7, Elements Organizer launches the Windows XP scanning interface if you’re using a WIA (Windows Imaging Architecture) scanner. You can find instructions in Windows online Help. In scanners that support TWAIN, a vendor-specific user interface is launched.
After the photo is scanned, a preview of the scan is displayed in the Getting Photos dialog box. Elements Organizer assigns the import date to the photos.
In Elements Organizer, choose Edit > Preferences > Scanner.
Choose the name of your scanner from the Scanner drop-down list in the Import area.
Each time you connect to a different scanner, you need to select the device from the list. The connected scanner is indicated to help you identify it.
Choose a file format from the Save As menu. JPEG, the default format, is usually the best choice. If you choose JPEG, drag the Quality slider to the setting you want. The higher the quality, the larger the file size.
Select a default location to store your scanned photos, and then click OK.
At any point before clicking OK, you can click Restore Default Settings.
TWAIN is a software driver used for acquiring images by certain scanners, digital cameras, and frame grabbers. For your TWAIN device to work with Elements Organizer, the manufacturer must provide a source manager and TWAIN data source.
Before using the scanner to bring images into Elements Organizer, install the TWAIN device and its software, and then restart your computer. (Refer to documentation from your device manufacturer for installation information.)
In Elements Organizer, click Import > From Scanner or select File > Get Photos and Videos > From Scanner.
After the image is scanned, it appears in Elements Organizer.
Note: After pressing the scanning button for the first time on some scanners, such as the Canon MP960, the scanning progress bar will open behind Photoshop Elements. You can reduce the Photoshop Elements window to bring the progress bar forward.