Editing albums and album categories in Elements Organizer
Learn how you can edit your photo albums in Elements Organizer.

Albums in Elements Organizer are like physical photo albums, where you can store and organize photos in groups of your choice. 

You can organize albums in groups. You can also create multiple levels of album categories. For example, you can have an album category “My Asia Trip,” containing an album “Japan Photos,” along with another album named “China Photos”. For information about creating photo albums, see Creating albums and album categories.

Elements Organizer lets you edit, rename, merge, and delete the photo albums. You can also remove photos from an album.

Edit an album

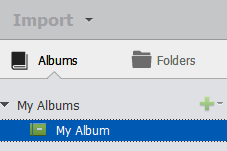
  1. Select an album from the Albums panel of the Organize workspace.

    Album
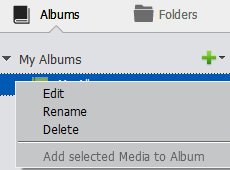
  2. Do one of the following:

    • (Windows) Right-click and choose Edit.
    • (Mac OS) Control+click and choose Edit.
    AlbumRC
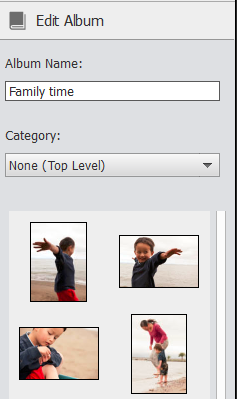
  3. In the Edit Album panel, you can edit the following:

    • Name: Edit the name of the album.
    • Category: Select the category from the drop-down list. Delete media by selecting a photo or video and drag to the trash bin. You can select multiple media and drop to the trash bin too.
    EditAlbum

Rename an album

  1. Do one of the following:

    • (Windows) Right-click an album and choose Rename.
    • (Mac OS) Control+click an album and choose Rename.
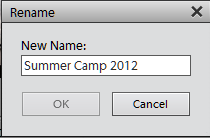
  2. Enter the new name in the Rename dialog box and click OK.

    Renamingalbum
    Rename album

Remove photos from an album

  1. In the Media view, select the photos you want to remove from an album.

  2. A photo can be present in more than one album. Select the album from where you want to delete the photo.

    Do one of the following:

    • (Windows) Right-click a photo, and choose Remove from Album > Album name.
    • (Mac OS) Control+click a photo, and choose Remove from AlbumAlbum name.


    Removing photos from an album does not remove them from Element Organizer catalog.  

    To delete a photo from the catalog, do the following:

    • (Windows) Right-click a photo, and choose Delete from Catalog.
    • (Mac OS) Control+click a photo, and choose Delete from Catalog.

    You can select the check box of confirmation message to delete the photo from hard disk.

Merge albums

You can merge multiple albums into a single album. The album created contains all the photos in the merged albums.

For example, if you create a “Cars” album, and then later inadvertently create an “Automobiles” album for the same photos, you can merge both albums into one. When you merge albums, all photos are placed into one album and the other albums are removed. Photos are placed in the order they appear in the Albums panel. You can rearrange the order before or after you merge.

  1. In the Albums panel, select the albums you want to merge.

    Do any of the following:

    • Click the album name to select an album.
    • Shift-click to select contiguous albums.
    • Control+click (Windows)/Command+click (Mac OS) to select noncontiguous albums.
  2. Do one of the following:

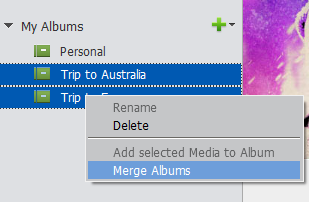
    • (Windows) Right-click and select Merge Albums.
    • (Mac OS) Control+click and select Merge Albums.
    Merge albums EO
    Merge albums
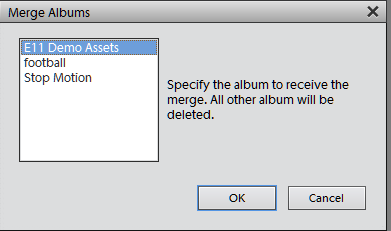
  3. From the list, choose the album into which you want to merge the selected albums, and click OK.

    Mergealbums2

Delete an album or album category

Deleting an album or album category removes the album, album category, and any albums in the category. However, it does not delete the photos in album.

Note:

You cannot delete an album category and an album in another category at the same time.

  1. In the Albums panel, click the album name to select an album or album category.

    Shift-click to select multiple contiguous albums or Control+click (Windows)/Command+click (Mac OS) to select multiple noncontiguous albums.

  2. Do the following:

    • (Windows) Right-click, select Delete, and click OK.
    • (Mac OS) Control+click, select Delete, and click OK.

    Note:

    The media associated with the album is not deleted.

Reorganize albums and album categories

By default, top‑level albums are listed in alphabetical order followed by album categories in alphabetical order. You can change their order, but you can’t place albums after album categories.

  1. Do the following:

    • (Windows) Choose Edit > Preferences > Keyword Tags And Albums
    • (Mac OS) Choose Elements Organizer > Preferences > Keyword Tags And albums.
  2. Under Enable Manual Sorting Option, select Manual for Album Categories and Albums, and then click OK.

  3. In the Albums panel, select one or more albums and album categories.
  4. Drag the items to their new location in the albums hierarchy.

    When you move an album category, the items it contains move with it.

    Note:

    You can’t move a lower-level album or album category to the top level by dragging. Instead, change its group to Top level in the Edit Album or Edit Album Category dialog box.

Attach keyword tags to photos in an album

Like albums, keyword tags provide a way of organizing photos and other media files. Keyword tags and albums can be associated with the same item. You can apply a keyword tag to a photo even when you are viewing that photo in its album.

  1. In the Albums panel, click the album name to display the photos in that album.
  2. Click Tags/Info button in the Task pane.

    keyword_icon_taskbar
  3. Do any of the following:

    • Select Edit > Select All to select all the items in the Media view.
    • Click and select particular media item.
    • Control+click (Windows)/Command+click (Mac OS) to select multiple media items.
  4. Select and attach the keyword tags to the photos. From the Keyword Tags pane, right-click and select Apply to selected Media. You can also drag and drop a keyword on a media item to apply that keyword tag to that media.

Create or edit an album from keyword tags

  1. In the Keyword Tags tab, click the triangle  next to Keyword Tags to expand the panel.

  2. Select a check box  to show the associated photos with the keyword tag. The Media view shows all the photos with that tag attached.

  3. On the Albums panel, click the triangle  next to Albums to expand the panel. 

  4. Do one of the following:
    • To edit existing albums, drag the photos into one or more albums in the Album panel.


Auto-curate your best photos

Use Auto Curate to allow Elements Organizer to smartly select your best photos in just a click. Auto Curation uses people, Smart Tags, and more to auto-curate your photos.

To learn more about auto-curation, see Auto Curate.